Set the levels, Set the sample rate and latency, Set the levels set the sample rate and latency – MACKIE PORTABLE RECORDING PREAMP User Manual
Page 11: Owner’ s manual
11
Owner’s Manual
Owner’
s Manual
2. Connect the FireWire connector from the Onyx Sat-
ellite to the FireWire connector on your computer.
3. If you are using the AC adapter with your Onyx
Satellite, turn on the Power switch.
Note: The Onyx Satellite is equipped
with a 6-pin FireWire connector and
comes with a 6-pin to 6-pin FireWire
cable. If your computer has a 4-pin
FireWire connector, you can use the
6-pin to 4-pin FireWire adapter included in the box
to make the connection, but the Onyx Satellite can-
not be powered from the 4-pin connector (the two
missing pins carry the power). You will need to use
the AC adapter included with the Onyx Satellite.
4. If the microphone is a dynamic microphone, leave
the 48V switch out. If it is a condenser microphone,
push in the 48V phantom power button to turn on
the phantom power (applied to XLR inputs 1 and 2).
5. Connect the Control Room A outputs to a pair
of powered studio monitors (or to an amplifier
connected to a pair of monitors). Optionally, you
can connect a pair of headphones to one of the
PHONES jack on the pod to monitor the audio.
Set the Levels
To set the channel GAIN controls (on channels 1-2),
it’s not even necessary to hear what you’re doing in the
monitors. The following steps must be performed one
channel at a time.
1. Play something into the selected input, either guitar
(channel 1) or vocal (channel 2). Be sure that the
volume of the input source is the same as it would
be during normal use. If it isn’t, you might have to
readjust these levels later.
2. Adjust the channel’s GAIN control so that the
“–20” and “–10” LEDs light frequently or continu-
ously, and the “OL” LED doesn’t light at all (or only
flashes occasionally).
3. Repeat for each channel.
4. You can also monitor the input level with the input
metering of your DAW software application.
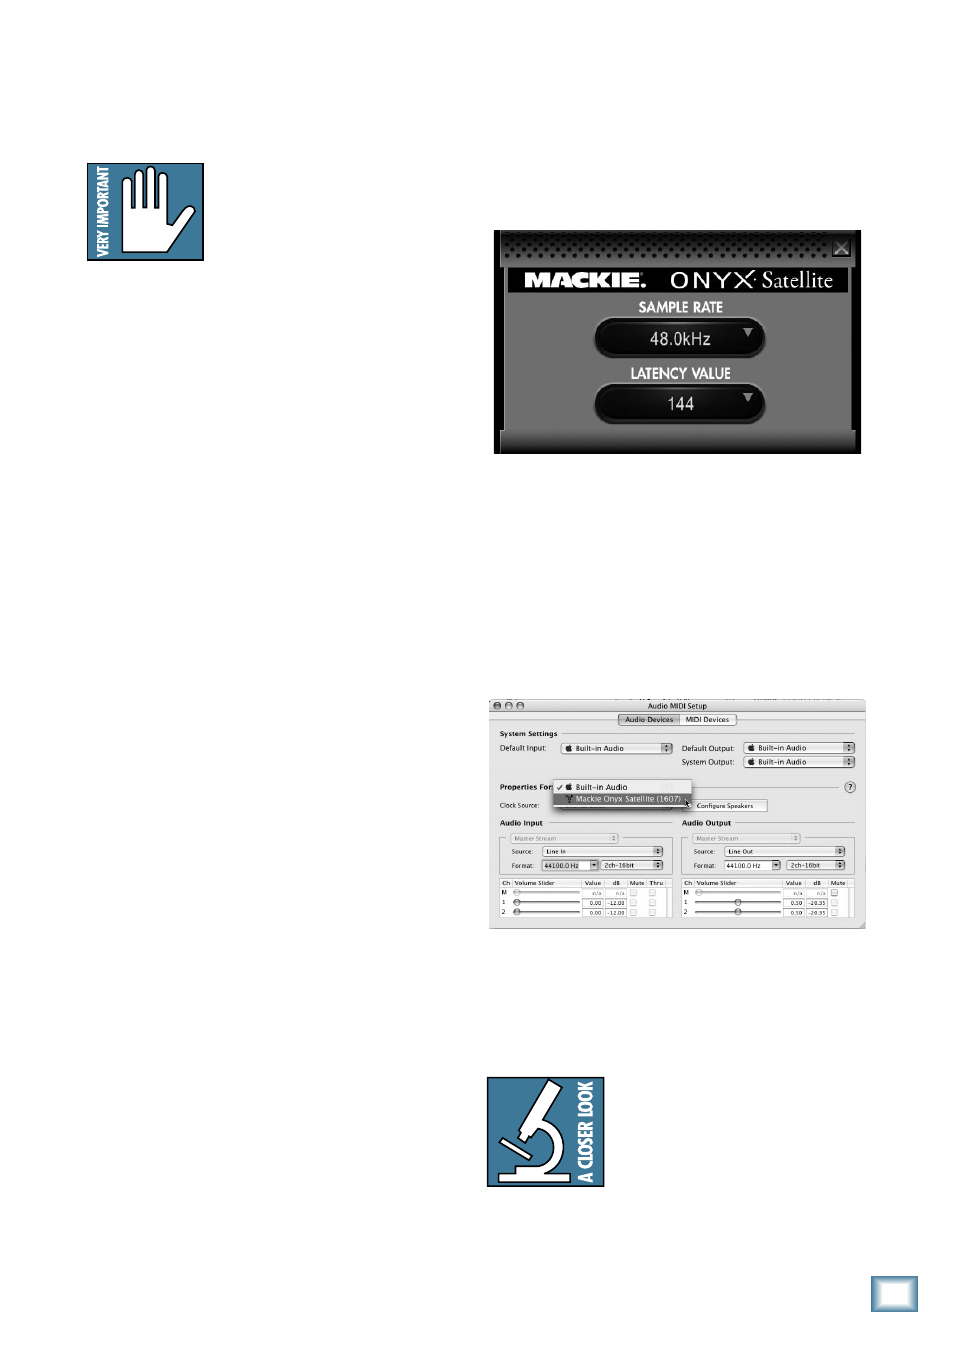
Set the Sample Rate and Latency
On a PC:
1. Open the Onyx Satellite Control Panel (click Start
> Programs > Mackie Satellite > Satellite Con-
sole). Select the sample rate of your choice (44.1,
48, 88.2, or 96 kHz) and the latency setting.
These values should be reflected in your DAW
software application, and it is important that they
match. If you are using Tracktion 2, click the “Set-
tings” tab and then click “Audio Devices” to see the
sample rate and latency settings.
On a Mac:
1. Go to the Applications folder and open the Utilities
folder.
2. Double-click “Audio MIDI Setup.”
3. Click the Audio Devices tab and select Onyx
FireWire in the “Properties For” drop-down box.
4. You can change the sample rate setting in the Format
drop-down box. There is no latency setting here. That
setting is made in the DAW software application.
Latency (sometimes called buffer
size) describes the amount of time
it takes for audio to get in and out of
your software application. The lower
the latency setting, the faster audio
can get into and out of the software