Recording, Timer recording – FUNAI MWR10D6 User Manual
Page 31
29
EN
Playing
discs
Editing
Before
you
start
Changing
the
Setup
menu
Others
Español
Connections
Recording
Getting
started
Recording
You can program the unit to record
up to 8 programs within a month in
advance. Daily or weekly program
recordings are also available.
• Be sure to set the clock before
setting a timer programming.
• Insert a recordable disc.
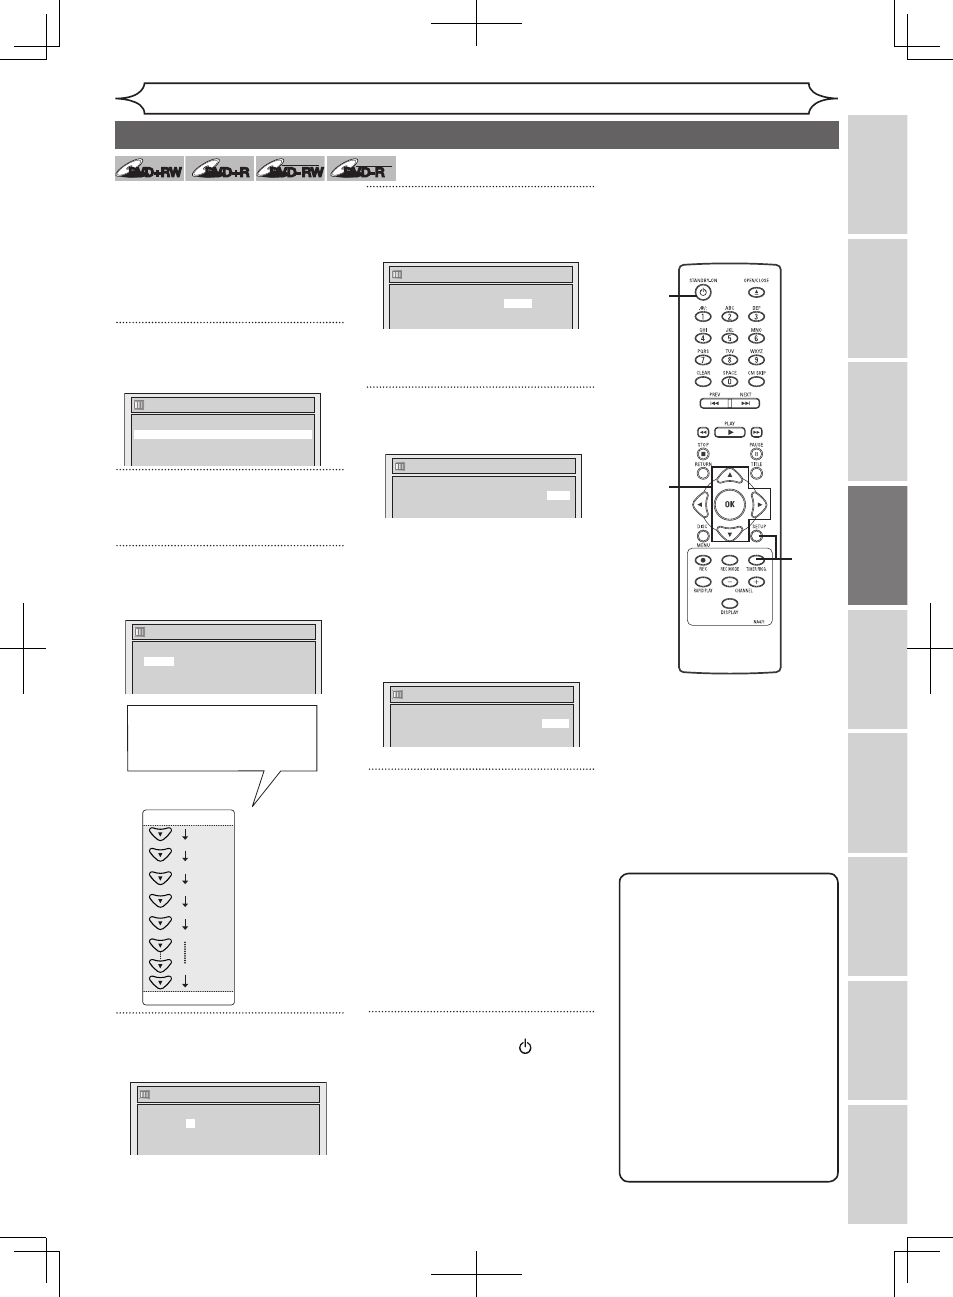
1
Press [TIMER PROG.].
Timer Programming list will appear.
2
Using [K / L], select a program
number. Press [OK].
3
Using [K / L], enter the Date.
Press [B].
4
Using [K / L], enter the Start
and End time. Press [B].
5
Using [K / L], select the CH
number to record. Press [B].
To record from external input,
select E1 or E2.
6
Using [K / L], select a recording
mode.
Refer to “Recording mode” on
page 24.
When “Auto” is selected as
a recording mode, the unit
determines how much time is
available on the disc and record in
the appropriate recording mode to
complete recording the program.
Note
•
If you have not set the
clock yet:
A manual clock setting menu
will appear instead of the
Timer Programming list at
step 1. Continue with the step
3 in “Manual Clock Setting”
on page 22 before setting a
timer programming.
• Press
[s / B] to move the
cursor to the left and the right
in the timer programming
menu.
• After step 8, the recording will
start immediately after the
recording time you set.
1
2
3
4
5
6
Timer Programming
2. ---
3. ---
4. ---
5. ---
6. ---
7. ---
8. ---
1. JAN/01 12:57AM --:--
E1
Date
Start
End
CH
Mode
Timer Programming
2. ---
3. ---
4. ---
5. ---
6. ---
7. ---
8. ---
1. JAN/01
--:--
--:--
E1
Date
Start
End
CH
Mode
Timer Programming
2. ---
3. ---
4. ---
5. ---
6. ---
7. ---
8. ---
1. ---
Date
Start
End
CH
Mode
When pressing
[L] at the
current date, the Date will
change as follows.
Daily
MON-SAT
JAN/01
JAN/31
MON-FRI
SAT
FRI
SUN
Timer Programming
2. ---
3. ---
4. ---
5. ---
6. ---
7. ---
8. ---
1. JAN/01
12:57AM
1:57AM
CH 8 Auto
Date
Start
End
CH
Mode
Timer Recording
e.g. January 1st
7
Press [OK] when all items are
entered.
Your program setting will be
stored.
• To set another program, repeat
steps 2 to 7.
• To exit, press
[TIMER PROG.]
or
[SETUP].
• When two or more programs are
overlapped, “Overlap” and the
overlapped program number will
appear.
8
Press [STANDBY-ON ] to set
a Timer Programming.
TIMER REC
indicator will be on.
7
7
8
Timer Programming
2. ---
3. ---
4. ---
5. ---
6. ---
7. ---
8. ---
1. JAN/01
12:57AM
1:57AM CH 8
Date
Start
End
CH
Mode
Timer Programming
2. ---
3. ---
4. ---
5. ---
6. ---
7. ---
8. ---
1. JAN/01
12:57AM
1:57AM
CH 8 HQ
Date
Start
End
CH
Mode
DVD+RW
DVD+RW
DVD+R
DVD+R
DVD-RW
DVD-RW
+VR
DVD-R
DVD-R
+VR