Problems and troubleshooting (continued), 37 english, Energency disc eject – Hitachi L32BD304 User Manual
Page 37
37
ENGLISH
Problems and troubleshooting
(continued)
SYMPTOMS
POSSIBLE SOLUTIONS
PAGE
PC
When a letter string is displayed in full-
screen, all of the characters on the screen
are blurred.
Check “Auto Adjust”.
If the condition is not improved with “Auto Adjust”, check “Phase” until you get the clearest image.
•
•
18
When small patterns are displayed on the
screen, the entire screen is flickering.
Check “Auto Adjust”.
If the condition is not improved with “Auto Adjust”, check “Phase” until you get a flicker-free display.
•
•
18
Image cannot be displayed in the correct
position.
Check the signal status of the PC.
•
–
DVD/Blu-ray Disc
TV/Blu-ray combo does not work.
A built-in safety device may have been activated. Press POWER on the side of unit to turn it off, then turn
it on again. If unit still does not turn on, unplug the power cord, wait about one minute, plug it in again, then
press POWER on the side of unit.
Condensation may have formed inside unit. Turn off unit and wait about two to three hours for the
condensation to evaporate.
•
•
–
–
Playback will not start, or playback starts
then stops.
If you see , the action you are trying is not allowed by unit or the disc.
Make sure that the disc is inserted with the label facing forward.
Make sure that the disc is not dirty.
The disc may be blank or not compatible with unit.
•
•
•
•
23
23
7
7
No picture.
TV/BD selector is not set correctly.
•
23
No sound.
Check the input selector of the amplifier is set properly.
The unit is in the Special playback mode.
Select the correct Audio Output position on AV amplifier.
•
•
•
–
23
34
Startup is slow.
Startup may be slow if the TV is connected to the HDMI cable.
Startup may be slow the first time you plug in the power cord or after a power failure.
•
•
–
–
The player is on and displays the start logo
and menu, but there is no image from the
disc displayed.
Make sure that the disc is not dirty.
Try resetting your player. Press POWER, wait five seconds, then press POWER again.
•
•
7
–
Picture is distorted during CUE or REVIEW.
The picture will be distorted occasionally.
•
–
Stopping playback, search, slow-motion
play, repeat play, or program play, etc.
cannot be performed.
Some discs may not allow these functions.
•
–
No surround sound.
The setup does not match your stereo system.
•
33
The unit is not functioning.
Turn off the unit and unplug the AC power cord for several minutes, then replug it.
•
13
Playback does not start when the title is
selected.
Check the Parental setup.
•
30
Audio soundtrack and/or subtitle language
is not changed when you play back a disc.
Multilingual language is not recorded on the disc.
•
25
No subtitle.
Some discs have no subtitles.
Subtitles are cleared. Press SUBTITLE.
•
•
25
Angle cannot be changed.
Multi-angles are not recorded on the disc.
•
25
“Prohibited”, “ ” or “This operation can’t be
performed” appears on the screen.
The function is prohibited with the unit or the disc.
•
23
BD-Live, Pandora and USB connections
Cannot connect to the Internet.
Make sure that the Internet connection is set up correctly.
Test the Internet connection to make sure that it is working.
Make sure that the BD-Live Internet Access option is not set to Prohibit Access.
Make sure that the disc you are playing is a legal copy.
•
•
•
•
–
–
31
–
After connecting to the Internet, cannot
download a file.
BD storage may be full. Try clearing storage.
Make sure that the Internet connection is still working. Try testing the connection.
If you are using a USB drive, try a different drive.
•
•
•
–
–
–
File downloaded successfully, but playback
pauses.
Make sure that the USB drive is a 2.0 USB drive. If the drive is a 1.1 USB drive, pausing can occur.
•
–
When playing a file on a USB drive,
playback pauses.
Try another USB drive.
•
–
REMOTE CONTROL
The remote control does not function.
Aim the remote control at the remote sensor.
Operate within Approx. 15 feet or reduce the light in the room.
Clear the path of the beam.
The batteries are weak. Replace the batteries.
Check that the batteries are inserted correctly.
•
•
•
•
•
13
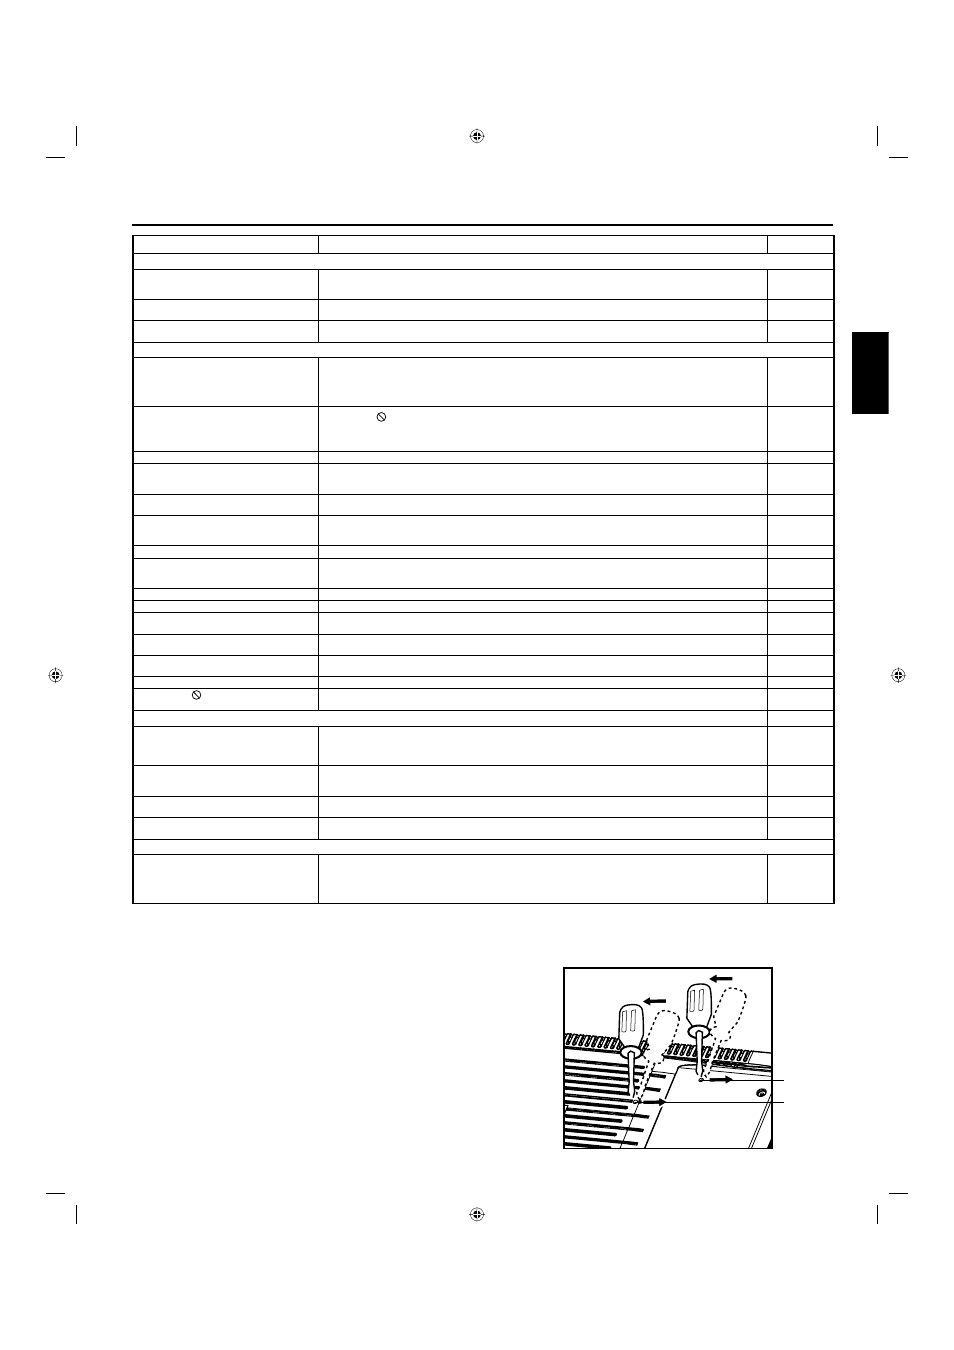
Energency Disc Eject
Note: This procedure must be done in the order described below.
1
Be sure to unplug the power cord from the AC outlet.
2
Insert the tip of a flathead screwdriver (5 mm dia. or smaller) vertically into Slot 1 on the
back of the TV. Push the internal lever to the right until it stops.
3
Insert the tip of the screwdriver vertically into Slot 2. Push the internal lever to the right
until the disc ejects.
Attention
A flashlight may be required to see the release levers.
Be sure to perform these steps in the order shown above, and as exhibited in the diagram,
or a malfunction may occur.
This procedure is for emergency use only. Performing these steps on a normal operating
unit may cause the TV to malfunction.
Please call the service center if Disc does not eject.
•
•
•
•
Slot 1
Slot 2
2
Rear of the unit
3
00_54L0621A.indb 37
00_54L0621A.indb 37
10.4.27 3:15:38 PM
10.4.27 3:15:38 PM