Water connection installing the faucet – İhlas Aura Cebilon Unique User Manual
Page 11
d
c
a
b
11
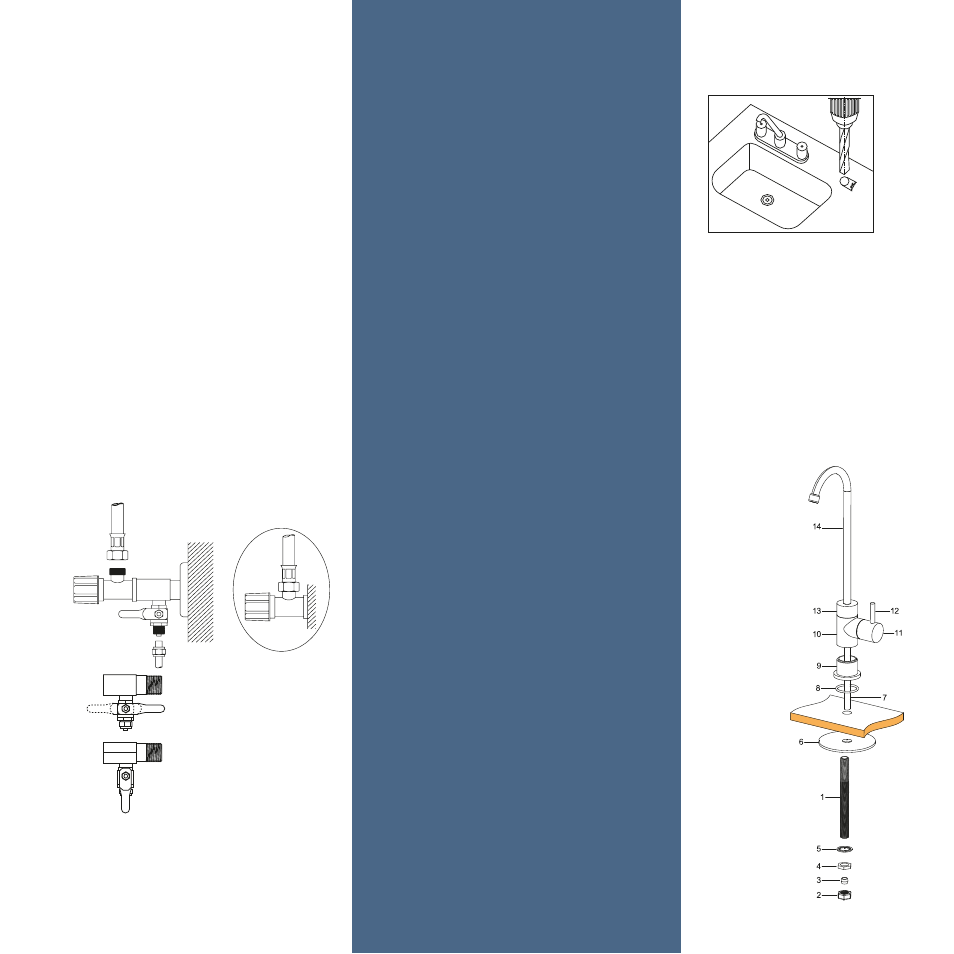
• Close the mains water from the apartment
inlet valve.
• After draining the water left in the pipes
from proper places, mount the three-way
adapter to the mains by ensuring the sealing.
• First, mount the 1/4 ball valve to the
three-way adapter by wrapping a teflon tape
in a position so that the valve is opened and
closed easily (Figure 5.a).
• Connect the water inlet hose to the ball
valve (Figure 5.b).
• Make sure the ball valve is closed (Figure
5.c).
• Open the mains water, check whether there
is any leakage (Figure 5.d).
• Place the appliance on a suitable place
underneath the counter in upright position.
Clean water faucet should be mounted
carefully in terms of use and aesthetics. If the
counter or kitchen sink will be drilled, drilling
process should be proceeded after the
dimensions are obtained so as to install the
washers, nuts and unions under the counter
or kitchen sink (Figure 6). Otherwise, drilling-
may be incorrect.
The location to be drilled may be granite,
marble, concrete or stainless sink. If the
counter is granite, it must be drilled with a 20
mm diameter bore bit. Bore bit is attached to
the end of the drill and it is set to low speed.
Water is poured on the ground to be drilled
(do not drill without water). Bend the bore bit
as 45 degrees and press slightly, it makes a
trail on the granite. Then it is brought to an
upright position slowly without lifting. When
it reaches the upright position, drilling iscom-
pleted by applying enough force. If the bore
bit is not kept constant when we start drilling,
parts can break off from the granite surface.
The o-ring on the faucet's mirror cannot
ensure sealing and may cause the water
leakage down from the counter. Marble coun-
tertops can be drilled by the same drilling bit
or bore bit. Concrete countertops are drilled
with a contact tip and hammer drill. If
concrete is coated with tiles, a pre drill is
made with a small-diameter drill bit to avoid
cracking the tiles. Bore bit for the stainless
sinks is different.
The hose should be mounted carefully
between the faucet mounted on the counter
and on the appliance where "Clean Water" is
written.
Water
connection
Installing the
faucet
Figure 5. Water connection fittings
Figure 6. Faucet
1- Faucet Pipe
2- Upper Body Part
3- Opening/Closing Handle
4- Hub Cover
5- Faucet Body
6- Body Bushing
7- Body Bushing O-ring
8- Mounting Parts
9- Mounting Plastic
10- Plastic Mounting Washer
11- Crinkled Spring Washer
12- Compression Nut
13- Faucet Screw
14- 1/4” Hose