Installation, Installation scheme, Filter flushing and conditioning procedures – İhlas Aura Cebilon Unique User Manual
Page 10: Warning
10
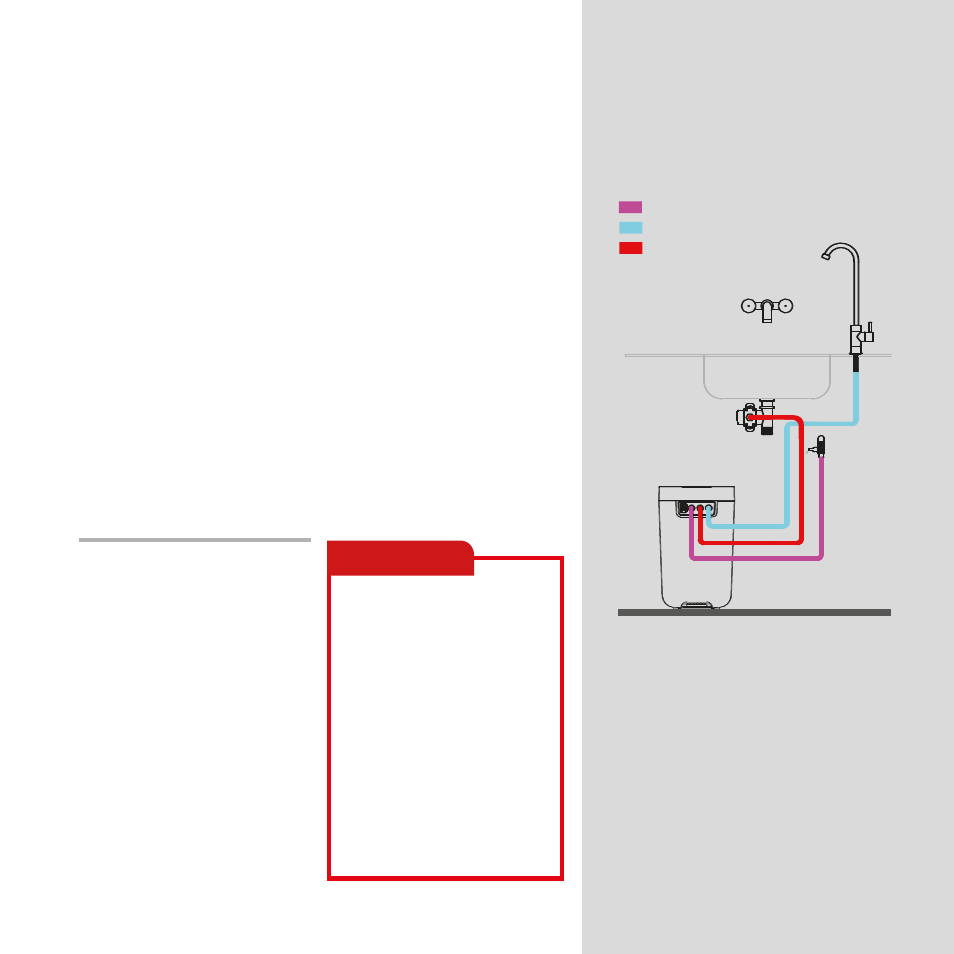
Figure 4. RO Installation Diagram
8
2
7
6 3 4 5
1
8
2
7
6 3 4 5
1
Installation
Filter flushing and conditioning procedures
Please make sure that, flushing the filters, before you start using the device. For
filters flushing, you can follow the instructions below.
Your appliance is very practical for use
and the water installation can be easily
installed anywhere. Installation of your
appliance must be made by Authorized
Services.
• Aura Cebilon Reverse Osmosis System
contains critical components that are
required to be replaced periodically to
purify the total dissolved solid materials
(TDS). To check the efficiency of the
system, water from the appliance must
be periodically tested.
• Free chlorine may affect the polymer
structure of the membrane filter that is
located inside the system.
• Please read the instruction manual for
installation, operation, maintenance and
warranty terms. Installation diagram for
the appliance is shown in Figure 4.
The first three filters shall be flushed
separately. Firstly close the ball valve that
supplies mains water to the system.
Remove the outlet tube on the housing
cover of first filter. Insert one meter ¼
Inch tube to the outlet of the cover. And
then open the ball valve, flush the filter
for 2-3 minutes with mains water. Insert
the outlet tube to its place and follow the
same procedure for the other two filters.
After that when you flush membrane filter
remove tubes on the both outlets of the
membrane housing. Insert one meter
tube to the both outlet. Flush the
membrane for 2-3 minutes to clear
membrane form protective membrane
solution.
Install the tube that has flow restrictor on
it but not to install the tube that goes to
post carbon filter. Allow water flow for
2-3 minutes to clear the membrane
solution completely. And then install the
tube that goes to post carbon filter.
Then storage tank will be filled for the
first time, tank water is let to flow for no
purpose, for at least once. The appliance
is now ready to use.
When you flush filters, some water drops
can cause E2 (water leakage error). So dry
the sensor and the device completely. Be
careful that there will be no water drop in
the device somewhere. If you experience
such a problem, dry the sensor and
device and then pull out the plug and
then install the plug again the E2 error
will disappear.
Also there are three pcs L elbow that is
not installed to the device. These elbows
should be fixed to the inlet and outlets of
the device for preventing tube breakage.
Installation
scheme
1- Cebilon
2- Water Inlet Valve
3- Appliance Water Inlet
4- Waste Water Outlet
5- RO Water Outlet (Clean Water)
6- 24 V Input
**
7- Waste Water Bracket
8- Clean Water Faucet
**
Applicable for 101 ME and 101 MD models.
Mains Water
RO-Water
Waste Water
1- Measures should be taken against
freezing.
2- Waste water should not
interfered with.
3- When muddy (clay) water comes
from the mains, close the water inlet
of theappliance.
4- If a water supply other than the
mains will be used, you must receive
a drinking water report from
relevant institutions.
5- If it is a water source other than
the mains water, make sure that the
disinfection process is performed.
6- Filters are considered as supplies
and are outside the scope of
warranty.
WARNING