Crank pulley installation – Paxton Superchargers Universal Big Block Mopar 440 Carbureted System User Manual
Page 23
15
P/N: 4809662
©2009 Paxton Automotive
All Rights Reserved, Intl. Copr. Secured
02NOV10 v2.0
Section 6
CRANK PULLEY INSTALLATION
*** NOTE ***
Depending on the model year of the vehicle, the bolt
pattern on the Harmonic Balancer will either be an
OFFSET or SYMMETRICAL bolt pattern. The
OFFSET pattern has a single hole that is offset in the
circle. You will need to determine which pattern
your vehicle has and proceed accordingly.
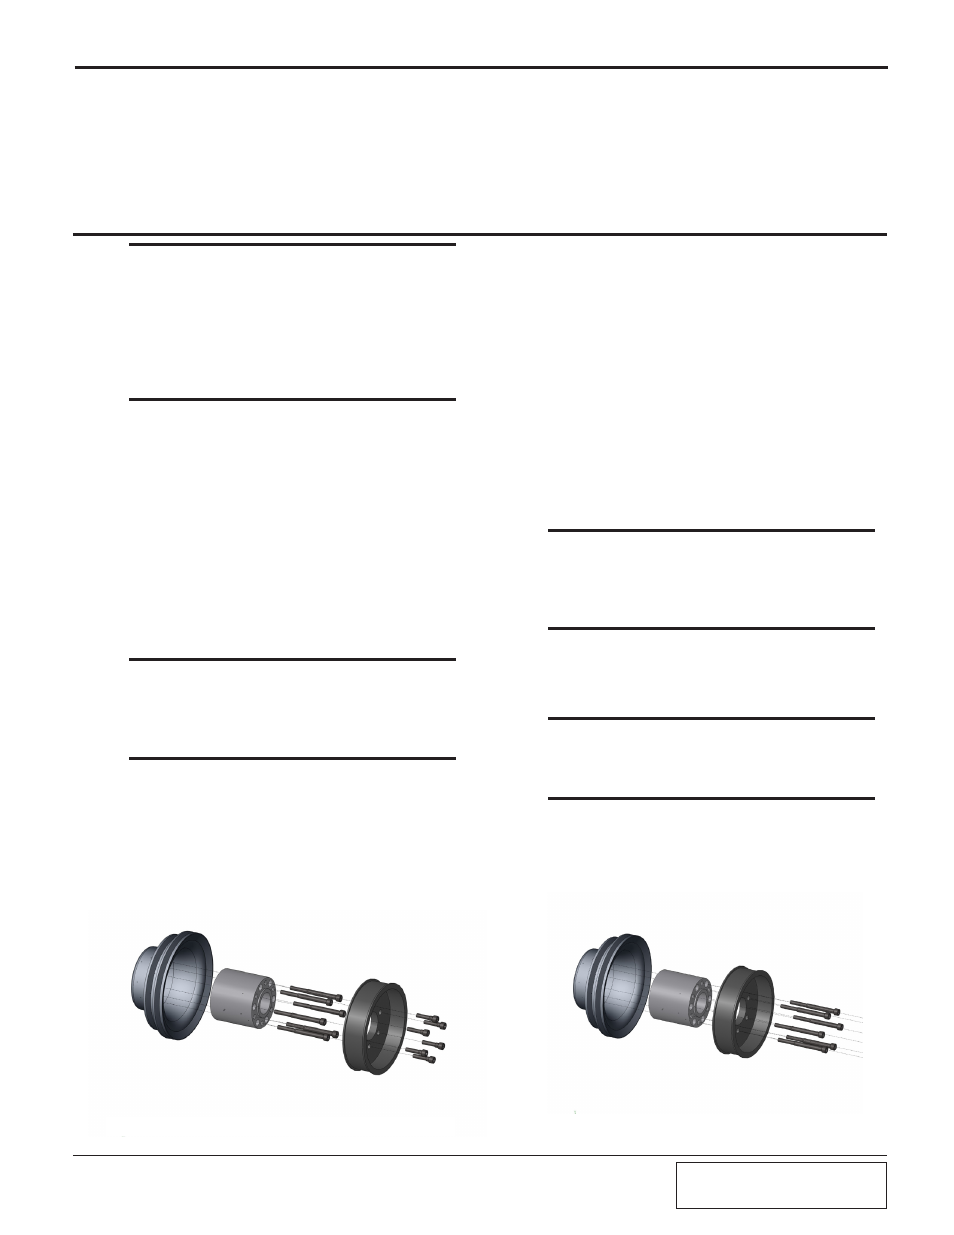
6.1 CRANK PULLEY INSTALLATION
(OffSET BOLT PATTERN)
A.
Locate the 10-rib Drive Assembly.
B. To assemble the crank pulley assembly on an off-
set bolt pattern, install six 5/16-18 x 3.25" socket
head bolts with a drop of blue loctite on each
fastner and NO washers through the counterbored
holes of the crank pulley spacer, and through the
factory crank pulley. Be sure the counterbores
face the front of the vehicle. (See Fig.6.1-a.)
C. Install the assembly onto the engine balancer and
secure using the installed hardware.
*** NOTE ***
Make sure that the pulleys are seated and piloting
correctly when securing. Use criss-cross torquing
sequence
D. Using the six 5/16-18 x 1.5” bolts with a drop of
blue loctite on each fastner and washers, install
the supplied 10-rib drive pulley on to the pilot of
the crank pulley spacer using the 6 bolt symmetri-
cal hole pattern in the supplied pulley. Make sure
the pulley is fully seated and tighten in crisscross
pattern.
6.2 CRANK PULLEY INSTALLATION
(SYMMETRICAL BOLT PATTERN)
A. Locate the 10-rib Drive Assembly.
B. To assemble the crank pulley assembly on a sym-
metrical bolt pattern you will first need to remove
the threads from the six threaded holes in the
crank pulley spacer using a 21/64 drill.
C. Assemble the crank pulley assembly as follows:
install six 5/16-18 x 3.75" bolts with a drop of
blue loctite on each fastner and washers through
the provided 10-rib crank pulley, through the sup-
plied crank pulley spacer (previously drilled), and
through the factory crank pulley. Make sure the
spacer pilot is seated in the supplied 10-rib pulley.
*** NOTE ***
Some supplied crank pulleys may have multiple bolt
patterns to fit different applications. Be sure to select
the bolt pattern that matches the stock crank pulley.
D. Install the crank pulley assembly onto the engine
balancer and secure using the previously installed
hardware.
*** NOTE ***
Make sure that the pulleys are seated and piloting
correctly when secure.
Fig. 6.1-a
Fig. 6.2-a