Havis-Shields C-VS-0812-CHGR User Manual
Page 3
C-VS-0812-CHGR_INST_12-07
3
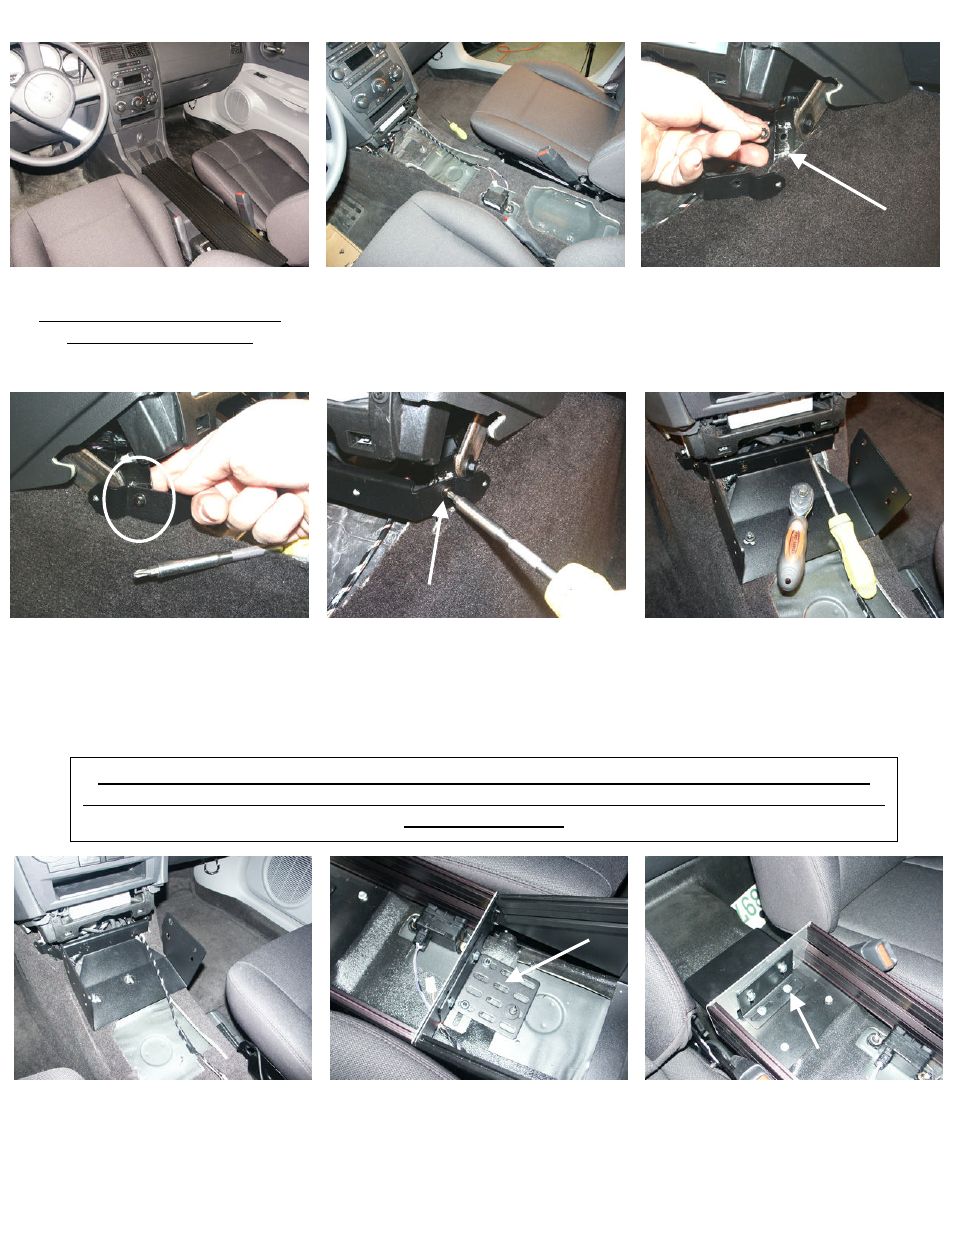
View of installation to this point
Note: Be sure OEM wiring is not
being crushed by mounting
brackets
Place console assembly and
install extension (#10) for “L”
bracket mounting leg on stout
console, using OEM hardware.
Attach “L” bracket mounting
leg (#9) to rear floor filler panel
(#6) using ¼-20 x ¾” hex bolts
and serrated nuts.
Remove OEM supplied trak.
Note: Some hardware is re-used
in installation of console
View of trak removed
Attach frame support bracket
(#4) to vehicle using 10/32 x ½”
phillips machine screws,
washers, and keps nuts
Attach support bracket for stout
console (#2) to vehicle and to frame
support bracket using OEM hardware
and #10 x ½” phillips machine screws
and washers
Tighten hardware
Attach frame support bracket
(#4) to vehicle using 10/32 x ½”
phillips machine screws,
washers, and keps nuts
Note: Due to some slight differences on the OEM floor mount bracket, tabs with mounting hole may
need to be bent slightly to accommodate the console front support bracket. Bending these tabs can easily
be done using pliers.
- P-MFK-9 (2 pages)
- C-SM-800 (82 pages)
- KR-15XX-ALF-X (2 pages)
- Kwik-Kit KK-120-05 (22 pages)
- Telescoping Computer Base C-TCB-12 (2 pages)
- C-HK (4 pages)
- 1995-2007 Ford Crown Victoria Trak-Mount Kit C-TM-CV (2 pages)
- 2002-2008 Chevrolet Trailblazer & GMC Envoy C-TCB-32 (2 pages)
- Heavy Duty Trak Mount C-TM-F250-1 (2 pages)
- Universal License Plate Bracket C-TIR3-UNV (1 page)
- Heavy Duty Trak Mount C-TM-GMC (2 pages)
- KK-K9-C14-K-32 (5 pages)
- 2000-2005 Chevrolet Impala Trak-Mount Kit C-TM-IMP (2 pages)
- C-VS-2400-CHGR (3 pages)
- C-B23 (1 page)
- C-VS-800-CV (4 pages)
- Kwik-Kit KK-100-03 (20 pages)
- Cupholders C-CUP2 Series (2 pages)
- Dodge Charger Spare Tire Bracket C-TTB-CHGR (5 pages)
- KK-K9-C13-K-32 (5 pages)
- Heavy Duty Trak Mount C-TM-EXC (2 pages)
- KK-K9-F12-K (3 pages)
- Telescoping Computer Base Lock C-TCB-LOCK (1 page)
- Slide-Out Radio Tray C-3190 (1 page)
- Computer Laptop Mount and Accessories C-3089's (4 pages)
- 18" Vehicle Specific Console for '04-08 Ford Econoline Van E-250/E-350 (2 pages)
- Half Size Trunk Box Organizer C-TBO-CV (1 page)
- Vehicle Specific Console C-VS-1100-F150 (2 pages)
- C-VS-0309-F250 (4 pages)
- 1997-2007 Dodge Dakota Telescoping Computer Base C-TCB-28 (3 pages)
- KK-F-ST-SS (2 pages)
- GSM33060-1 (1 page)
- 1997-2008 Ford Expedition Interior Window Guards WGI-F14 (1 page)
- K9/Prisoner Transport Unit KK-K9-C20-K-PT (7 pages)
- Four Compartment Prisoner Transport Insert KK-100-07 (3 pages)
- 1996-2008 Crown Victoria Swing-Out Dash Monitor Mount S-DMM-XXX-CV-SO (5 pages)
- Impala C-SM-830 (1 page)
- Cold Cathode Compartment Light KR-CCL Series (1 page)
- Telescoping Computer Base C-TCB-34 (1 page)
- C-TCB-27 (1 page)
- C-3085-UN-1 (1 page)
- Dual In-Dash Microphone Clip Bracket 1996-2007 Ford Crown Victoria C-MCB-CV (2 pages)
- Angled Series Consoles C-AS-MMP (2 pages)
- C-TSM-CHGR-D (1 page)