Cooktop installation, Installing the optional installation brackets, Installing the blower plenum to the cooktop – GE Profile 30 Inch Electric Cooktop Owners Guide User Manual
Page 21: Installing the blower to the plenum
49-2001160 Rev. 0
21
INST
ALLA
TION INSTRUCTIONS
Installation Instructions
COOKTOP INSTALLATION
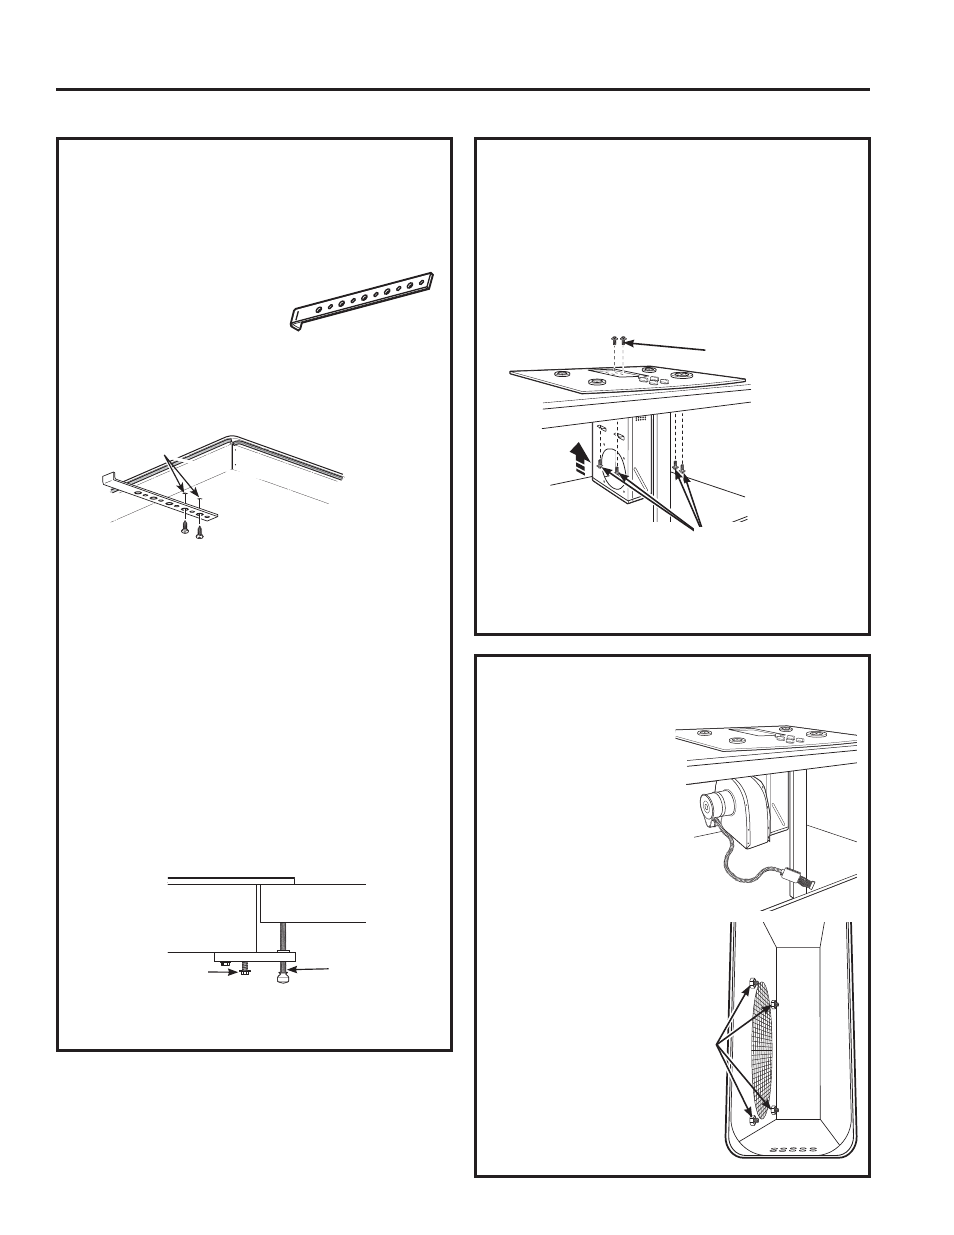
10. INSTALLING THE OPTIONAL
INSTALLATION BRACKETS
A. Make sure the front edge of the countertop is
parallel to the cooktop. Make final check that all
required clearances are met.
%/RFDWHDQGUHPRYH
hold-down brackets from
installation kit package.
C. Attach brackets to the
underside of the cooktop. Remove the screws
from the bottom of the cooktop and screw the
hold-down bracket to the bottom of the cooktop
unit. Repeat for opposite side of cooktop.
'6FUHZWKHKROGGRZQEUDFNHWVLQWRWKHFDELQHW
sides to secure the unit into place.
Alternate Installation:
You can order an alternate installation kit
:%;ZLWKZLQJQXWVDQGEUDFNHWVE\FDOOLQJ
800.GE.CARES. See diagram for instructions.
To install optional installation brackets:
Remove 2 screws on both sides under cooktop.
Align optional installation bracket under cooktop and
UHLQVWDOOVFUHZVWKURXJKWKHVORWLQWKHEUDFNHW'R
this on both sides of the cooktop.
Thread the thumb screw through the hole in the
bracket and tighten to secure the cooktop to the
countertop. Repeat on the other side.
IMPORTANT:
Turn the thumbscrew until it touches
WKHERWWRPRIWKHFRXQWHUWRS'RQRWRYHUWLJKWHQ
Cooktop
Countertop
Screws supplied with
cooktop
Thumb screw
Pre-drilled holes
%RWWRPRI
Cooktop
Cooktop Surface
11. INSTALLING THE BLOWER
PLENUM TO THE COOKTOP
Slide the plenum, with the blower opening on the
left, into the opening in the bottom of the cooktop.
Push up on the plenum until the stops on the
plenum contact the bottom of the cooktop, and snap
the plenum into place. (You may have to move the
plenum back and forth to work it into place.)
Secure the plenum to the bottom of the cooktop,
on each side, using the four (4) screws provided.
Further secure the plenum to the cooktop, from the
top side, using the two screws (2) provided.
12. INSTALLING THE BLOWER TO
THE PLENUM
Orient the blower
discharge opening to
match the ductwork in
Steps 6 and 7. Slide the
four threaded studs on the
side of the blower housing
into the four holes on the
side of the plenum.
NOTE:
See Step 13 for
installing the transition
duct to the blower. It
may be easier to install
the transition duct to the
blower before installing
the blower to the
plenum.
From the vent opening
in the top of the
cooktop, fasten the
blower assembly
securely to the plenum
with four (4) nuts.
Torque to 25±5 in/lb.
4 Nuts
(
7
/
16
”
socket
required)
Install 2 screws
Install 4 screws