Installation instructions – Allstar Performance ALL90000 User Manual
Page 2
Installation Instructions
1. Remove front timing chain cover locating dowel pins
with a claw hammer. Extract dowels in same manner
as pulling a nail. Install new dowels (furnished in kit)
so that dowel protrudes 1/2” out from face of block.
Use care driving dowels in place. Be sure they are
straight.
2. Lower oil pan. Place gasket between main adapter
plate and block. Install main adapter plate leaving idler
gear assembly in place. Put all cover bolts in place
and tighten, being sure that the main adapter plate is
seated flat with the block face.
3. Remove crank sprocket and install crank gear. Align
marks on crank and idler gear.
4. Shorten dowel pin in camshaft so that it does not
protrude beyond flange face of cam gear if using fuel
pump drive.
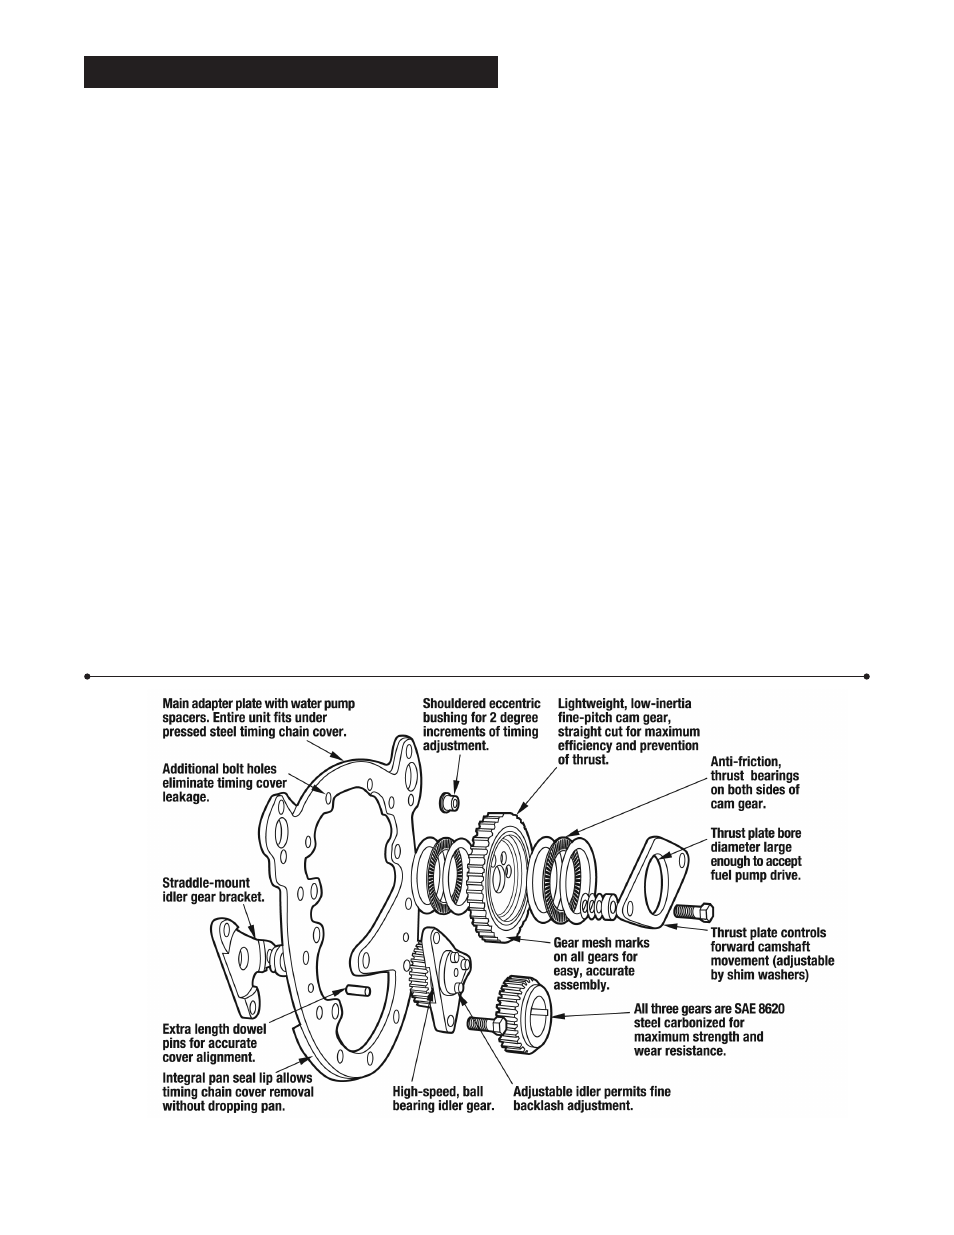
5. Coat small diameter needle thrust bearing and thrust
washers with a heavy grease, and install on back
of cam gear (washers must be on both sides of the
bearing). Install cam gear on cam using concentric
bushing. Install cam in block, using extreme caution to
prevent thrust bearing and washers on cam gear from
falling out of place. Align marks on cam and idler gear.
Caution: the thick thrust washer must be installed after
the thin washer on the bearing. See drawing.
6. Once all gears have been installed, degree the cam-
shaft according to the manufacturer’s specifications.
Coarse adjustment of the timing can be made by index-
ing the cam gear one tooth. This is equal to 10.28 cam-
shaft degrees. Fine adjustment can be made by install-
ing the concentric or eccentric bushings in a centered,
advanced, or retarded position. Bushings install from
rear of gear. Do not assume that timing is correct with-
out checking with a dial indicator and a degree wheel.
7. Loosen the three idler gear retaining bolts. Using
a dial indicator, adjust between .006" and .008" total
backlash between the idler gear and the crank gear.
Once backlash is adjusted, tighten the three idler gear
retaining bolts to lock placement of idler gear then
remove each of the three idler gear retaining bolts
(one at a time) apply Loctite to threads and re-install.
8. Coat the large diameter thrust bearing and two thrust
washers with a heavy grease and install in front of the
cam gear. The washers must be on both sides of the
bearing. Caution: Be careful the front washer does not
fall out of place.
9. Install the cam thrust plate on the main adapter with
the countersunk holes facing away from the block.
Put one spacer ring and five spacer shims on each
side between the main adapter plate and thrust plate.
Check cam end thrust using a dial indicator. Install or
remove shims to arrive at a total end thrust of .002 preload
to .002 clearance. Use Loctite on the two mounting bolts.
Allstar Performance 8300 Lane Dr., Watervliet, MI 49098
Phone: (269) 463-8000 Fax: (800) 772-2618 www.allstarperformance.com
Form 1005
Page 2 of 2
Rev. 071012