SP Controls PX2-NRC-1142 User Manual
Page 5
Step 6: DON’T PANIC!
As soon as you click Apply Changes, the NRC Configuration Wizard will disappear from your browser
window. This is supposed to happen. To continue configuration, access the Configuration Wizard with
your browser again, but instead of connecting to the NRC directly with an Ethernet cable, connect to it
over the network.
Note: If the NRC interface does not come up on your browser within 90 seconds or so, simply re-
enter the address of the NRC in your browser’s address bar and click enter to reconnect to the de-
vice.
Step 7: Change your computer’s network settings back to what they were
Change your computer’s Network Settings back to what they were (i.e. reverse what you did in Step
3). Disconnect the Ethernet cable from the NRC and reconnect your computer to the network it was
on.
Step 8: Connect to the NRC on the network
Connect the NRC to the same network your computer is on. If you chose a static IP, enter that IP ad-
dress into your web browser’s location field. If you chose DHCP, use the IP address that your network
administrator gave you. You’ll be prompted for login name and password again (remember: “Admin”
for both).
Step 9: Change the default password and add users
Now that your NRC is live on the network, you should change its default password to prevent unau-
thorized access. Be sure to record this password in a safe place! If you lose it, you will have to re-
vert your NRC back to its factory default settings and it will lose all its programming and configuration.
To change the password, click on Security, then on the pencil icon to edit the Admin user.
You may add other users at this time. To do so, simply click the Add + button. Then you’ll fill in the
UserID, Password, and Re-enter password fields for this user. UserID and password can be 3-16 al-
phanumeric characters in length (A-Z and 0-9 – no symbols allowed). Passwords are case sensitive.
You’ll also need to check the box labeled Can Configure if you want this user to be able to change the
configuration settings on the NRC, or leave it unchecked if you only want them to monitor and control.
The Admin user will always have configuration privileges.
Step 10: Your NRC is online!
You’re ready to start configuring your NRC to control the devices in your room.
7
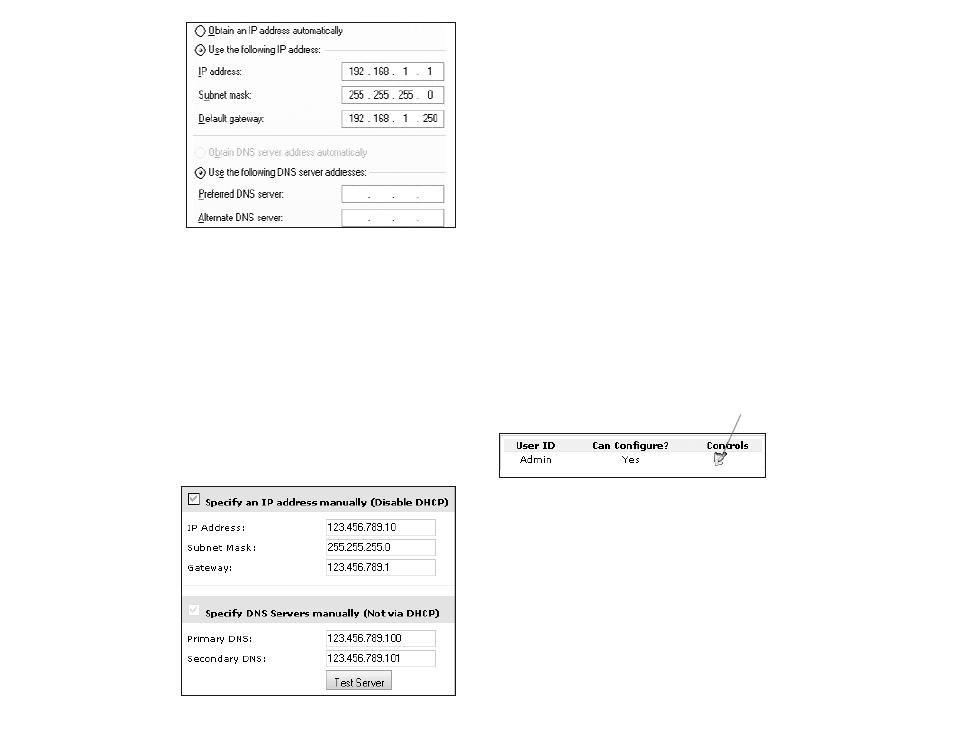
Use the following IP settings:
IP address: 192.168.1.1
Subnet mask: 255.255.255.0
Default gateway: 192.168.1.250
DNS server fields can be left blank.
Save these settings and close the
windows.
Step 4: Open a Web browser
and connect to the NRC
Type the following URL into the
browser’s location bar:
http://192.168.1.100
You will be prompted for a username
and password; enter “Admin” into both
fields (username and password are case sensitive). After a few seconds, you should then see the
“Monitor and Control” page of the NRC.
If you are not configuring your NRC for network use, go to Chapter IV. Basic Configuration to continue
configuration.
Step 5: Configure the NRC’s network settings
Now that you can see the NRC in your browser, you need to configure its network settings. You’ll
need to follow one of the two instructions below, depending on whether you’ll be using a static IP ad-
dress or DHCP.
Assigning a static IP address
Mark the checkbox shown to the right, then enter the IP Address, Subnet Mask, Gateway, Primary
DNS, and Secondary DNS that you received from your network administrator. Once you’ve entered
this info, click Save Changes, then click Reboot NRC. Go to Step 6.
Assigning DHCP
To use DHCP, you’ll need to give
your network administrator the MAC
address for the NRC. Your network
administrator will need to ensure that
the NRC is assigned the same IP ad-
dress every time by the DHCP
server. They will need to give you the
IP address that the DHCP server will
assign. Uncheck both boxes that
indicate you want to specify IP ad-
dress and DNS servers manually to
enable DHCP. Click Save Changes,
and then click Reboot NRC. Go to
Step 6
.
6
Example of TCP/IP configuration window from inside
the Microsoft Windows
TM
XP Control Panel