V. advanced configuration – SP Controls PX2-NRC-1142 User Manual
Page 10
V. Advanced Configuration
The NRC can control many more devices than just a display by extending its control capabilities with
Control Pucks (sold separately). This chapter will teach you how to configure Control Pucks, as well
as how to use some of the NRC’s more complicated features. A few of the things you can learn to do
in this chapter are:
• Create a driver for controlling RS-232 devices other than your display device
• Generate an IR driver using the Modular Panel and a remote control
• Configure multi-device switching
• Use the Transport Control Module in Multiple-Device Mode
• Customize complex action lists
• Configure system events such as Aux Audio
• ...and more!
In Chapter II, several sample systems were listed. This chapter will go through the steps necessary to
configure the system in example 3 from Chapter II, including:
• A projector, controlled via NRC’s RS-232 and IR ports
• A screen and a lift, controlled via the NRC’s two pairs of relays
• A DVD-VCR combo, controlled via one of the IR ports on an IR Puck
• A receiver-amplifier, controlled via an RS-232 Puck
This chapter will build on “Chapter III, Basic Configuration”, skipping some of the configuration steps
that were already covered.
Start by clicking on the Devices Setup link. Step 1, Select Source, and Step 2, Select Display, will be
no different than last chapter. You’ll still choose a name for your room, and then select a display driver
for your projector. We’ll start on Step 3, Attached Devices.
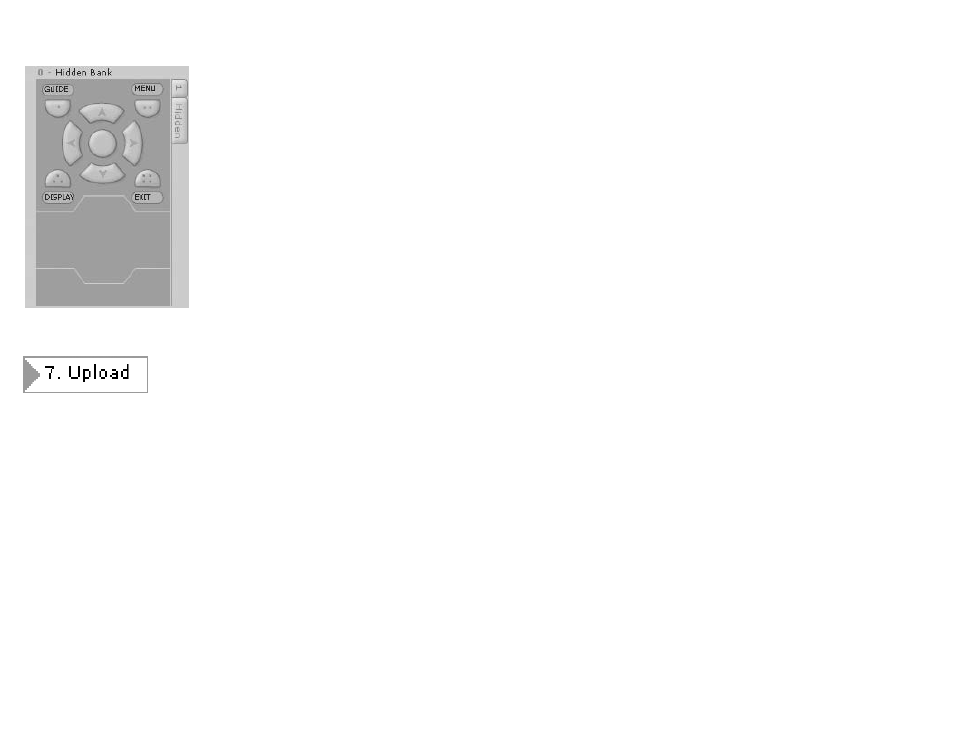
Hidden Functions
The tabs you see in the image to the left represent different
code sets corresponding to different remote controls you
have learned. The tab labeled “1” represents a single de-
vice that will be controlled by the Transport Control/Menu
Module. The tab labeled “Hidden” is special.
Not all of the functions on the NRC will be visible to the ca-
sual user. There is a class of secondary functions that are
hidden from the casual user. Pressing and holding the
Power On button makes these functions active.
Virtually all of the display drivers we provide will have some
hidden functions built in. By default, these functions will be
assigned to seven buttons: Guide, Menu, Up-Down-Left-
Right Arrows, and the Enter button in the center. You can
assign hidden functions to any button in the Transport Con-
trol/Menu module, simply by clicking on the Hidden tab and
then adding an action list to a button.
For Advanced Configuration information for this step, go to
page 24.
Saving Configuration Templates
On this page you may save your configuration settings as a room template for later reference or to
copy to another NRC. Simply enter the name for your room template and click SAVE. Your room tem-
plate will be saved as a NRCTPL file on your hard drive in this directory:
C:\~\My Documents\SP Controls\nrc\userrooms
You may copy or email this file as needed to load it on another PC.
The NRC network settings including the email recipient address for alerts are not saved in a room
template.
Upload Settings
When you are ready to upload your configuration to the NRC, select Upload. The NRC will take 20-30
seconds to reset before responding normally again. If the NRC does not automatically redirect to the
Monitor and Control Page within 90 seconds or so after uploading a new configuration, you may need
to enter the NRC address in the browser bar to manually return to the “Monitor and Control” page.
Note: If you have changed the NRC’s network settings (IP address, et cetera) then after you upload
the new configuration you will not be able to communicate with the NRC again except through a net-
work.
17
16