Advanced configuration - 5. switching options, Advanced configuration - 4. assemble pixiepro – SP Controls PX2-NRC-1142 User Manual
Page 13
Advanced Configuration - 5. Switching Options
In Basic Configuration, you learned how to instruct your display device to add particular input selec-
tion commands to the input selection button action lists. There are a few other configuration settings
here that will help populate action lists for various buttons with commands.
Press the button you’d like to learn a command for and it will start flashing, indicating that it is armed
for learning. It will remain like this for five seconds, after which it will time out (if it does time out, you
can simply press it again to arm it).
While the button is flashing, hold the remote control about six inches from the Modular Panel, aim it at
the small hole on the right side that’s labeled “aim remote here”, and squirt it for about one second
with the code you’d like that button to learn. While you’re squirting it, you should see the “learning
mode indicator” light blink rapidly, then when you stop squirting it, you should see the button on the
Panel remain lit. If you don’t see this, then the code was not learned successfully and you’ll need to
try again. Bright fluorescent lights or sunlight may interfere with IR learning.
Sending an IR Test
Click the pencil icon next to the command you want to test. This will bring up the Edit Existing IR
Code window. Once in that window, use the pull-down menu to select the IR port that your device is
connected to. Then click Send Test To. Note: you shouldn’t ever edit IR codes from inside this win-
dow. That function is for SP Controls engineers only.
Advanced Configuration - 4. Assemble PixiePro
Multiple-Device Mode
In the Basic Configuration chapter, we covered all of
the configuration settings for this section except Multiple-
Device Mode. This setting allows control of different de-
vices with the Transport Control/Menu module (TCM). Or
you might use it if you have just one device, but you only
want its controls to be active when its input on the display
has been selected.
Checking the box will cause the TCM to switch the com-
mands that are mapped to its buttons each time a differ-
ent input is selected. For example, you might have one
DVD player, one VCR, and one document camera. Se-
lecting DVD in the input selection area would cause the
TCM to display the buttons that were learned for the DVD
player, and likewise for the other devices. Selecting an
input that has no associated TCM commands would
cause the TCM display to go dark.
If you’re using Multiple-Device Mode, in Step 3 (Attached
Devices), you would have created a driver for each one
of those devices. In this step, you simply check the box to
indicate you want Multiple-Device Mode. In Step 5, you’ll
see how to assign the different TCM commands to differ-
ent selection.
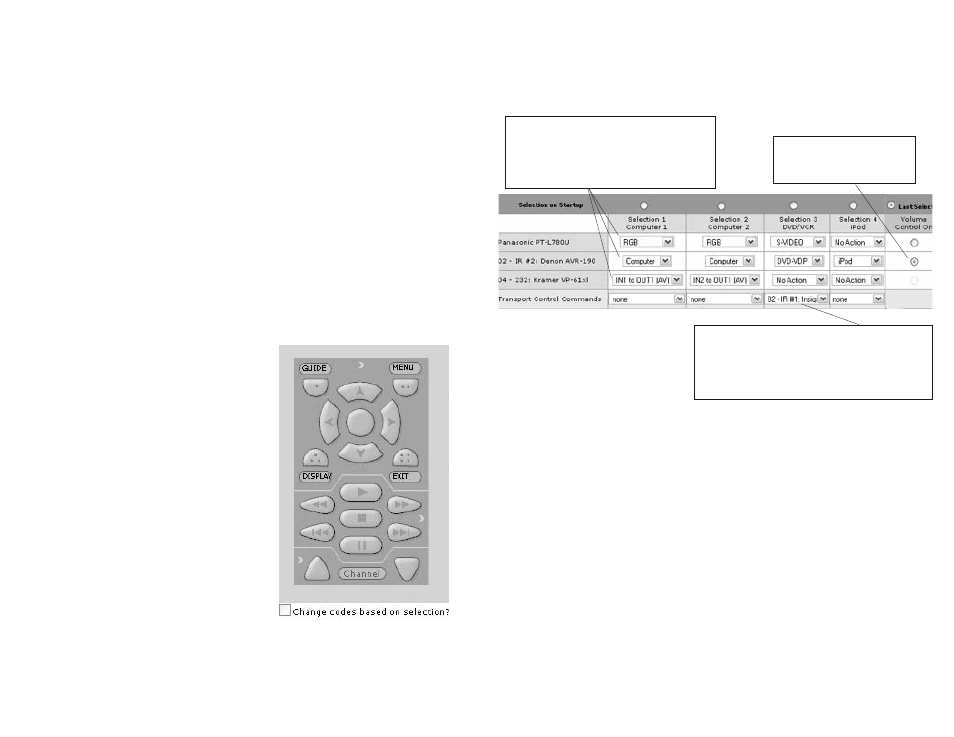
The commands listed under each selection will
be sent when that input selection button is
pressed. In this case, Selection 1 will send the
“RGB” command to the projector, the “Com-
puter” command to the receiver, and the “IN1 to
OUT1” command to the switcher.
Selecting this driver here will populate the TCM with
the commands to control the DVD/VCR combo unit,
and make them active just when Selection 3 is active.
To make one set of TCM commands active on every
selection, go back to step four and uncheck the box
“Change codes based on selection?”
Selecting this means that all vol-
ume control will happen through
the receiver (only one device
can control volume)
Selection Numbering: Source Selection 1 corresponds to the source selection button in the upper-
left hand corner, Selection 2 is in the upper-right hand corner, Selection 3 is second down on the left,
et cetera.
22
23