Step 4: preview input and switch between layers, Step 3: set output resolution, Step 6: output control – RGBLink CP 2048 User Manual
Page 5
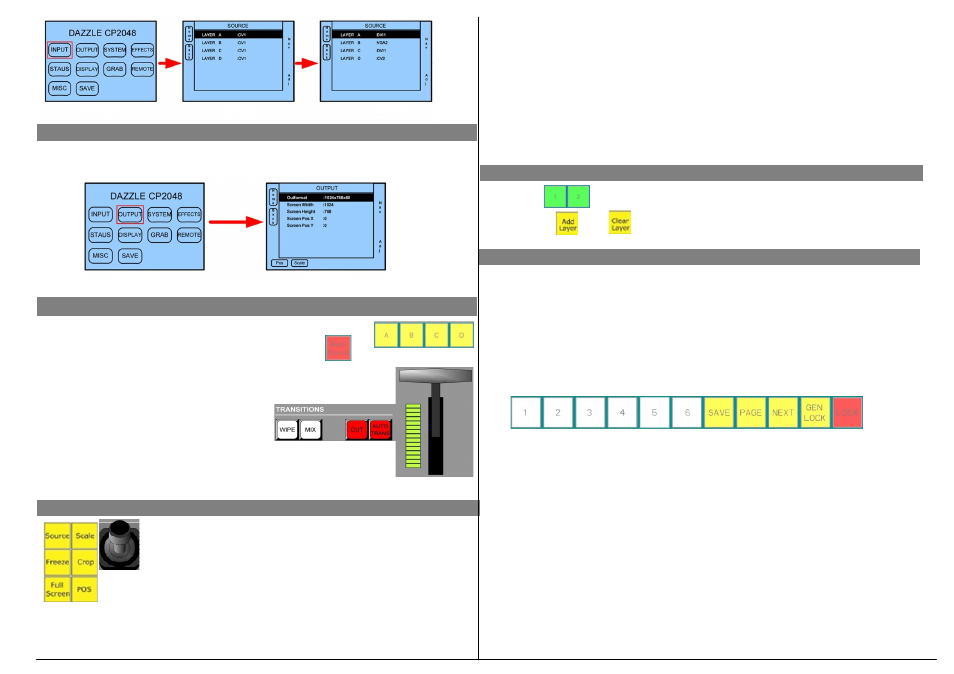
Step 4: Preview Input and Switch between Layers
1) After programming the source, push the buttons as in the right
picture to preview the input of Layer 1~4 and background to layer 5.
2) WIPE will active the layers switch with plus transition defined, and
MIX will active fade in fade out, CUT will switch
the layers from the top one to the bottom one
without delay, and AUTO TRANS will take the
preview to the program output via WIPE or MIX.
User can also use T-BAR to do the transition via fade in fade out and
can overlay layers via stopping in a particular position. LED bar shows
the fusion percentage.
Step 3: Set Output Resolution
Enter out format setup in OUTPUT via Touch Screen, then select the output resolution
by the knob.
Step 6: Output Control
The button is Preview 1 and Program 2. Push the button, and add or clear layer
by the button and .
Work with this part of buttons and and the joystick as the lift
picture, user can set display windows size, position and zoom in
operation easily via set up the parameters: Width, Height, X for
start point of horizontal coordinate, Y for start point of vertical
coordinate.
Step 5: Set Image Size, Position, and Crop the Image
Step 7: Save and Load User Configuration
1) There are 6 pages memory, and each page has 6 config, so in total there will be max
36 configurations. RGBlink comments use each page for one external device, and it will
be convenience to active the control when there are more external video devices in
connected. Push Page and select the page number which will be used to save, and
push SAVE button to be ready to save the config, and push button 1 to 6, will save the
current config to the active page memory separately.
2) Operator can push Page button and select the page number which will be used to
load, and load the memory number under the page. Also can use Next to view the
defined memory.
Picture 1
Picture 2
Picture 3
Picture 1
Picture 2
1) Push Scale will active the display window to be ready for size down.
Control Joystick to left or right will size down or size up display window in the horizontal.
Control Joystick to up or down will size down or size up display window in the vertical.
2) Push POS will active the display window to be ready for change position.
Control Joystick to left or right will move position of display window in the horizontal.
Control Joystick to up or down will move position of display window in the vertical.
3) Push Crop will active the display window to be ready for be cropped with a curtain size
and position.
Control Joystick to left or right will size down or size up display window in the horizontal.
Control Joystick to up or down will size down or size up display window in the vertical.
Do as the step 2 to change position of the cropped display window.
4) Freeze: Freeze the active layer on Program.
5) Full Screen: Take active layer to full screen.