REMKO CLK 30 User Manual
Page 9
9
Cleaning
The complete unit including heat exchanger, combus-
tion chamber and forced-air burner, is to be cleaned
from dust and dirt after every heating period, or before if
necessary, depending on the operating conditions.
Parts subject to wear and tear, such as waste gas sup-
pressors, gaskets, oil filter inserts, and oil nozzles are to
be checked and replaced if necessary.
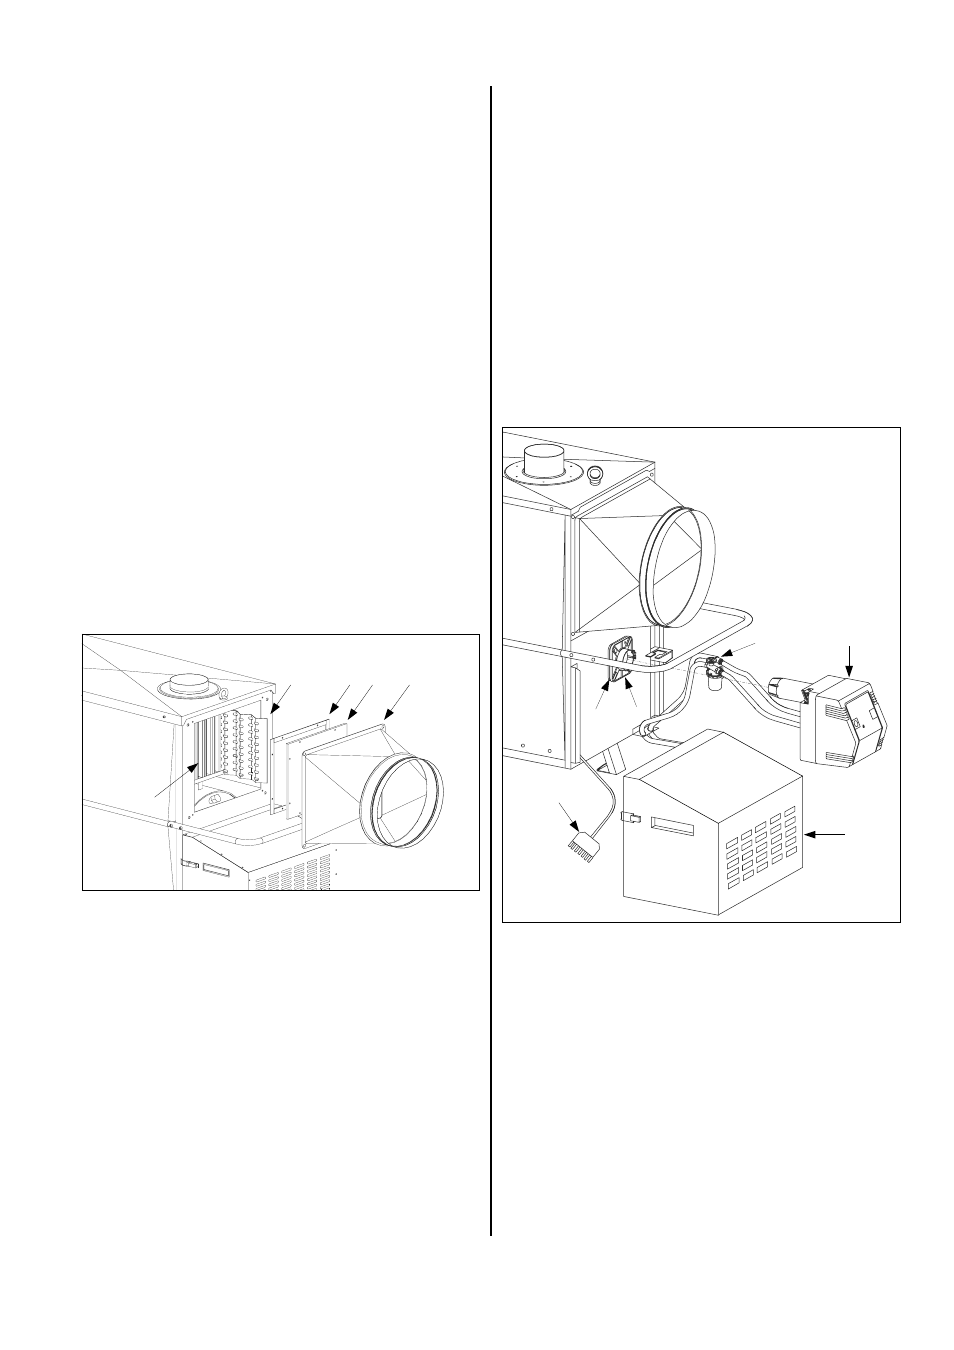
Cleaning the heat-exchanger
1. Unplug the unit.
2.
Unscrew the 4 fixing screws and remove the
blow-out cone 1.
If there are warm air hoses, they do not have to be
removed.
3. Remove revision cover 2 and take the waste gas
suppressor 4 out of unit.
4. Clean waste gas passes 5.
A special cleaning brush (Ref. No. 1103110) can be
purchased as an accessory.
5. Clean waste gas suppressors or replace them if
necessary.
6. Check gaskets 3 and revision cover 2 and replace
them if necessary.
7. Reassemble the unit in the reverse order.
5
3 2
4
1
G
Adjustments and maintenance work may only be
performed by authorised personnel.
Important information about the revision cover
à Make sure that the gaskets and the revision covers
are placed correctly.
à During assembling take care of uniform tightening of
the fixing nuts for clamping of the revision cover.
Uneven tightening may result in leakages of waste
gas.
Cleaning the combustion chamber
1. Unplug unit from the power source.
2. Remove the burner cover 1 after opening the two
quick release fasteners.
3. Unscrew the fuel filter 2 including the fuel tubes from
the mount and pull the plug 3 from the burner 4.
4. Loosen the tightening bolt on the burner flange 5
and remove the burner by pulling it towards you.
5. Place the burner and the fuel filter next to the unit.
6. Disassemble the burner flange.
7. Do not damage the flange gasket.
Damaged flange gasket can cause air to be suc-
tioned in incorrectly.
8. Clean combustion chamber through the burner open-
ing using a vacuum cleaner.
Special cleaning sets can be purchased as accesso-
ries for the REMKO industrial vacuum cleaner.
9. Assemble the burner flange and burner as described
in the following section.
5
1
2
3
4
6