Navigation, Main screen icons and button functions, Smts ii for gpc-xp technical guide 8 – Orion System System Manager TS II For GPC-XP User Manual
Page 8: Icons and button functions
Zone
Zone
NAVIGATION
SMTS II for GPC-XP Technical Guide
8
Main Screen Icons and Button Functions
Icons and Button Functions
System settings and screens are easily accessible by simply touch-
ing
one of the fi ve icons on the Main Screen. The subscreens contain
green outlined data entry boxes with accessible number keypads for
data entry and screen maneuvering buttons such as
,
,
and
.
NOTE:
Do not attempt to make changes to the Touch Screen
while the GPC-XP is initializing. This can cause
programming errors.
Main Screen Icons
There are fi ve Main Screen icons. See Table 1 for a list of the Main
Screen
icons and their functions.
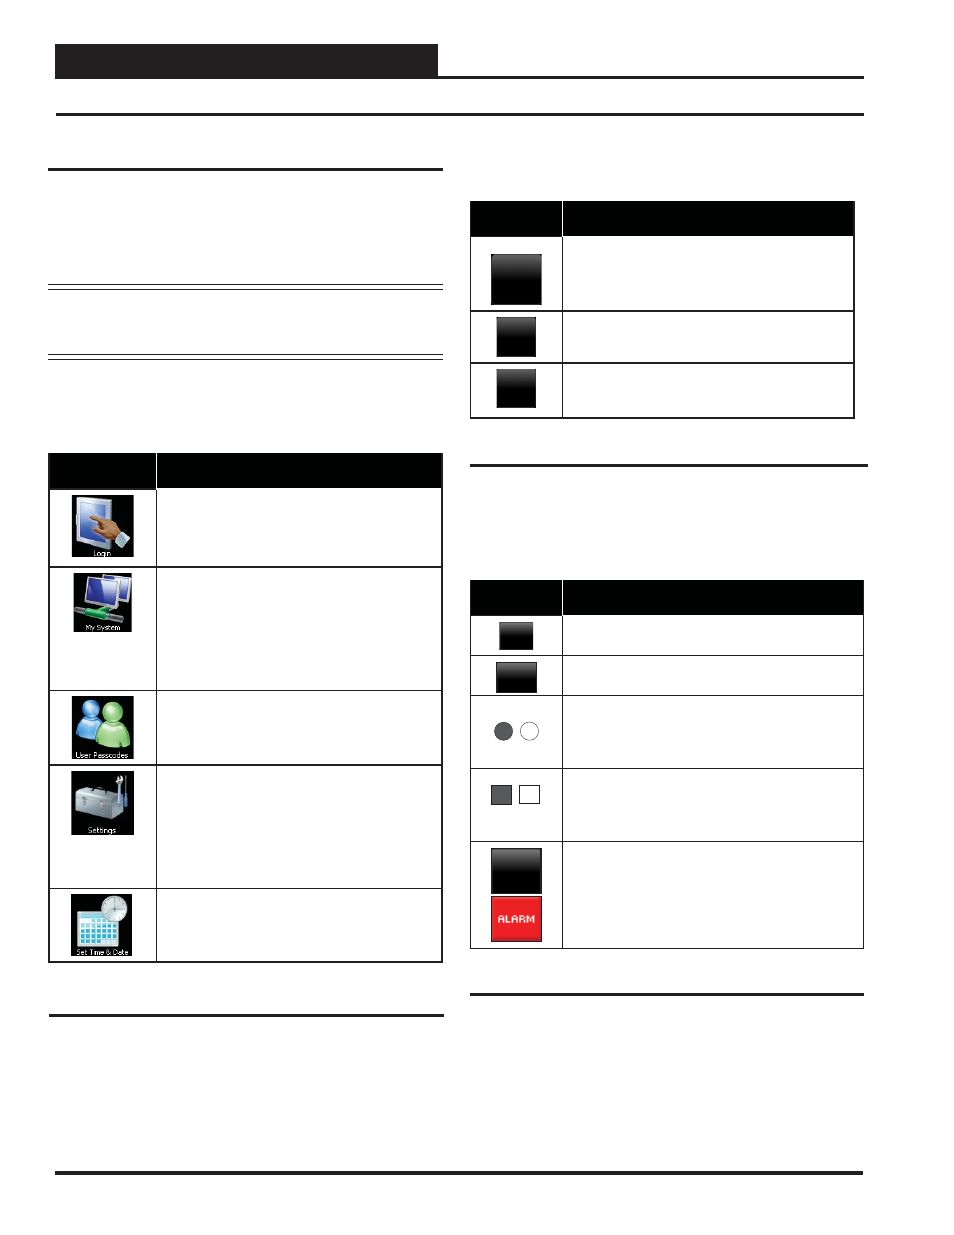
Icon
Main Screen Icons
The
< Login>
icon takes you to the Login
Screen where you enter your passcode.
In a networked system, the
< My System>
icon takes you to a Unit Selection Screen
which takes you directly to the GPC-XP
Controller’s Status Screen. In a stand-alone
system, the
< My System>
icon takes you
directly to the Status Screen.
The
< User Passcodes>
icon takes you
to the System Manager Passcode Levels
Screen if you are a Level 3 user.
The
< Settings>
icon takes you to the
System Settings Screen where you can
change the Backlight settings, set the
System Manager address, or choose One
to One Unit Connection (stand-alone
connection). System settings are only
accessible to a Level 3 user.
The
< Set Time & Date>
icon takes you to
the Set Time and Date Screen. Any level of
user can set the time and date.
Navigation Buttons
See Table 2 for a list of Navigation buttons and their functions.
Button
Function
Back
Use the
< Back>
button while in a Data Entry
Screen to return to the Status Screen. Use
the
< Back>
button while in a Status Screen
to return to the Main Screen.
+
Use the
< +>
key to step to the next screen.
-
Use the
< ->
key to step to the previous
screen.
Data Entry, Selection, and Alarm Buttons
See Table 3 for a list of data entry, selection, and alarm buttons and
their functions.
Button
Function
Esc
Use the
< Esc>
(Escape) key to exit from data
entry without saving any new data.
OK
Use the
< OK>
key to save the data you just
selected or entered.
Touch the gray radio button to make your
selection. A white circle will designate that the
item is selected. You can only select one radio
button item per screen.
Touch the gray square to make your selection.
A white square will designate that the item is
selected. You can select more than one
square per list of items.
No Alarms
The
or
< ALARM>
button, ap-
pearing on each Status Screen, takes you
directly to the GPC-XP Alarm Status Screen
where you can program alarms and view
active alarms. If red, alarm(s) are present.
If black, no alarm(s) are present.
Table 2: Navigation Button Functions
Table 1: Main Screen Icon Functions
Table 3: Confi guration Selection Buttons