Playable media, Setting the current time (24-hour display), Discs – Marantz MER803 User Manual
Page 20
14
ENGLISH
Playable media
Discs
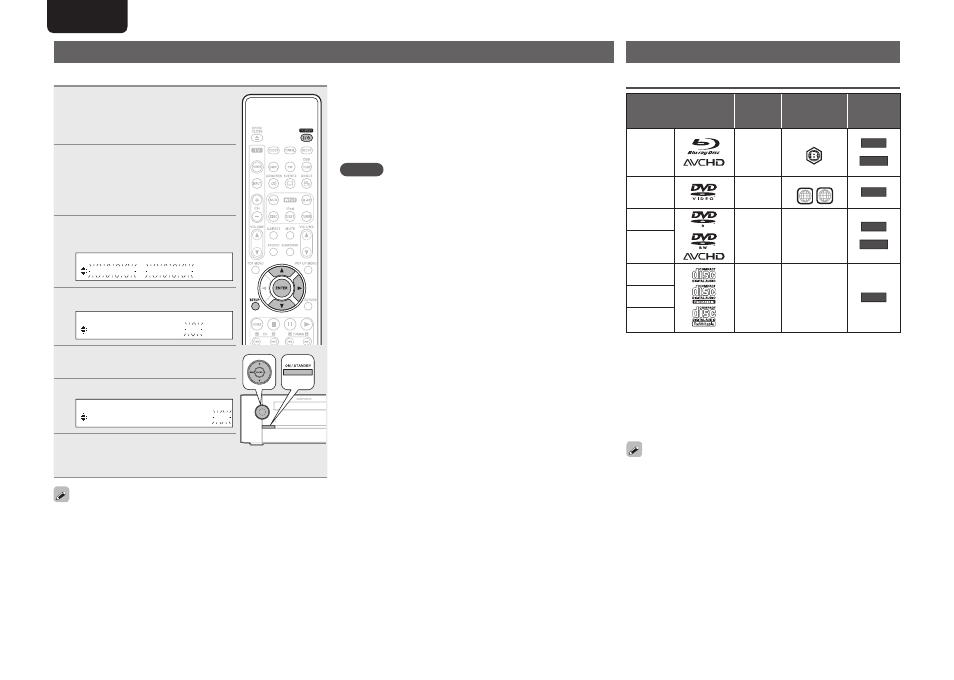
Playable discs
Playable
formats/
modes
Playable region
codes
Category
type
BD-Video,
BD-ROM,
BD-RE/
BD-R
z
1,z2,z3
BDMV,
AVCHD
format
Include region
BD
AVCHD
DVD-Video
z
1,z2
Video
mode
Include region
ALL
2
DVD
DVD-R
Video
mode,
AVCHD
format
–
DVD
AVCHD
DVD-RW
CD
CD-DA
–
CD
CD-R
CD-RW
• Only BD-RE/-R, DVD-R/-RW and CD-R/-RW discs recorded in UDF or
ISO9660 format can be played back.
z
1 BD-Video/DVD-Video discs may not operate as described in this
guide due to menu structure.
z
2 The Blu-ray Disc player and BD-Video disc, and DVD player and
DVD-Video disc each have their region codes (code assigned for
each region). Playback is not possible if the codes do not match.
z
3 This unit supports Ver 2.0 BD-ROM, Ver 3.0 BD-RE and Ver 2.0
BD-R.
The following discs will not play back on this unit.
• DVD+R/DVD+RW
• BD-RE Ver1.0 (BD disc with cartridge)
• BD-R/BD-RE in which BDAV is recorded
• HD DVD / DVD-RAM / DVD-Audio
• CDV (Only the audio part can be played)
• CD-G (Only the audio signals can be output)
• Non-standard CD (CD with copy protection, etc.)
• Unauthorised disc (Pirated disc)
• Disc with recording area less than 55 mm in diameter
• Hybrid disc
• Video Single Disc (VSD) / CVD / Video CD / Super Video CD /
Compact Disc-Interactive (CD-I) / Photo CDs / Super Audio CD
Setting the current time (24-Hour Display)
G
ExampleH Setting the current time to 10:15 am
1
Press
POWER
to turn on power to
the unit.
• If you perform operations on this unit, press
ON/STANDBY
.
2
Press
SETUP
.
Various types of setting menus are
displayed.
• If you perform operations on this unit, press
and hold
MODE
for 3 seconds and longer.
3
Use
ui
to select “CLOCK
SETUP”, then press
ENTER
or
p
.
S E T U P M E N U
C L O C K S E T U P
4
Use
ui
to set the “hours”.
C L O C K S E T U P
1 0 : 0 0
5
Press
ENTER
or
p
.
The “minutes” display fl ashes.
6
Use
ui
to set the “minutes”.
C L O C K S E T U P
1 0 : 1 5
7
Press
ENTER
or
p
.
The current time is set, and the normal
display reappears.
You can also perform the same operations as p on the remote control
unit with the
INPUT
button on this unit, respectively.
n
Checking the current time when the power is on
Press
CLOCK
.
Press once more and the display returns to its original condition.
n
Checking the current time when the power is
set to standby
Press
CLOCK
.
The current time is displayed for 10 seconds.
NOTE
The time cannot be set when in the standby mode. Turn on the power
fi rst.