Controls and functions – Eizo DuraVision FDX1501 / FDX1501T 取扱説明書 User Manual
Page 17
4
Package Contents
Check that all the following items are included in the packaging box. If any items are missing or damaged, contact
your local dealer.
Note
• Please keep the packaging box and materials for future movement or transport of the monitor.
• Monitor
• Analog signal cable : MD-C87
• USB cable: MD-C93 (for FDX1501T only)
• EIZO LCD Utility Disk (CD-ROM)
• Setup Manual (this manual)
• “For Users of Touch Panel LCD Monitor”
(for FDX1501T only)
• Clamper 2 pcs.
• Screws for fixing the clamper M4 × 12: 2 pcs.
• VESA mounting screws M4 × 12: 4 pcs.
• Metal panel fittings: 8 pcs. (Panel mount type only)
(Prepare a screwdriver.)
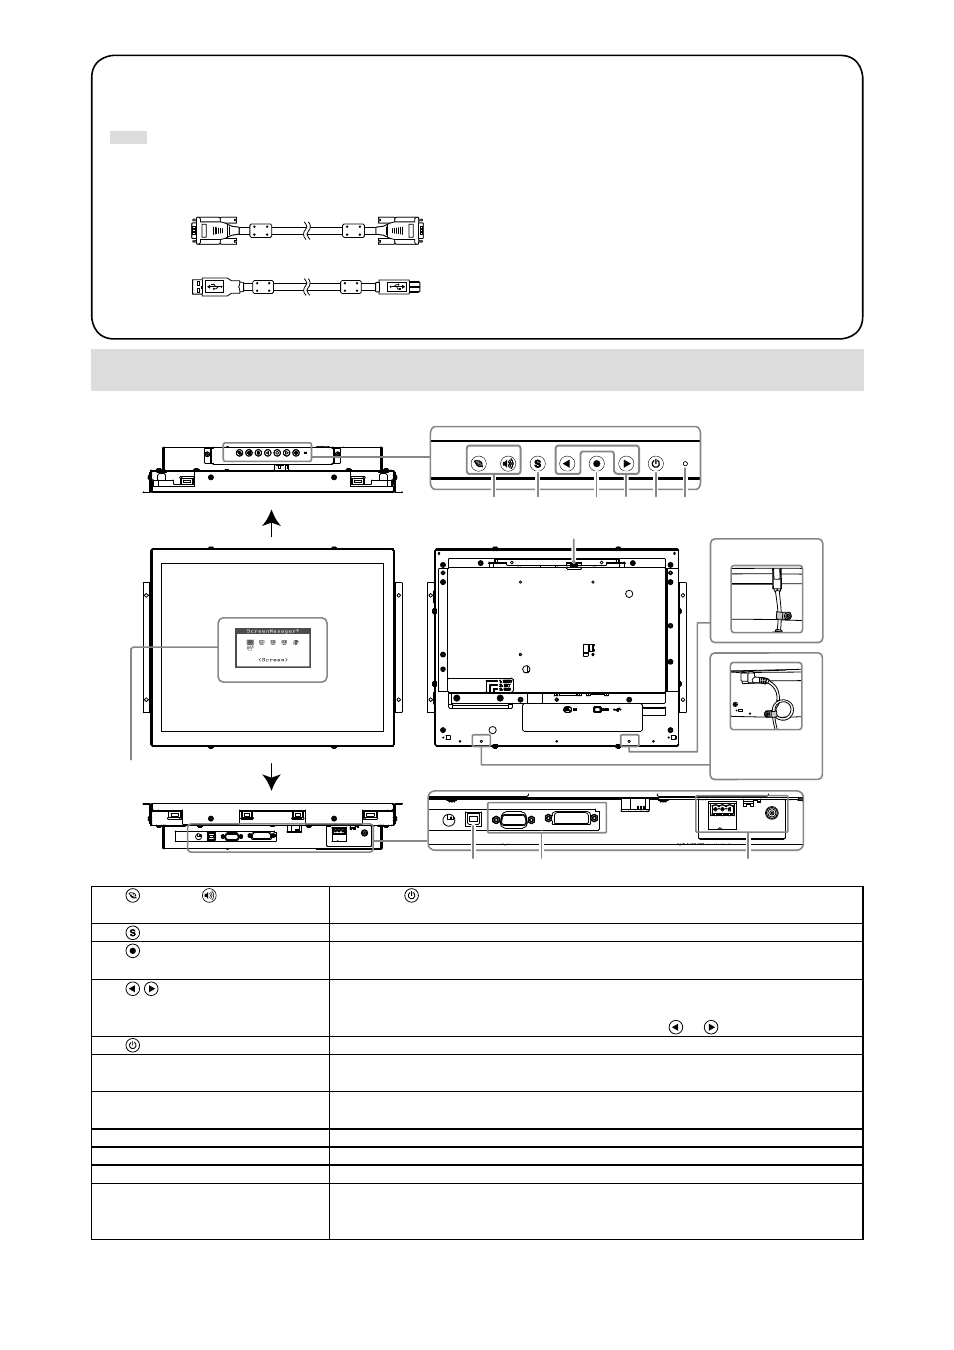
Controls and Functions
10
11
7
8
9
5
1
2
3
4
6
Top
Bottom
Attaching the clamper
• FDX1501T
Ex: Connected to
power jack
Adjustment menu
(ScreenManager
*
)
Example: FDX1501T (Chassis mount type)
1. button / button
Used with to set the monitor (key lock and DDC/CI communication).
These buttons do not function by themselves.
2. button
Switches input signals for display.
3. button
Displays the Adjustment menu, determines an item on the menu screen, and
saves values adjusted.
4. button
• Chooses and increases/decreases adjustment settings for advanced
adjustment using the Adjustment menu.
• Displays the brightness adjustment menu. (Press
or to adjust brightness.)
5. button
Turns the power on or off.
6. Power indicator
Indicates the monitor’s operation status.
Blue: Operating Orange: Power saving mode OFF: Power off
7. USB port (UP)
(for FDX1501T only)
Connects a USB cable when this product is used as a touch panel monitor.
8. Input signal connector
Left: D-Sub mini 15-pin connector / Right: DVI-D connector
9. Power connector
Left: DC power terminal block / Right: Power jack (DC-IN)
10. Button extension connector This is an extension connector for using the external control buttons.
11. Screw holes for securing
the clamper (2)
Attach the clamper to prevent the cable from falling off.
Fit the cable in the clamper and fit it with the set screw (M4 × 12), as shown in
the diagram above.
*
ScreenManager is an EIZO’s nickname of the Adjustment menu. For how to use ScreenManager, refer to the Monitor
User’s Manual (on the CD-ROM).