DR Power TreeChopper User Manual
Page 12
12
DR
®
TreeChopper™
Never attempt to mount the Universal Mounting Bracket to your ATV by drilling into the frame, skid plates, or mounting bracket.
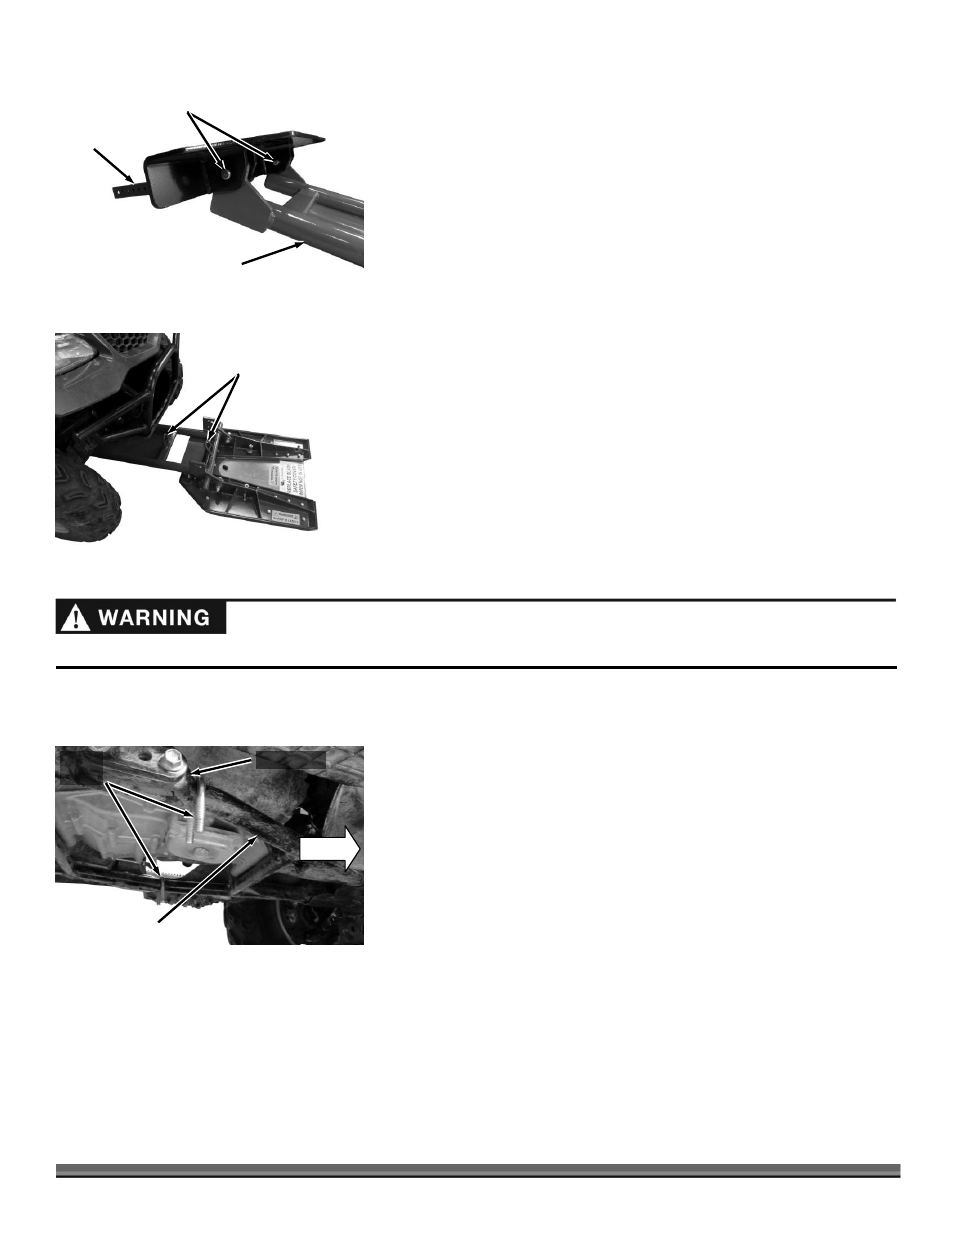
2.
Temporarily attach the Universal Mount to the Chassis using the two Pivot
Pins (Figure 8).
3.
Slide the Universal Mount and Chassis under the ATV far enough so that the
non-removable lifting ring on the chassis is forward of the front of the winch
(or other lifting device) by one to two inches. This allows for a slight angle
during lifting (Figure 9). The Universal Mount should be centered as closely
as possible to the center of the ATV (side to side).
Note: Included in your hardware kit is a removable 2nd lifting ring and hardware if
you need to mount your TreeChopper farther forward. The two lifting rings locations
are available to allow for more flexibility when finding an accessible position to
attach the front mounting plate.
Note: Some plastic guarding or similar material may need to be removed to ensure
an ideal mounting point to the Frame.
4.
Look under the ATV to determine the closest location on the Frame where
the Universal Bracket and Cross Bar can be attached. If you have a plastic
skid plate remove it from where the front and back mounting plates will
fasten to the frame. Make sure that the Universal mount is tight to the frame
or metal skid plate. If there is a plastic skid plate between the bracket and the
frame it should be removed so that the bracket tightens flat against the ATV
frame.
5.
Unpin the Universal Mount from the Chassis and lift it into position against
the Frame to determine where the hardware can go around the Frame and
into the slots of the Mount.
6.
Round Tube Frame (also some Polaris Frames): Lower the Universal Mount
and place a 2.25 Long U-Bolt around the Frame on both sides where it can
rest against a stop on the rear facing side of the U-Bolt (Figure 10).
Square Tube Frame (also some Polaris Frames): Lower the Universal Mount
and place a Square Frame Bracket over the top of the Frame on both sides
where it (or the Bolts that will support it) can rest against a stop on the rear
facing side of the Bracket. Insert a 3/8-16 X 2-3/4" Bolt down through each hole
on the two brackets.
Beam Frame: Lower the Universal Mount and place a Beam Frame Bracket over
the Frame where it (or the Bolts that will support it) can rest against a stop on
the rear facing side of the Bracket. Insert a 3/8-16 X 4-1/2" Bolt down through
each hole on the bracket.
Note: “U-Bolt Stop, Square Bracket Stop, or Beam Bracket Stop” is an area of the
Frame where there is a cross piece or welding point that the U-Bolt , Square Frame
Bracket, or Beam Frame Bracket will push against as the TreeChopper cuts into a
tree. Never use a U-Bolt to mount the TreeChopper to a Square Tube Frame, or a
Square Frame Bracket and Bolts to mount the TreeChopper to a Round Tube
Frame.
Pivot Pins
Figure 8
Chassis
Universal
Mount
Lifting
Rings
Figure 9
FWD
2.25"
U-Bolts
Figure 10
ATV Frame
U-Bolt Stop