Replacing a power supply, 9 radio connections, Radio connections – Daktronics BA-1518 Multi-Section Outdoor LED Scoreboard User Manual
Page 38: On 5.9, N 5.9 )
32
Scoreboard Troubleshooting
Replacing a Power Supply
To remove a 150 W power supply:
1. Use the component location drawings listed in Appendix A to locate the enclosure.
2. Open an access panel as described in Section 5.3.
3. Loosen the wing nuts to remove metal cover from the enclosure.
4. Locate the power supply (Figure 22) and disconnect all wires connected to it.
5. Use a 9/32" nut driver to remove the hardware securing the power supply.
6. Fasten the new power supply in place and reconnect all wires.
To remove a 1000 W power supply:
1. Open an access panel as described in Section 5.3.
2. Loosen the wing nuts to remove metal cover from the enclosure.
3. Remove the mounting plate secured to the enclosure, remove the circuit board
attached to the power supply, and detach the power supply from the mounting plate.
4. Attach the circuit board to the new power supply and secure both to the mounting plate.
Note: If replacing the 1000 W power supply (Daktronics part # A-1856R) does not
seem to resolve the problem, try replacing its circuit board (part # 0P-1337-2000).
This circuit board also contains individual fuses for each output jack. If a single digit
doesn‟t work, a fuse may be blown. Replace the fuse(s) as needed with part # F-1058.
5.9 Radio Connections
To determine the settings for radio
connections between the scoreboard
and control console:
1. Power off any radio-equipped
consoles in the area.
2.
Cycle power to the scoreboard,
and watch for the radio
settings. These settings appear
in different locations based on the scoreboard layout:
If there is no clock, the settings should appear in
the Home and Guest digits, but this may vary by
scoreboard model.
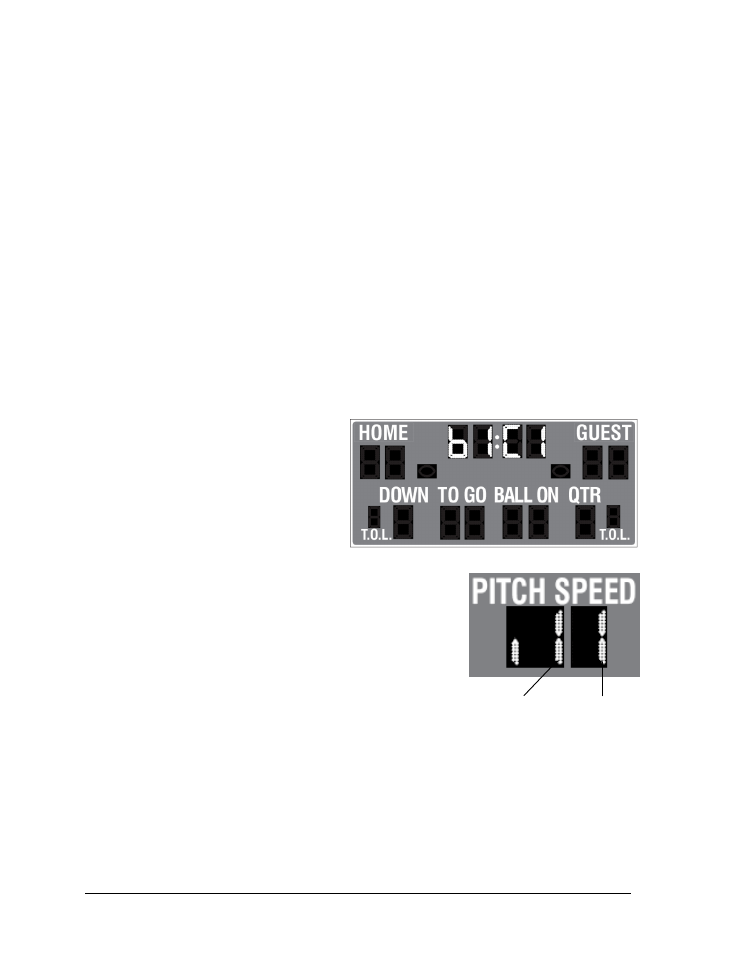
If there is a clock, the settings appear in the clock
digits (Figure 25).
Scoreboards capable of displaying speed of pitch
may also have separate radio settings for the
second All Sport console controlling those digits
(Figure 26).
The first values are the broadcast settings (“b1”), and the second are the channel settings
(“C1”). These values must match the settings within the console. The speed of pitch
controller must be set to a different channel than the main scoreboard controller.
Note: If these settings do not appear, the receiver(s) may need to be
repaired/replaced.
To make sure the current radio settings match the receiver in the scoreboard, refer to the
appropriate control console manual (see Section 1.4).
Figure 25: Radio Settings (Clock)
Broadcast # Channel #
Figure 26: Radio Settings (SOP)
- BA-1524 Multi-Section Outdoor LED Scoreboard BA-2013 Multi-Section Outdoor LED Scoreboard BA-3718 Multi-Section Outdoor LED Scoreboard BA-3724 Multi-Section Outdoor LED Scoreboard FB-2018 Multi-Section Outdoor LED Scoreboard FB-2019 Multi-Section Outdoor LED Scoreboard FB-2020 Multi-Section Outdoor LED Scoreboard FB-2021 Multi-Section Outdoor LED Scoreboard FB-2022 Multi-Section Outdoor LED Scoreboard FB-2023 Multi-Section Outdoor LED Scoreboard FB-2024 Multi-Section Outdoor LED Scoreboard FB-2025 Multi-Section Outdoor LED Scoreboard SO-2023 Multi-Section Outdoor LED Scoreboard SO-2022 Multi-Section Outdoor LED Scoreboard SO-2021 Multi-Section Outdoor LED Scoreboard SO-2019 Multi-Section Outdoor LED Scoreboard SO-2018 Multi-Section Outdoor LED Scoreboard SO-2011 Multi-Section Outdoor LED Scoreboard MS-2918 Multi-Section Outdoor LED Scoreboard MS-2009 Multi-Section Outdoor LED Scoreboard FB-3010 Multi-Section Outdoor LED Scoreboard FB-2027 Multi-Section Outdoor LED Scoreboard FB-2026 Multi-Section Outdoor LED Scoreboard BA-2001 LED Baseball Scoreboard BA-2008 LED Baseball Scoreboard BA-2018 LED Baseball Scoreboard BA-2009 LED Baseball Scoreboard BA-2002 LED Baseball Scoreboard FB-2351 Multi-Section LED Football Scoreboard FB-2352 Multi-Section LED Football Scoreboard FB-2353 Multi-Section LED Football Scoreboard FB-2354 Multi-Section LED Football Scoreboard FB-2355 Multi-Section LED Football Scoreboard FB-2356 Multi-Section LED Football Scoreboard FB-2357 Multi-Section LED Football Scoreboard FB-2358 Multi-Section LED Football Scoreboard TN-2016 Single-Court Outdoor LED Tennis Scoreboard TN-2601 Single-Court Outdoor LED Tennis Scoreboard TN-2603 Single-Court Outdoor LED Tennis Scoreboard TN-2604 Single-Court Outdoor LED Tennis Scoreboard TN-2605 Single-Court Outdoor LED Tennis Scoreboard TN-2606 Single-Court Outdoor LED Tennis Scoreboard TN-2607 Single-Court Outdoor LED Tennis Scoreboard TN-2601 Outdoor LED Tennis Scoreboard TN-2603 Outdoor LED Tennis Scoreboard TN-2604 Outdoor LED Tennis Scoreboard TN-2605 Outdoor LED Tennis Scoreboard TN-2606 Outdoor LED Tennis Scoreboard TN-2607 Outdoor LED Tennis Scoreboard TN-2650 Outdoor LED Tennis Scoreboard TN-2651 Outdoor LED Tennis Scoreboard TN-2652 Outdoor LED Tennis Scoreboard TN-2653 Outdoor LED Tennis Scoreboard TN-2654 Outdoor LED Tennis Scoreboard TN-2655 Outdoor LED Tennis Scoreboard TN-2656 Outdoor LED Tennis Scoreboard TN-2657 Outdoor LED Tennis Scoreboard