Hearth access and assembly – Desa (V) CB36(N User Manual
Page 15
14
www.desatech.com
117437-01
HEARTH ACCESS AND ASSEMBLY
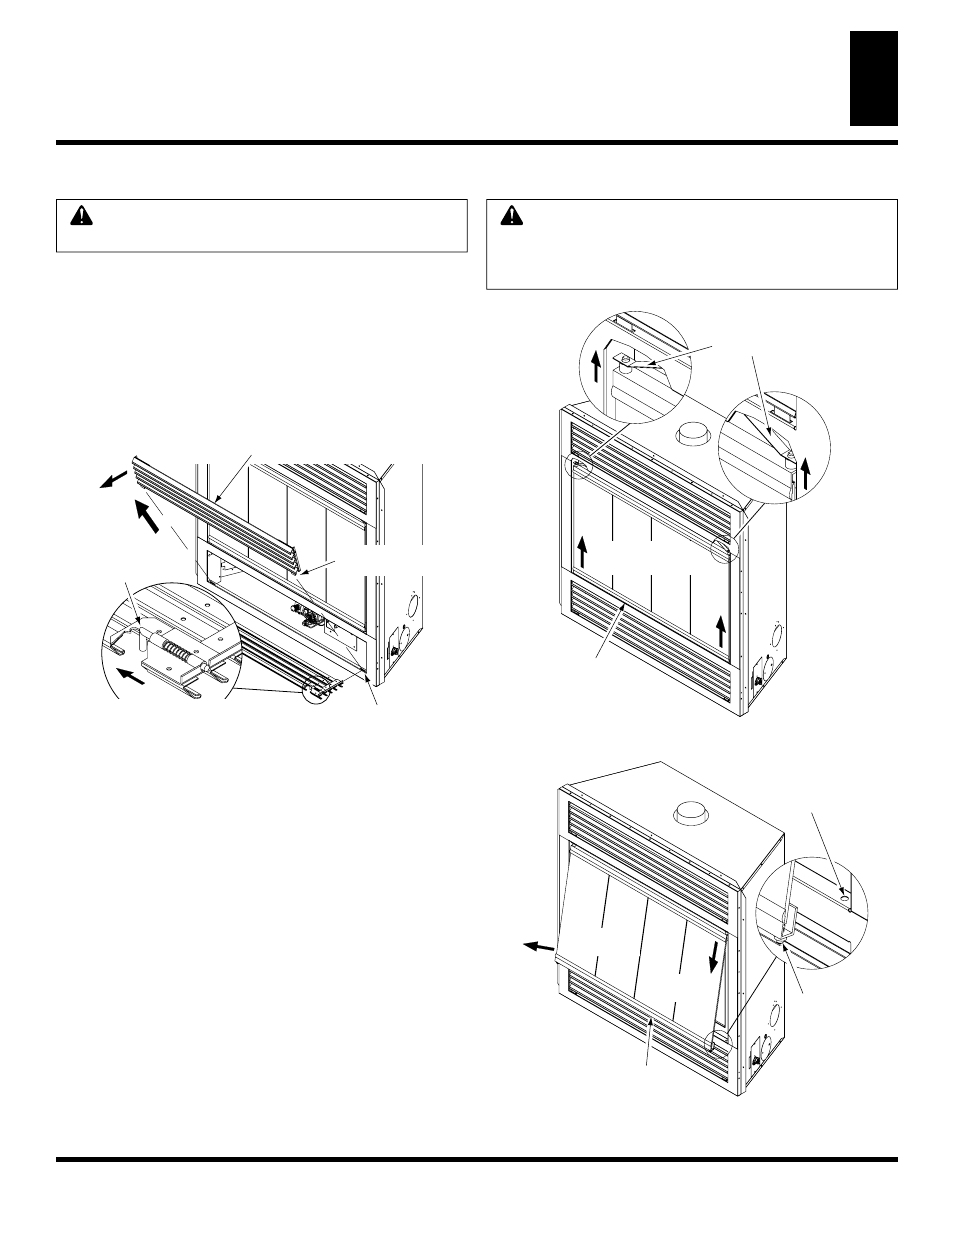
Removing Top Louver Trim Panel
The top louver panel may be removed for inspection and cleaning
by following the instructions for removing the lower louver access
panel. (see Figure 28).
Removing Lower Louver Access Panel
1. Use your index fi ngers to locate the left and right spring latches
found just under the top louver then draw them inward to release
the pins holding the panel on the side face (see Figure 28).
2. Swing the louver panel out until it clears the fi replace opening.
3. Pull the entire panel out until the bottom tabs are free of the slot
openings in the lower face frame.
HEARTH ACCESS AND ASSEMBLY
Removing Lower Louver Access Panel
Removing Top Louver Trim Panel
Removing/Replacing Glass Door
Figure 28 - Removing Lower Louver Access Panel
WARNING: If fi replace has been running, turn off
and let cool before accessing or servicing the unit.
WARNING: Handle glass door panel with care. Do
not strike, slam, or otherwise abuse glass. Do not
operate fi replace with glass door removed, cracked,
or broken.
Removing/Replacing Glass Door
If replacement of glass is necessary, the entire assembly, glass and
frame, must be replaced. If glass is broken, wear gloves and tape the
remaining fragments onto the frame.
1. Placing a screw driver or your fi nger tips into the gap between
the lower glass panel rail and the bottom face frame, lift the
glass door assembly until the door pins clear the locating
holes in the bottom face frame (see detail Figure 29).
2. Swing bottom glass panel assembly out until the door pins on
the lower rail clears the bottom face frame (see Figure 30).
3. Lower the door down until the upper door pins are free of the
locating holes in the spring clips and place in a safe area.
4. Replace glass panel in reverse order by inserting the top door
pins into the spring clips, lifting up at the lower frame rail,
and locating the bottom pins in the holes on the lower face frame.
Figure 30 - Removing/Replacing Glass Door
Spring Latch
3. Pull
Out Panel
2. Swing
Out Panel
Locating Slot
Lower Louver
Access Panel
1. Draw Latches Inward
Panel Tab
Spring Clips
Glass Panel
Frame Rail
1. Lift Up Panel
at Lower Rail
Figure 29 - Removing/Replacing Glass Door
Locating
Hole
Door Pin
Glass Panel
Frame Rail
2. Swing Out
Panel
3. Lower
Panel Out