Programming update procedure – Pinnacle Systems Universal Safety Controller HUB User Manual
Page 22
Page 17 of 18
Programming Update Procedure
Changes to the programming in the field can be done
via EMAIL and the USB port on the HUB. The Factory
can EMAIL a zip file containing the Master and Slave
computer programs for a specific Device setup. Below is
a procedure:
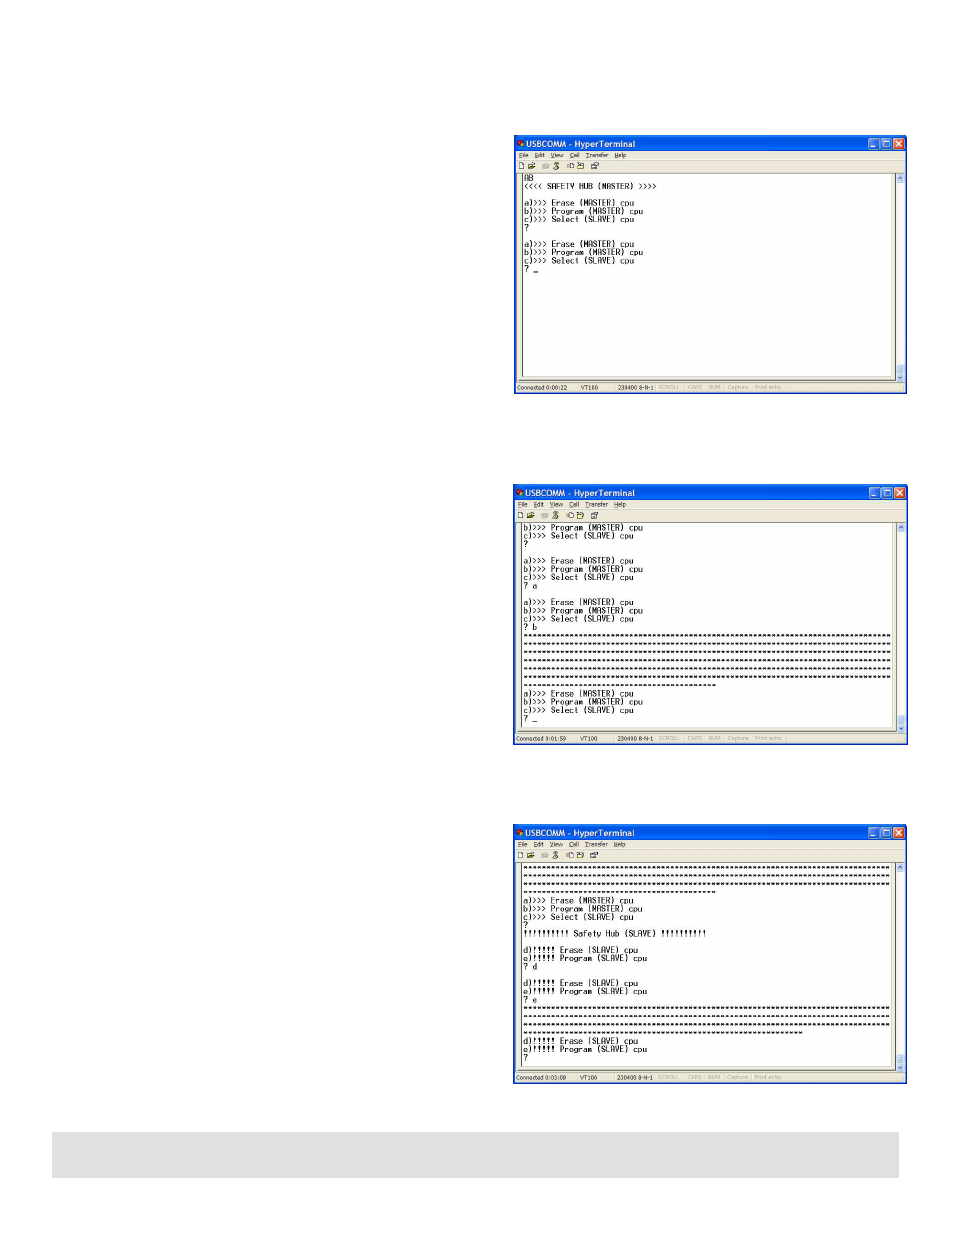
1. Email Factory ([email protected]),
following the Programming Model # on page 7,
with the new model# you want the HUB to run.
You must also include the 2 digits that appear at
the top of the Terminal window from Step 8) (i.e.
This screen shot shows the digits “AB.”)
2. The Factory will EMAIL you back with the Master
file SHM.s19 and the Slave file SHS.s19.
3. Attach a standard USB cable between your HUB
and PC
4. The “first time” you will need to insert the CD
that came with the HUB. This CD contains the
Driver for the USB connection. Let your PC
search the CD to find the proper Driver.
5. Run “Hyperterminal” that comes with Windows
XP, but is also included on the CD if you are
running Windows Vista or 7.
6. The “first time” you run “Hyperterminal”, you will
be asked to name a file to save your settings
under: Type in a name and save it to the
desktop. You will be asked to choose an icon:
don’t select any. You will be asked to make this
your default “Telnet” program: Select NO. You
will be asked for your fax number: Skip past.
Click File->Properties-Connect Using-> Select
the COM port assigned to this USB connection.
Click File->Properties->Configure-> Bits per
second-> 23400, Data Bits -> 8, Parity -> None,
Stop bits -> 1, Flow Control-> Xon/Xoff
Click File->Save
7. Turn power ON to the HUB (you have 3 seconds
to hit the “SPACE BAR” on the PC keyboard.
Otherwise the HUB will power up for normal
operation).
8. If you succeeded with step 7), you will see a
menu appear on the Terminal window. Notice
the 2 digits that appear in the upper left corner
of the screen shot (below), as you will need this
information for Step 1).
9. Type in ‘a’ to erase, ‘b’ to start to program, then
click “Transfer” and click “Send text file”. The file
for the Master is shm.s19. Wait until the menu
re-appears.
10. Now, Type in ‘c’ to switch to the Slave, ‘d’ to
erase, ‘e’ to start to program, then send the text
file shs.s19. Wait until the menu re-appears.
11. Cycle the power and the new configuration will
be running.
NOTE: If you do not have Hyperterminal, or find it difficult to run the Hyperterminal included on the CD, please refer use
the Terminal.exe (also on the CD) program on the following page.