Oklahoma Sound #MMC User Manual
Page 4
4
f) Proceed by taking 2 wooden dowels C and insert them in the predrilled holes on the
top and boƩom of the panels and shown. Repeat for both panel #2 and #3.
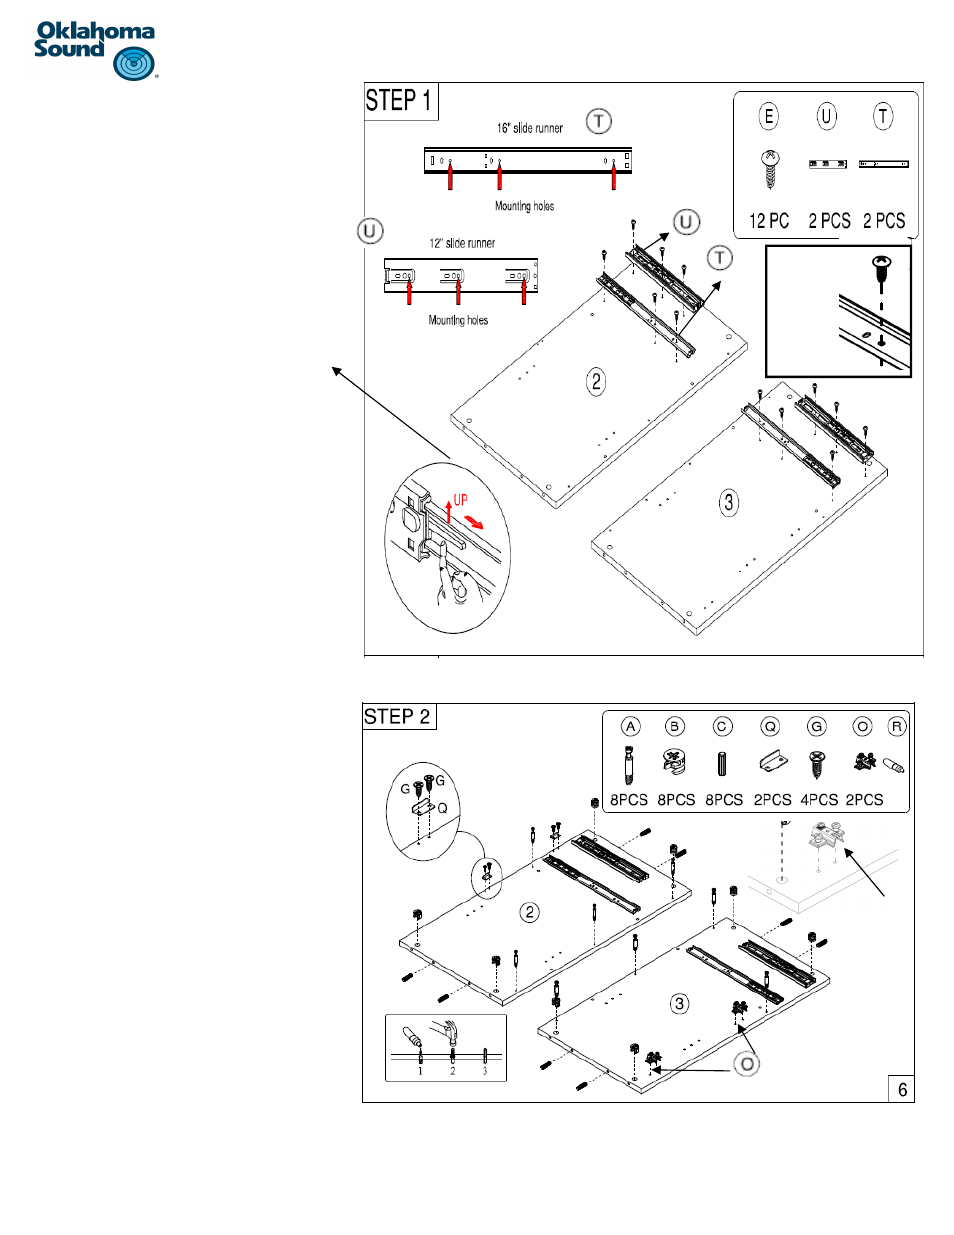
Step 1:
a) Begin by idenƟfying part #2 and #3 and lay
them down on a clean, soŌ surface with the
inside of the board facing upwards as shown.
b) Next idenƟfy the 12” slide part #U (upper
slide) . Detach the inner and the outer part
(mounƟng plate) of the slide by pulling the
inner part half way out and exposing the
plasƟc lever. Once the lever is exposed liŌ it
as much as it goes and conƟnue to pull the
inner porƟon of the slide out all the way.
Removing it completely as shown.
c) ConƟnue to screw the outer porƟon to the
panel in the predrilled holes as shown using
three screws #E. This should be repeated for
both slides on panel 2 and 3. The open ends
of the slides should be aligned with each oth-
er at the edge of the panels as shown.
d) Next idenƟfy the16” slide part #T and repeat
step c) to screw in the slide below the upper
slide #U. Use three screw #E per slide to
screw in each slide to the predrilled holes as
shown.
Step 2:
α)
IdenƟfy lock catch #Q and screw it to the pre
drilled holes at the edge of panel 2 using
screw #G. Be sure that the verƟcal porƟon of
part #G is closest to the edge of the panel as
shown.
b) IdenƟfy the female hinge part #O and screw
them to the edge of panel #3 as shown using
the screws pre-aƩached to the hinge into
the predrilled holes as shown. Open end of
the hinge facing the edge of the panel.
c)
ConƟnue by inserƟng four Cam locks #B into
panel #2 and four into panel #3.
d) Important: Be sure to always insert the
cam locks with the arrow +/- facing the
edge of the panel so the cam bolt can be
inserted with ease.
e) Using a Phillips screwdriver, insert four cam
bolts #A ,to panel #2 and four to panel to #3
as shown.
e) Set the inner porƟon of the slide #U and #T to the side for later use.
The screw
goes
through the
round holes
and NOT the
oval holes
.
Open end of the hinge facing
the edge of the panel.