CRU RAX420-XJ User Manual
Page 5
RTX220 QR - Manual
4.2.2 Formatting a Drive
If you purchased your RAX pre-populated with a hard drive, this
step should not be necessary unless you wish to change the format
or erase the drive. To format, use the Disk Management utility.
a. Right-click on My Computer, then select Manage. The Com-
puter Management window will open.
b. In the left pane of this window, left-click on Disk Management.
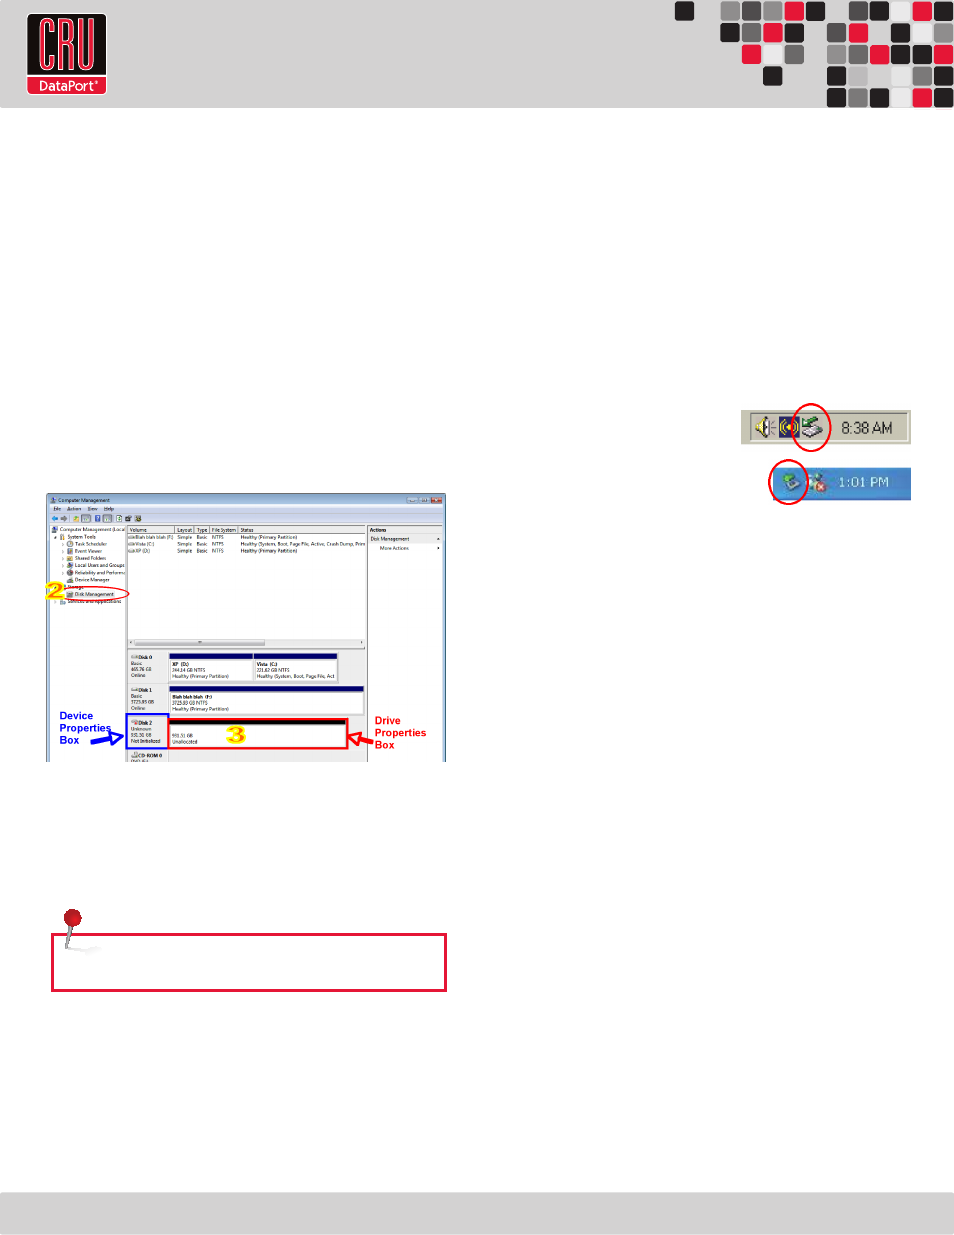
c. The drive should appear in the list of Disks in the lower
middle/right pane (see picture below). You may need to scroll
down to see it. If the drive is already formatted, you can
identify it easily by its volume name. If it’s unformatted, the
Drive Properties Box will say “Unallocated” and you’ll need to
initialize the disk before formatting it. Initialize the disk by right-
clicking the Device Properties Box and selecting Initialize Disk.
d. To format the drive, right-click the Drive Properties Box and
select Format.
e. If you are prompted to select a partition type, select MBR for
volumes 2TB or smaller, or GPT for volumes larger than 2TB.
f. Click through several more windows, leaving the default set-
tings, until you see a window that allows selection of a file
system. Choose NTFS and enter a name for the new volume.
Be sure to check the box labeled “Perform a quick format”
unless you want to completely erase any data on the drive
and have time to wait. A quick format should take less than a
minute, while standard formatting may take several hours.
g. Click “Next” and then “Finish” to start the format process.
When the format is complete, the Drive Properties Box will
update to show the new volume name. The new volume can
now be found in My Computer.
4.2.3 Mounting and Ejecting Volumes
If the hard drives attached to RAX are already formatted, you can
begin using the volume right away. When the unit is properly con-
nected and turned on, a window may open to allow you access to the
volume. If no window appears, you can find the volume by double-
clicking “My Computer.”
Eject the RAX before powering it down by single-clicking the green
arrow icon on the task bar, then select-
ing “Safely remove….” Windows will
indicate when it is safe to disconnect
RAX. Disconnecting the unit without
first ejecting it can result in data loss.
4.2.4 Creating a Boot Drive
Some PC motherboards support booting from an external device. To
activate this feature, you will need to adjust the motherboard’s BIOS
settings. Check with your motherboard’s manufacturer or owner’s
manual for details.
5. Frequently Asked Questions (FAQ)
Q: Why won’t the computer let me eject or unmount my drive?
A: There may be a software application running in the background
with an active link to the drive. Sometimes, you may see a mes-
sage such as “The disk is in use and could not be ejected. Try
quitting applications and try again.” Try invoking the Force Quit
feature in OS X to see what software may be running. For Win-
dows, the equivalent command is CTRL-ALT-DEL. Drives connected
to the computer via eSATA cannot be ejected in Windows the way
FireWire or USB drives can. However, freeware utilities are avail-
able on the internet that provide a similar function.
Q: What kind of host bus adapter (HBA) will I need for this
product?
A: Most SATA or SAS HBAs will work with RAX as long as there is
a converter cable that will convert RAX’s host connection to the
connection type on the HBA. For instance, converter cables can
often be found that convert multi-lane SAS/SATA (SFF-8470) to a
“mini-SAS” (SFF-8088) connector or four separate SATA or eSATA
connectors. Some of these converters are available at www.
wiebetech.com or www.cru-dataport.com.
Page 4
NOTE: Windows XP does not support GPT or volumes larger than 2TB.