CRU DataPort 25 Secure USB User Manual
Page 5
RTX220 QR - Manual
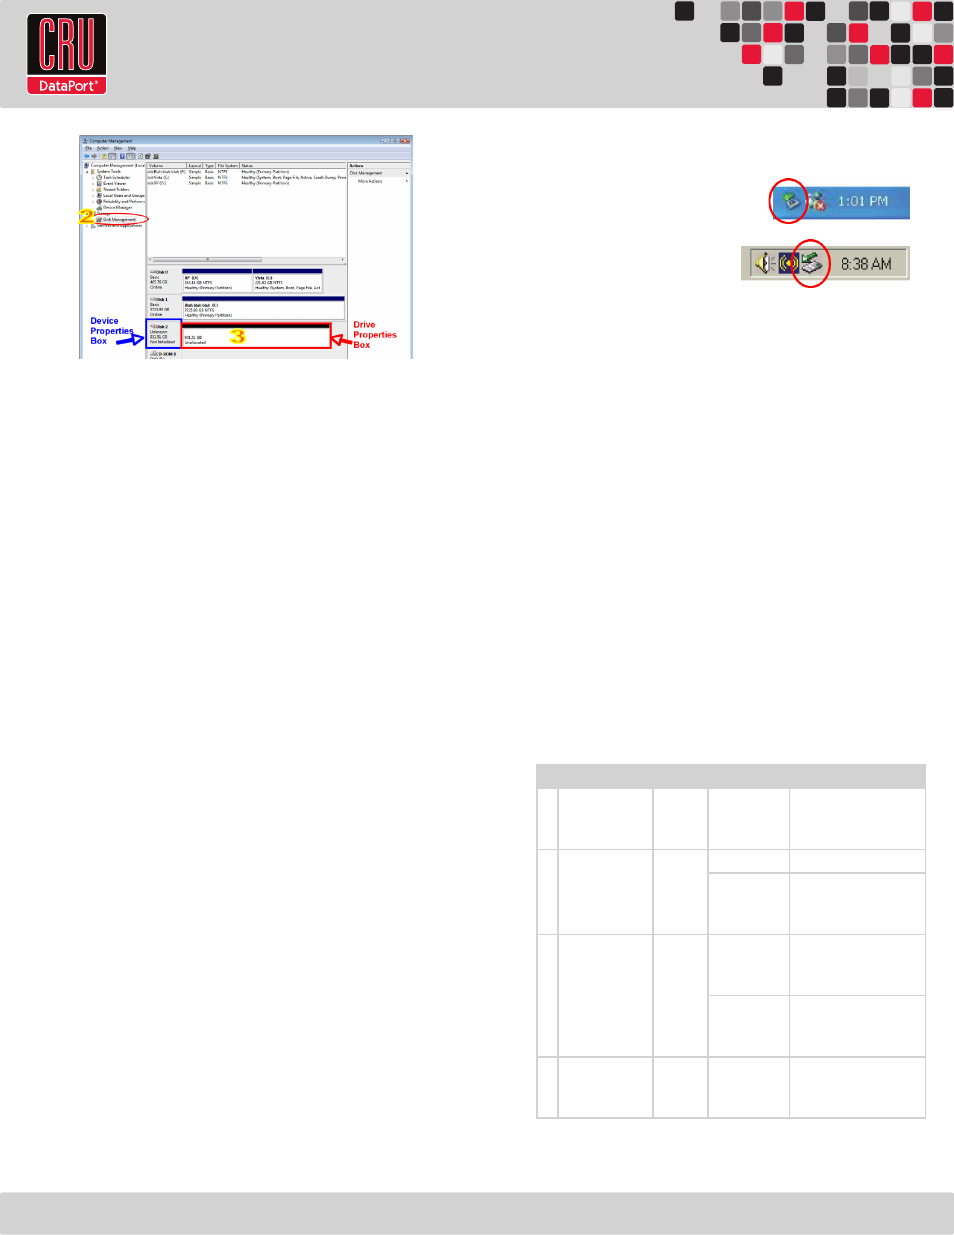
clicking the green arrow icon on the task bar (in Windows XP) or the
USB plug icon with the green checkmark on the taskbar (Windows
Vista and Windows 7), then selecting the
proper device from the menu that pops up.
Windows will indicate when it is safe to
disconnect the DataPort 25 Secure.
Disconnecting the unit without first
ejecting it can result in data loss.
4. Encryption
• The DataPort 25 Secure USB Version uses full disk hardware
encryption to encrypt the entire contents of the drive - including
the boot sector, operating system and all files - without perfor-
mance degradation.
• The encryption key must be installed prior to powering on the
DataPort 25 Secure for the data to be decrypted on the drive.
If the key is externally connected to the Mini-USB Security
Key Port and is not internally installed, then once it has been
accepted, it may be removed and stored apart from the data
so that in the event that the drive is lost or stolen, the data is
protected.
• When a drive is formatted using an encryption key, the same
or a duplicate key must be used in order to access the data.
There is no “back door” to access the data; lost keys make data
recovery virtually impossible.
5. Frequently Asked Questions (FAQ)
Q: What do the LED lights indicate?
A:
Page 4
d. The drive should appear in the list of Disks in the lower middle/
right pane (see picture below). You may need to scroll down to
see it. If the drive is already formatted, you can identify it easily
by its volume name. If it’s unformatted, the Drive Properties Box
will say “Unallocated” and you’ll need to initialize the disk be-
fore formatting it. Initialize the disk by right-clicking the Device
Properties Box and selecting Initialize Disk.
e. To format the drive, right-click the Drive Properties Box and
select Format.
f. If you are prompted to select a partition type, select MBR for vol-
umes 2TB or smaller, or GPT for volumes larger than 2TB. Note:
Windows XP does not support GPT or volumes larger than 2TB.
g. Click through several more windows, leaving the default set-
tings, until you see a window that allows selection of a file
system. Choose NTFS and enter a name for the new volume.
Be sure to check the box labeled “Perform a quick format”
unless you want to completely erase any data on the drive
and have time to wait. A quick format should take less than a
minute, while standard formatting may take several hours.
h. Click “Next” and then “Finish” to start the format process.
When the format is complete, the Drive Properties Box will
update to show the new volume name. The new volume can
now be found in My Computer.
i. When formatting is finished and both green LEDs are lit, show-
ing that the drive is ready and encrypted, the Security Key may
be removed and stored in a safe location.
3.2.3 Mounting and Unmounting Volumes
If the hard drive inside of the DataPort 25 Secure USB Version carrier
is already formatted, you can begin using the volume right away.
When the DataPort 25 Secure USB Version is properly connected and
turned on, a window may open to allow you access to the volume.
If no window appears, find the volume by double-clicking the “My
Computer” icon.
Unmount the DataPort 25 Secure before powering it down by single-
# LED Name
Color
State
Description
1 Drive Activity
Amber Intermittent
Flashes when
the drive is being
accessed.
2 Power
Green
Solid
Unit is powered on.
Flashing
The data cable is
connected to an
incorrect SATA port.
3 Key Error
Red
Solid
Encryption engine
error. Contact
Technical Support.
Flashing
The Security Key is
not present or is not
functioning.
4 Encryption
Green
Solid
The Security Key
is present and
encryption is enabled.