CRU DataPort 10 Secure 256-bit User Manual
Page 4
RTX220 QR - Manual
the system. See Section 3 for instructions on how to properly
dismount the drive from Mac or Windows systems.
b. Use the DataPort Key to turn the keylock 90 degrees counter-
clockwise to unlock and power off the unit.
c. Pull the carrier by the handle towards you to remove the carrier.
2.5 Optional Configuration Settings
2.5.1 Fan Failure Alarm
The fan failure alarm function is a standard feature on the DataPort
10. If the cooling fan should fail, an alarm will beep and the green
LED on the upper left corner of the DataPort will flash indicating
fan failure. Remove the jumper on JP6 on the frame (see picture) to
silence the audible alarm. The jumper is located directly below the
fan power connector on the DataPort 10 Secure circuit board.
3. Usage with Mac and Windows Operating Systems
3.1 Usage with Mac OS X
3.1.1 Compatibility
The DataPort 10 Secure supports 2.5” and 3.5” SATA hard drives.
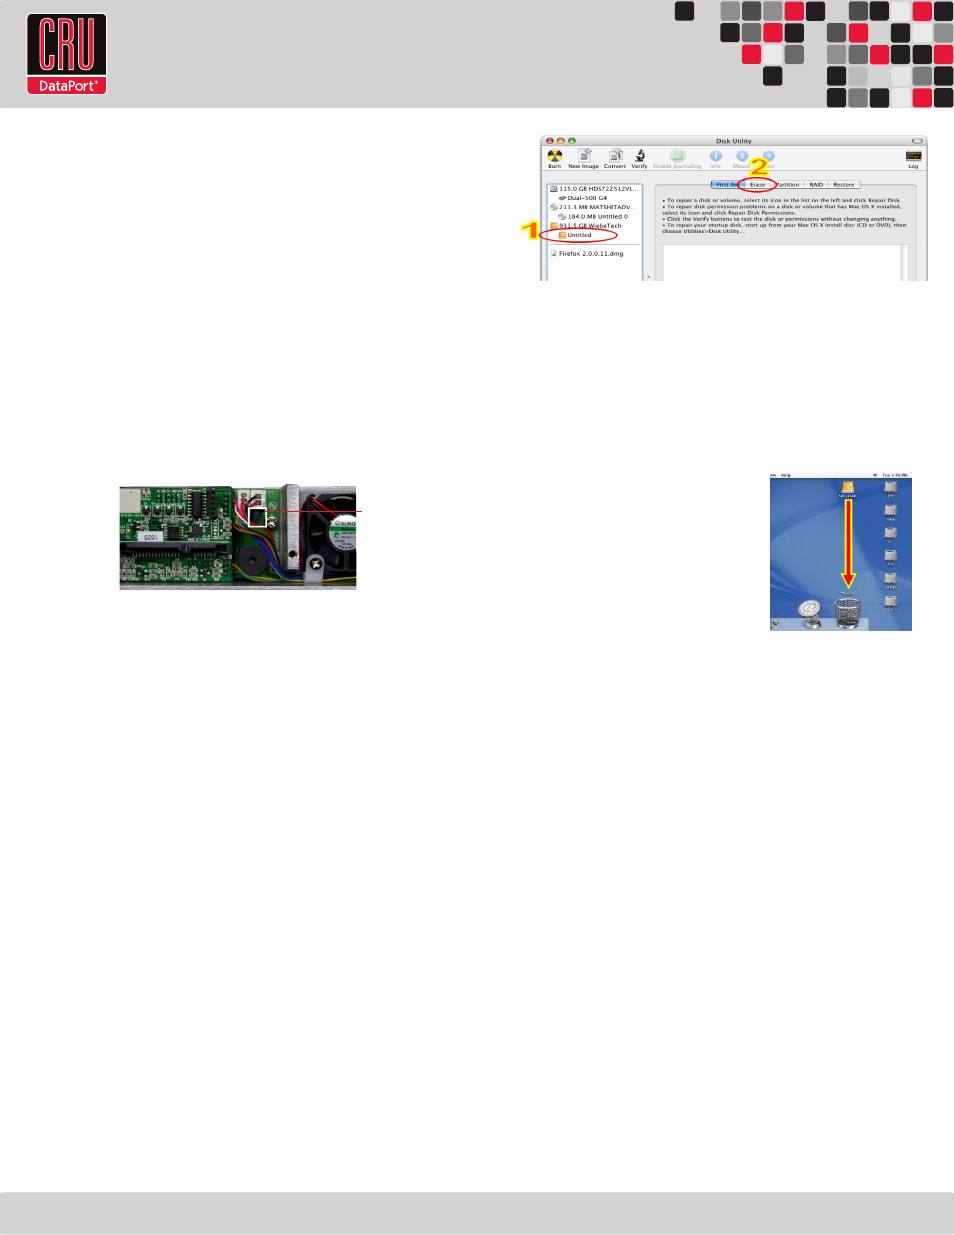
3.1.2 Formatting a Drive
To format, use Mac OS X’s Disk Utility (found in the applications
folder). The DataPort 10 Secure must have been powered on with
the Security Key present and both the Power and Encryption Ready
LEDs must be lit. See Section 2.3 for instructions on how to do so.
a. Click on the drive in the window to the left (see picture to right).
b. Click the Erase tab in the window to the right (see picture to
right).
c. Select the format type. Most users prefer Mac OS Extended
with Journaling (HFS+), which is required for compatibility with
Time Machine (OS 10.5 or newer). If you need to use your Data-
Port 10 Secure with both Mac and Windows computers, select
MS-DOS File System instead.
d. Enter a name for the new volume and then click “Erase” to start
the process.
3.1.3 Mounting and Unmounting Volumes
If the hard drive installed in the DataPort 10 Secure was previously
formatted with the correct Security Key inserted into the Mini-USB Se-
curity Key Port on the face of the receiving frame, then you can begin
using the volume right away. If the drive is unformatted, a message
will appear on the desktop saying that the disk is unreadable. You can
use OS X’s Disk Utility to easily format the drive (see section above).
Unmount the volume before powering
down the unit by dragging the volume’s
icon to the trash bin, or by selecting
the volume then pressing Command-E.
Disconnecting the unit without first un-
mounting the volume can result in data
loss (see picture to the right).
3.1.4 Creating a Boot Drive
To activate this feature, you must first install OS X on the hard drive
in your carrier. The easiest way to do this is to clone an existing sys-
tem drive using a utility such as Carbon Copy Cloner or Super Duper.
Next, go to System Preferences --> Startup Disk. A window will list
the available bootable volumes. Select the volume from which you
wish to boot. Another method is to hold down the Option key dur-
ing boot up. A screen should appear that allows you to select the
volume you wish to use. This is useful if you wish to boot from your
DataPort 10 Secure hard drive only some of the time.
3.2 Usage with Windows Operating Systems
3.2.1 Compatibility
The DataPort 10 Secure supports 2.5” and 3.5” SATA hard drives.
3.2.2 Formatting a Drive
To format, use the Disk Management utility. The DataPort 10
Secure must have been powered on with the Security Key present
and both the Power and Encryption Ready LEDs must be lit. See
Section 2.3 for instructions on how to do so.
a. Right-click on My Computer, then select Manage. The Com-
puter Management window will open.
Page 3
Jumper