Manual transmission with linelock and nitrous, Page 9 of 13 – Lingenfelter L460015297 Lingenfelter LNC-001 Launch Controller v3.02 User Manual
Page 10
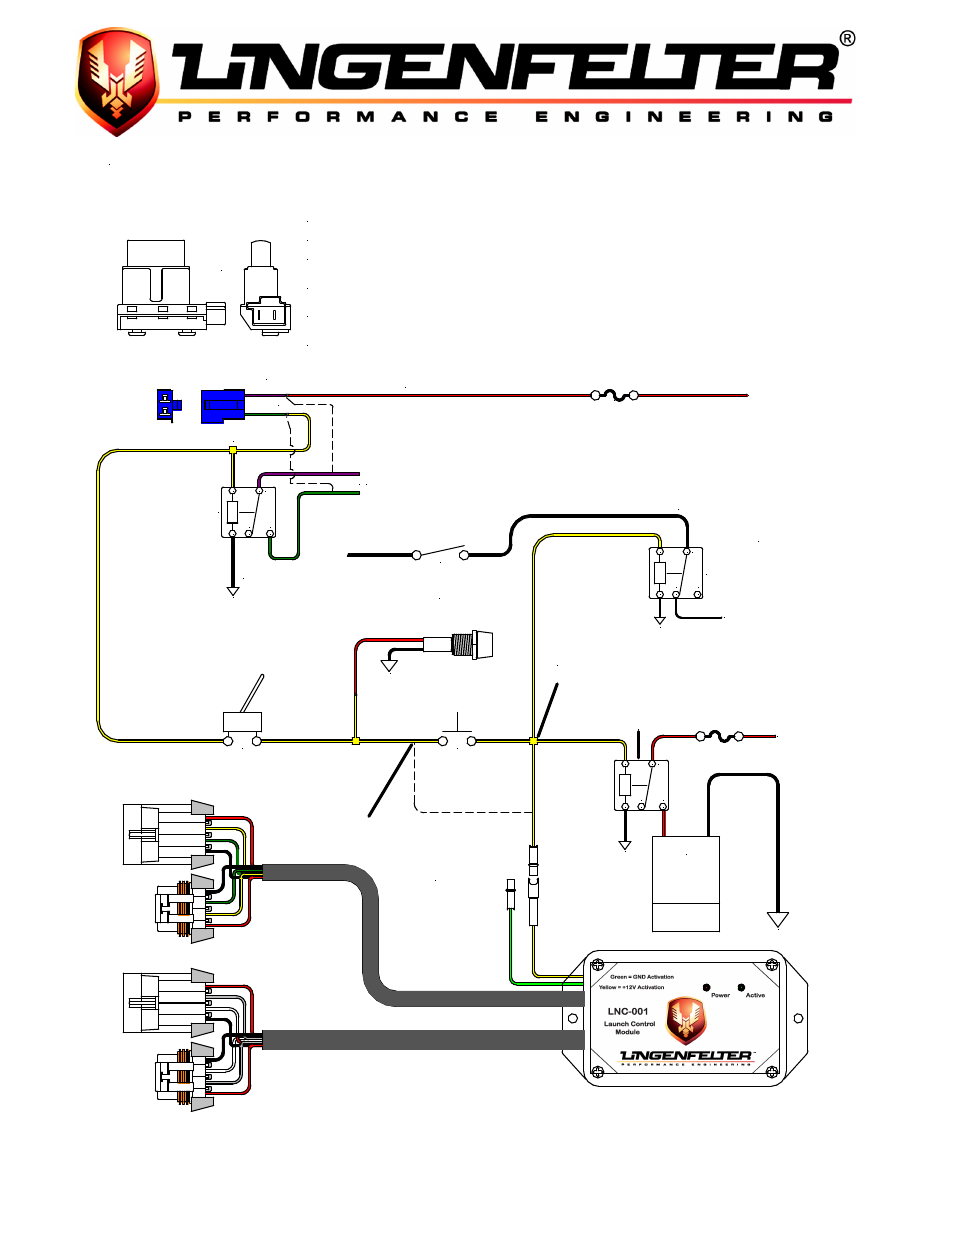
Momentary
Pushbutton
Switch
Toggle Switch
Arms Linelock &
2-Step
Fuse
20 Amp
+12 Volts
Linelock
Solenoid
Ground
Manual Transmission with Linelock and Nitrous
1
85
86
30
87
87a
C
NO
NC
Ground
Connect wires cut from CPP
Switch connector in Step 2
to Relay as shown.
2
3
4
5
6
General purpose
Automotive Relay.
5 to 40 Amp
Wire color illustrated is for 1999 TransAm
1 - Locate CPP (Clutch Position Switch) and unplug 2-wire connector.
2 - Cut wires appox. 3" back from connector.
3 - Find +12 volt Key On power source and connect to one wire of CPP connector.
4 - Splice two wires onto remaining CPP connector wire and connect one wire to #85 on Relay.
The extra wire will be used for LNC-001 Launch Controller activation.
5 - Connect terminal #86 on Relay to Ground.
6 - Connect wires cut from CPP Switch connector to Terminals #30 and #87 as shown.
Wire color may vary for model/year.
Connect LNC-001 "Activation" here to
have 2-Step Active ONLY when Linelock
momentary switch is ON.
Connect LNC-001 "Activation"
here to have 2-Step Active
any time Clutch Pedal is
depressed and Arming
Switch is ON.
85
86
30
87
87a
C
NO
NC
Fuse
20 Amp
+12 Volts
Ground
Relay can be omiited if
Linelock Solenoid draws
5 amps or less.
The "Nitrous Disable Relay" is used to disconnect the
"Wide Open Throttle" switch from the Nitrous Relay.
This allows the throttle to go wide open while the
Linelock / 2-Step is Active and the Nitrous will
remain OFF until the Linelock is released.
85
86
30
87
87a
C
NO
NC
Ground
Nitrous Disable Relay.
Cut WOT Switch wire and
Install Relay as shown.
To Nitrous Relay
Wide Open Throttle
Switch
Ground
Optional LED, On when
Arming Switch is ON and
Clutch Pedal is depressed.
Page 9 of 13