Operation, Continued, Manual lighting procedure – Desa CGCDV36PR User Manual
Page 28: Optional hand-held remote operation
www.desatech.com
116200-01L
28
6. The pilot is located by the main burner and
should not require accessing for lighting.
7. Turn gas control knob counterclockwise
to PILOT (see Figure 45).
8. Push in gas control knob all the way and
hold. Immediately light pilot by repeatedly
pressing piezo spark ignitor until a flame
appears. Continue to hold for about one
(1) minute after pilot is lit. Release gas
control knob and it will pop back. Pilot
should remain lit. If it goes out, repeat
steps 5 through 8.
• If gas control knob does not pop up when
released, stop and immediately call your
service technician or gas supplier.
• If pilot will not stay lit after several tries,
turn gas control knob to OFF and call
your service technician or gas supplier.
9. Turn on all electric power to fireplace.
10. Turn gas control knob counterclockwise
to ON.
11. This valve is equipped with a HI/LO fea-
ture. Set fireplace input as desired.
12. Close lower louver panel.
13. To leave pilot lit and shut off burners only,
turn control knob clockwise
to the
PILOT position or set selector switch in
the OFF position.
OPERATION
Continued
O
F
F
PILOT
LO
IH
O
N
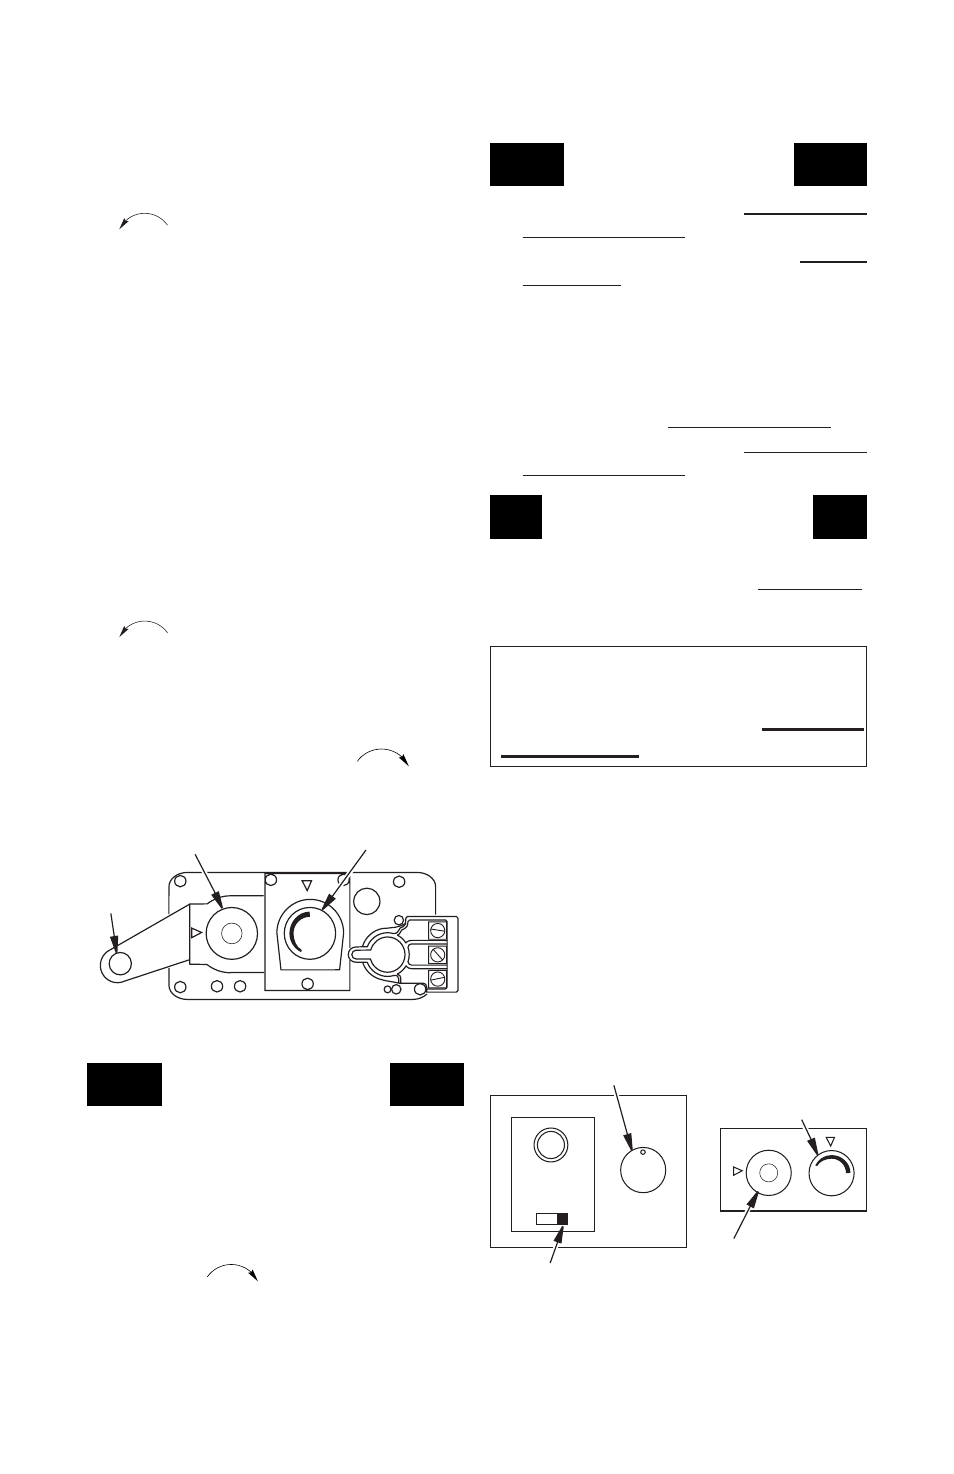
Figure 45 - Control Valve
Piezo
Ignitor
Gas Control Knob Variable Control Knob
TO TURN OFF GAS
TO APPLIANCE
1. Open lower louver panel.
2. Set selector switch in the OFF position to
prevent draining battery.
3. Turn off all electrical power to appliance
if service is to be performed.
4. Push in gas control knob slightly and turn
clockwise
to OFF.
5. Close lower louver panel.
MANUAL LIGHTING
PROCEDURE
1. Remove glass door (see Removing/Re-
placing Glass Door, page 25).
2. Follow steps 1 through 8 under Lighting
Instructions, page 27.
3. Press gas control knob and light pilot with
match.
4. Keep gas control knob pressed in for 30 sec-
onds after lighting pilot. After 30 seconds,
release gas control knob. Follow steps 9
through 12 under Lighting Instructions.
5. Replace glass door (see Removing/Re-
placing Glass Door, page 25).
OPTIONAL HAND-HELD
REMOTE OPERATION
Note: All remote control accessories must
be purchased separately (see Accessories,
page 42). Follow instructions included with
remote control.
NOTICE: You must light the pilot
before using the hand-held re-
mote control unit. See Lighting
Instructions, page 27.
After lighting, let pilot flame burn for about
one minute. Turn control knob to ON position.
Adjust flame adjustment knob anywhere be-
tween HI and LO. Slide selector switch to the
REMOTE position (see Figure 46).
Note: Burner may light if hand-held remote
was on when selector switch was last turned
off. You can now turn burner on and off with
hand-held remote control unit.
IMPORTANT: Do not leave selector switch in
the REMOTE or ON position when pilot is not
lit. This will drain the battery.
OF
F
PIL
O
T
LO
IH
ON
OFF
REMOTE
ON
OFF
O
N
Blower Control Knob (Optional Accessory)
Variable Control Knob
Selector Switch in
Remote Position
Gas Control Knob
in ON Position
Figure 46 - Setting Selector Switch, Gas
Control Knob and Variable Control Knob
for Remote Operation