Installation – Glow-worm Clearly Solar Cylinders User Manual
Page 21
0020115479_03 - 10/12 - Glow-worm
- 19 -
INSTALLATION
9.6.1
flurocyl
2
hot water flow rates at 60 °C
80
4
5
60
3
40
2
Inlet pressure (bar)
Flo
wr
at
e (l/
min
)
20
1
0
The displayed flow rates apply to installations in which the cold
water supply is of appropriate dynamic pressure. If the static
water pressure is less than 1 bar, contact Glow-worm.
9.6.2
Mounting the safety assembly
Risk of damage to the cylinder as a resultof excess
pressure! Excess pressure can cause the cylinder to
burst. Make sure that there is no stop valve installed
between the safety assembly and the cylinder.
9.6.3
safety assembly
1
2
3
4
5
7
6
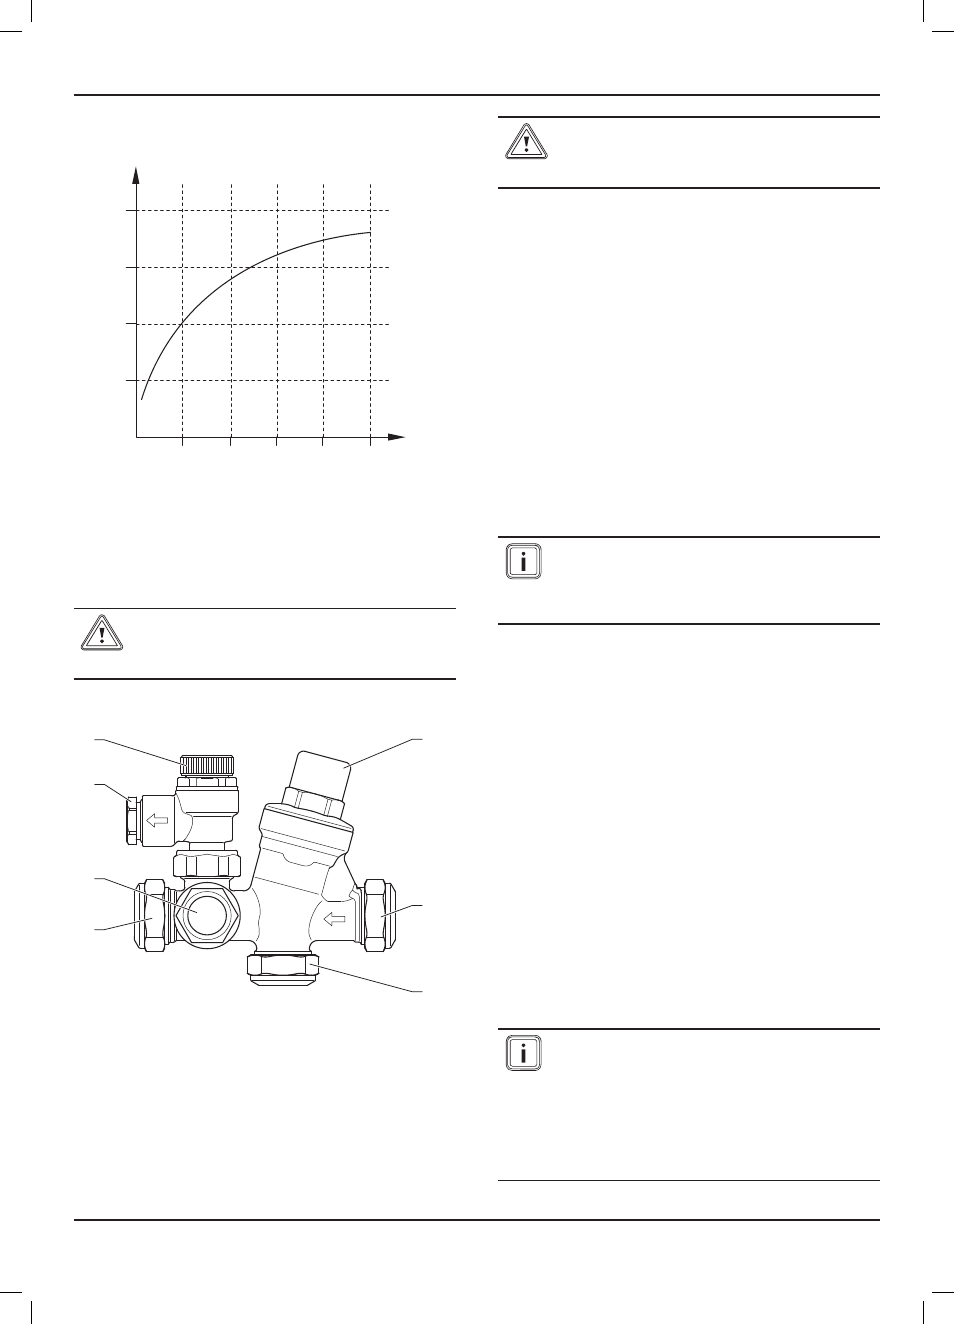
Key
1 Pressure limiting valve with line strainer
2 Cold water connection
3 Pressure-controlled cold water connection
4 Cylinder connection
5 Hot water expansion vessel connection
6 15 mm expansion relief valve connection
7 expansion relief valve
During the installation process, position the valves so that you
are able to connect the 15 mm connection (6) of the expansion
relief valve (7) with the tundish. Note the direction of flow, which
is marked on the safety assembly with arrows. Do not install the
valve with the relieve valve opening upside down.
Risk of damage to the cylinder as a result of excess
pressure! Excess pressure can cause the cylinder to
burst. Make sure that the expansion relief valve outlet
is not covered or closed.
- Mount the discharge pipe of the expansion relief valve with
a constant slope to the outside. The discharge pipe must
finish at a safe and visible point where there is no danger of it
freezing up and where it poses no risk of injury to persons.
- Actuate the expansion relief valve regularly to prevent
calcification.
- Connect the cylinder to the cylinder connection (4).
- For the pipe from the main stop valve of the building to the
cylinder, use copper piping with a diameter of at least 22 mm
to ensure that the cylinder is as efficient as possible. This
is particularly important for installations with a pressure-
controlled cold water connection (3).
- Mount a drain valve in the cold water pipe at the lowest point
between the cylinder and the safety assembly.
- Mount the safety assembly in the cold water pipe on the
cylinder.
If you mount the safety assembly above the cylinder,
you do not need to drain the cylinder in order to
maintain the safety assembly. Make sure there is
sufficient space for maintenance and the connection of
the discharge pipe from the expansion relief valve.
When the discharge pipes are connected, the expansion relief
valve may not be more than 600 mm away from the temperature/
pressure relief valve.
9.6.4
Mounting the expansion vessel
The Glow-worm solar cylinder is delivered with an external
expansion vessel. Connect this expansion vessel to the installed
safety assembly as follows:
- Connect the expansion vessel with the safety assembly via a
copper pipe or suitable hose line. Make sure the expansion
vessel is supported sufficiently.
- Use the supplied wall bracket if you want to mount the
expansion vessel to a wall.
- If necessary, establish the connection to the cold water
connection (3) with pressure compensation of the safety
assembly.
Depending on the fittings used and the type of the draw-off
points, it may be necessary to install a backflow preventer in the
pressure-controlled cold water connection.
In regions with high water pressure (4 bar or more),
you can also connect the mixer tap for a bath or
shower to the cold water connection with pressure
compensation (3) of the safety assembly. This ensures
that the hot and cold water supply to the mixer tap
have the same pressure. You should install the cold
water supply for all other connections using a T-piece
before the safety assembly in the cold water pipe to
the cylinder.