Menu options, Entering and exiting menu mode, Selecting the menu parameter to change – Eagle Tree EagleEyes FPV Station User Manual
Page 4: Changing the value of the selected menu item
Copyright © 2010-2014 Eagle Tree Systems, LLC
http://www.eagletreesystems.com
Page 4
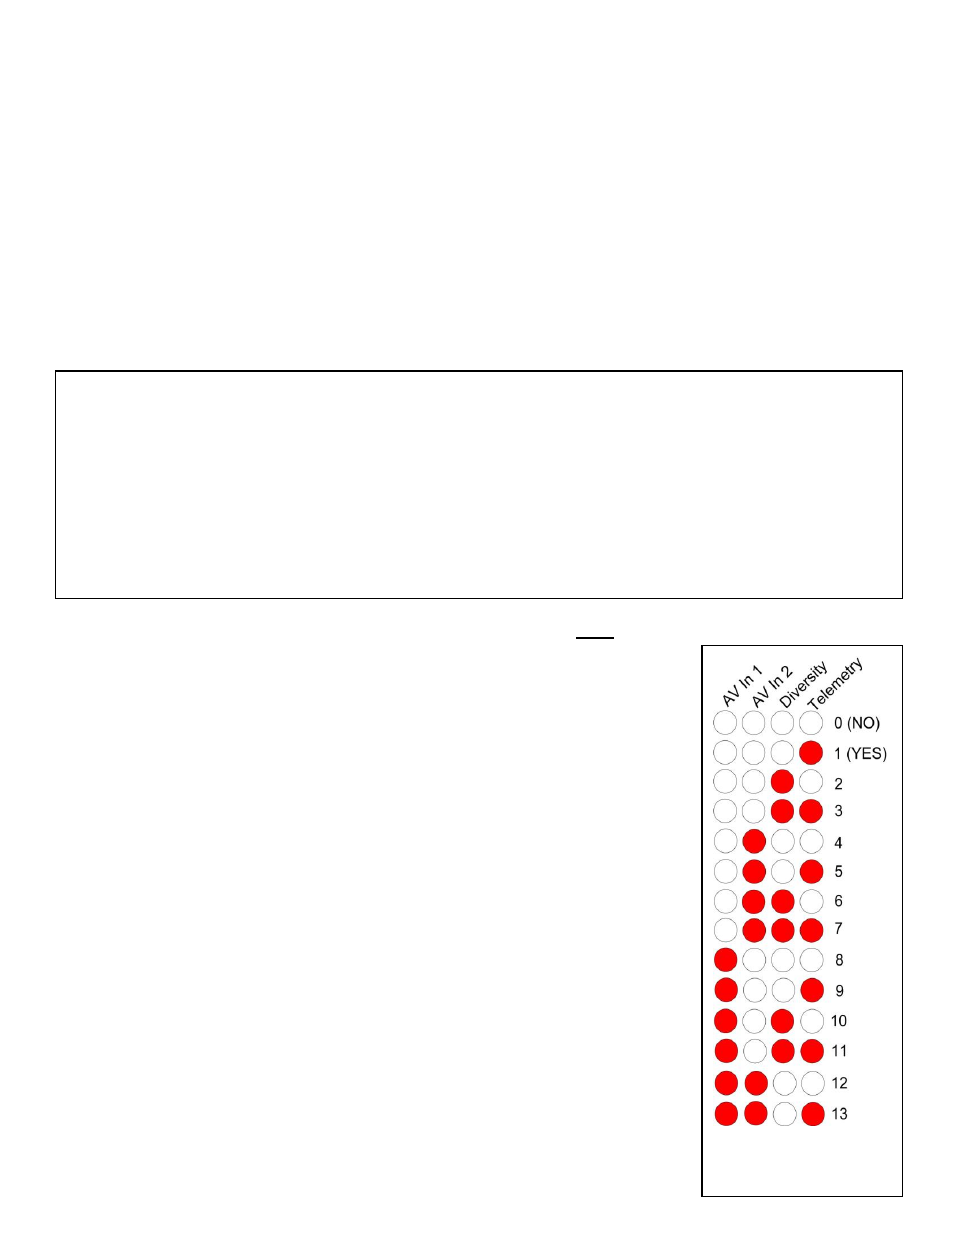
Figure 4: Menu Item
Values on LEDs
1.
Low Battery Alarm Enable - this menu item lets you select whether the EagleEyes make a periodic beep when the voltage powering the
EagleEyes (at the “barrel” connector) is below the programmed voltage. The options for this menu are either “No” or “Yes.” If this
parameter is set to “Yes” the alarm will sound when the present voltage is less than the minimum voltage (programmed below).
2.
Low Battery Alarm Integer – This menu item lets you set the integer portion of the minimum voltage for alarm. For example, if you
wanted to set a minimum voltage of 11.6V, you would set this parameter to “11”.
3.
Low Battery Alarm Fraction - This menu option lets you set the fractional (tenths) portion of the minimum voltage for alarm. For
example, if you wanted to set a minimum voltage of 11.6V, you would set this parameter to “6”.
4.
Diversity Sensitivity - This menu item lets you set the sensitivity of the diversity function. The lowest sensitivity is 1, and the highest is
10. The default setting is 5. Please see the Diversity section below for more information.
5.
Diversity Switch Chirp - This menu item lets you select whether the EagleEyes beeps when the diversity function switches between video
channels. The options for this menu are either “No” or “Yes.”
Figure 2: Built-in Menu Items, accessed with the pushbuttons (use the built-in menus only if the OSD-Pro airborne system is not used)
If Futaba style servo plugs are used, the plugs are polarized by the EagleEyes board – the small tab on the Futaba plug forces the plug to be
connected in the correct orientation. If JR style servo plugs are used, you must ensure the correct polarity is achieved. The legend on the EagleEyes
board indicates the correct polarity. See the “Antenna Tracking” section below for more information.
NOTE: if you see “video lines” or similar noise after connecting your servos, please see the troubleshooting section below.
Adjustment Potentiometers – The two blue potentiometers adjust the secondary A/V input levels. These are used to attempt to match the
secondary A/V inputs with the primary A/V inputs, when using the Diversity function. A small screwdriver is required to rotate the potentiometers.
See the “Diversity Function” section below for more information. CAUTION: rotate the potentiometers gently, and do not rotate the
potentiometers past their stops. They do not rotate 360 degrees! Forcing the potentiometers past their stops could damage the EagleEyes
board or other equipment.
Expansion Port – the expansion port is presently unused. Planned features for the port include support for our PowerPanel
TM
LCD display. Please
let us know if you want this supported, or if you have other suggestions!
Configuring the EagleEyes with the Built-in Button Menus
The EagleEyes has a built-in menu system for setting up features. The menus use the four LED’s and the two pushbuttons. The four LED’s
indicate the present menu parameter being configured, as well as the present value for that parameter.
NOTE: If you are going to be using the EagleEyes with the Vector or OSD Pro system, do not use the built-in menus to configure the
EagleEyes. Use the Vector or OSD Pro’s onscreen menus, described in the “Configuring the EagleEyes with
the Vector or OSD Pro Onscreen Menus” section below. The onscreen settings take precedence over the built-
in menu settings when the Vector or OSD Pro is in use.
Menu Options
There are five built-in menu parameters that can be configured, as shown in Figure 2:
Entering and Exiting Menu Mode
To enter menu mode, hold the SELECT/MENU button down for about two seconds, until two beeps are heard.
To exit menu mode, hold the SELECT/MENU button down again for two seconds, until two beeps are heard.
Selecting the Menu Parameter to Change
The present menu parameter is indicated by the state of the four LEDs on the EagleEyes. Figure 3 indicates
which menu parameter is selected for editing, based on the state of the four LEDs. When menu mode is
entered, the first parameter (Enable Low Battery Alarm?) will be selected.
The menu parameter selected will be shown on the LEDs for about 2 seconds, as shown in Figure 3. Then, the
present value of that menu item will be shown, as indicated in Figure 4.
To select a different menu parameter for editing, just tap the SELECT/MENU button, and the next menu item
will be selected for editing. The LEDs will indicate which menu item is being edited for about 2 seconds, then
the present value of that menu item will be displayed.
Changing the Value of the Selected Menu Item
Figure 4 indicates how the present value of the selected menu item is displayed.
Note that “No” is indicated by no LEDs illuminated, and “Yes” is indicated by one LED illuminated.
To increase the value of a menu item, tap the MUTE/ADVANCE button. Then, the value will be incremented
by one, and the new value will be displayed. Once the value reaches the maximum value supported by that