The antenna tracking function, What the tracking function does, How to set up the antenna tracking hardware – Eagle Tree EagleEyes FPV Station User Manual
Page 12: How to configure the antenna tracking function
Copyright © 2010-2014 Eagle Tree Systems, LLC
http://www.eagletreesystems.com
Page 12
EagleEyes Main Onscreen Menu (OSD Pro)
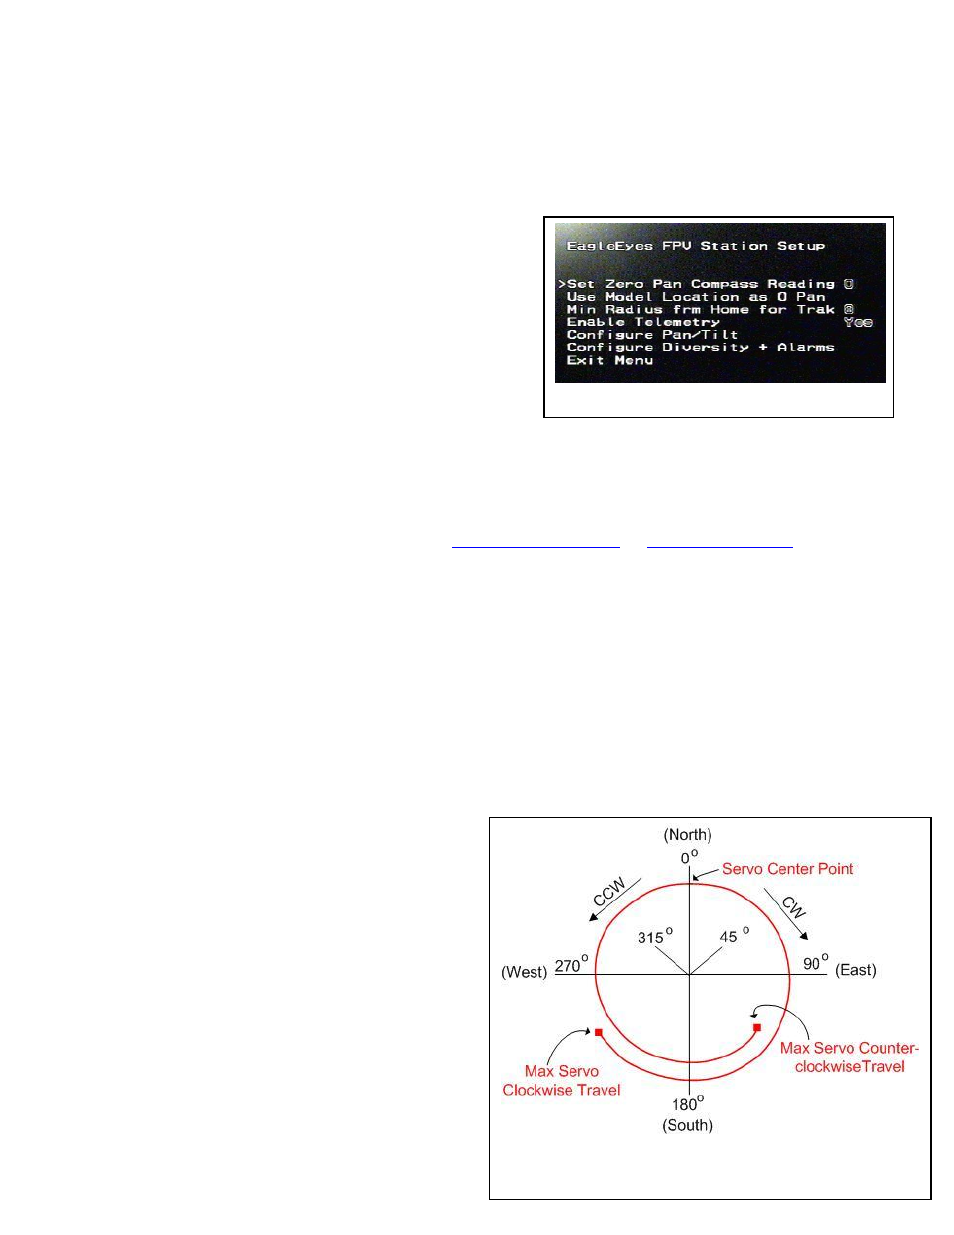
Figure 8 – Pan Angles for tracker (this one rotates more than
360 degrees)
Configuring and Using the EagleEyes with the OSD PRO
This section describes using the EagleEyes with the OSD PRO. If you are using the EagleEyes with the Vector, see the prior
section, starting on page 7.
All of the EagleEyes features can be configured using the OSD Pro Onscreen menus. Please see the OSD Pro instruction manual for information on
how to use the Onscreen menus with either your radio sticks, or with your computer. Note: that the EagleEyes must be connected to your video
receiver, and the EagleEyes telemetry LED must be blinking, for Onscreen configuration to work!
After invoking the OSD Pro Onscreen menus, select the “Configure EagleEyes
Station” item from the main menu. Then, the EagleEyes main setup menu will
appear, as shown in Figure 5. The additional EagleEyes Onscreen menus are
described below, in Figure 6 and Figure 7.
The Antenna Tracking Function
This section describes the antenna tracking function of the EagleEyes ground
station. This function requires the OSD Pro airborne system, and a servo based
antenna panning or pan/tilt mount (tracker).
IMPORTANT: please read through this entire section before attempting to calibrate your tracker. Calibration is relatively simple as long as
you understand how the calibration procedure is done.
What the Tracking Function Does
The tracking function points a pan/tilt capable antenna tracker directly towards your model, based on the position of the model in relation to home.
The EagleEyes drives the pan and (optionally) tilt servo of your tracker. The EagleEyes is easily calibrated to work with virtually any type of servo
based antenna tracker. Some sources for pan/tilt antenna mounts a
an
How to Set Up the Antenna Tracking Hardware
The Pan servo, and optionally the tilt servo, of your pan/tilt mount are connected to the EagleEyes pan and tilt servo outputs, as described in the this
“Connections” section above. The EagleEyes board is capable of providing a maximum burst current of approximately 5 amps to the servos,
dependent on the capabilities of your power supply. Caution: when a tracker is being used, the EagleEyes printed circuit board, especially the
center of the board, can become hot to the touch! The maximum continuous current available to the servos depends on the input voltage, as well
as the capability of your power supply. Higher input voltages cause the on-board regulator to produce more heat. If the regulator becomes too hot,
it will shut off briefly (for about 20 seconds) and then start again. Note that the rest of the EagleEyes functionality will not shut off - only the
power to the servos. With the standard sized servos used for typical pan/tilt trackers, there should never be a regulator shutoff, even at the maximum
input voltage of 14 volts. If your tracker uses very large servos, and they are constantly under heavy load, the regulator may shut off briefly at
higher input voltages. If this occurs, see the Troubleshooting section below.
How to Configure the Antenna Tracking Function
There are two ways to configure and calibrate the Antenna Tracking function – on the PC, using our software, or using the on-screen OSD Pro
menus, your radio sticks, and a video display. While the two methods of calibration are similar, calibration using the PC is generally much easier to
do and more precise, but the on-screen method is provided for field
calibration without a laptop.
Before using either calibration method, you will need to confirm that the
EagleEyes is receiving telemetry data from the OSD Pro. If telemetry is
being received, the EagleEyes “Telemetry” LED will be flashing at about
2 blinks/second. Please see the troubleshooting section if this is not the
case.
With both calibration methods, the pan and tilt functions of your tracker
are calibrated slightly differently. For pan calibration, two or more
angles can be calibrated, for maximum accuracy and flexibility. For tilt
calibration, only the highest and lowest points are calibrated.
Information for Calibrating Pan Angles (both
calibration methods)
To calibrate the pan on either the PC or on-screen menus, the first step is
to make sure you can physically measure your tracker’s pan angle, using a
compass, (with the tracker positioned so that the pan servo center point is
pointing toward magnetic north), by installing a paper compass rose