Carburetor adjustment, D. carburetor adjustment -19, Maintenance and repair instructions – Ryobi 310BVr User Manual
Page 18
Attention! The text in this document has been recognized automatically. To view the original document, you can use the "Original mode".
MAINTENANCE AND REPAIR INSTRUCTIONS
8. Place heat shield/muffler on a flat, stable surface with
the heat shield facing down. Reinstall the spark
arrestor by pressing it into the recessed hole in the
muffler. Make sure it fits tightly against the muffler
and is not raised up, bent, or wrinkled once in place.
9. Pick up the unit. If necessary, align muffler bolt holes
with the bolt holes in heat shieid. Insert muffler
mounting boits into holes of heat shield and through
the muffler.
10. Place heat shield/muffler on a flat, stable surface with
the heat shield facing down. Place exhaust gasket
over bolts sticking through the muffier and on top of
the spark arrestor (Fig. 33).
11. Hold heat shield/muffler with finger over the exhaust
gasket to keep it in place. Turn over and align boits
with boit holes in the engine. Push bolts into the
engine hoies and reiease gasket once bolts are
started. Do not tighten bolts completely.
12. Reinstall four (4) screws to attach top heat shield to
bottom heat shield.
13. Tighten muffler mounting bolts.
14. Reassemble the housing unit. Reaiign the two
housing units and screw holes. Make sure all wires
and other parts are completeiy within the housing
units and are not crimped, pinched, or sticking out.
Reinstall the 10 screws.
CARBURETOR ADJUSTMENT
NOTE: Careless adjustments can seriously damage
your unit. An authorized service dealer should
make carburetor adjustments.
Check Fuel Mixture
Old and/or improperly mixed fuel is usually the reason
for the unit not running properly. Drain and refill the tank
with fresh, properly mixed fuei prior to making any
adjustments. Refer to Oil and Fuel Information, Pg. 12.
Clean Air Filter
The condition of the air filter is important to the
operation of the unit. A dirty air filter will restrict air flow
and change the air/fuel mixture. This is often mistaken
for an out of adjustment carburetor. Check the condition
of the air filter before adjusting the idle speed adjuster.
Refer to Air Fiiter Maintenance Pg. 15.
Adjusting the Carburetor
If after checking the fuel mixture and cieaning the air
fiiter the engine stiii will not idle, adjust the idle speed as
follows.
1. Make the initial settings with the engine stopped.
These initial settings should allow you to start and
warm up the unit before making the final adjustments.
A
WARNING:
This unit wiii need to be running
during idle speed adjustment. Wear
protective clothing and observe all safety
instructions to prevent serious personal injury.
Do not set unit on any surface except a clean,
hard area while starting or performing any
adjustments. Debris such as gravel, sand,
dust, grass, etc. could be picked up by the air
intake and thrown out by the discharge
opening, damaging unit, property, or causing
serious injury to bystanders or operator.
initial Idle Speed Setting
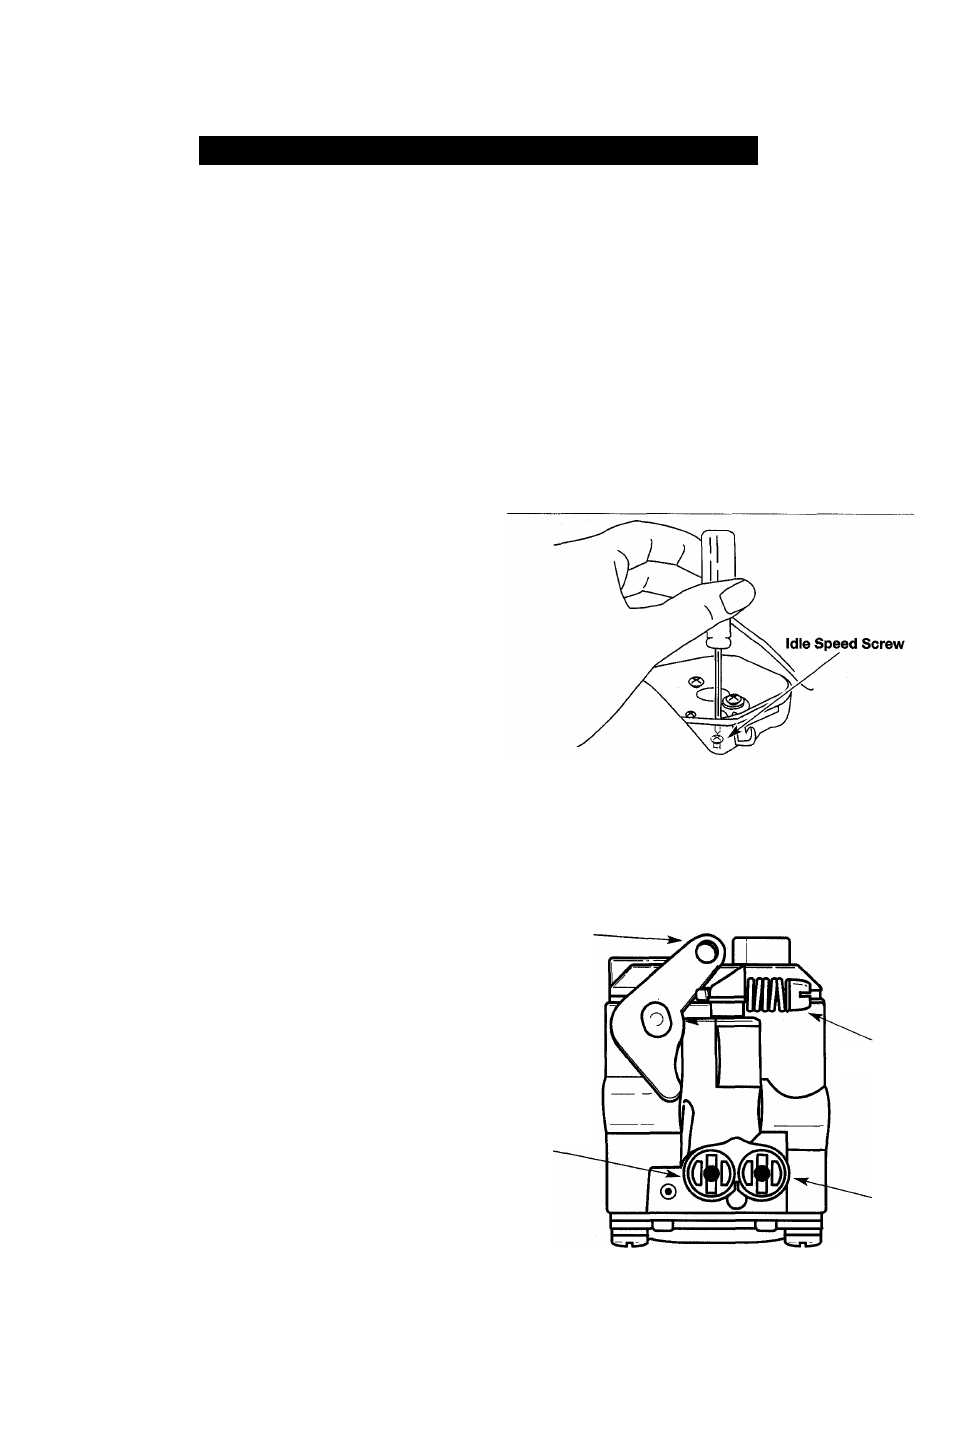
2. Remove the air filter cover and insert a screwdriver
through the opening in the air filter base (Fig. 35).
-------------------------------------------- Fig. 35-------------------------------------------
3. Back the idle speed screw (Fig. 36) out
(counterclockwise) until it does not contact the
carburetor throttle lever. Then turn the screw in
(clockwise) until it just begins to move the throttle
lever; then continue turning for 2 more full turns.
Throttle
Lever
Idle Speed
Screw
Idle Speed
Mixture
Needle
High Speed
Mixture
Needle
Fig. 36
18