A. guide bar and chain, A guide bar and chain, General maintenance – Poulan 2100 User Manual
Page 16
Attention! The text in this document has been recognized automatically. To view the original document, you can use the "Original mode".
GENERAL MAINTENANCE
A good maintenance program of regular inspection
and care wiU increase the service life and help to main
tain the safety and performance of your saw
• Check saw for loose bolts, screws, nuts, and
fittings regularly Loose fastened can cause an
unsafe condition as well as damage to your saw
• Make all adjustments or repairs (except car
buretor adjustments) with:
— spark plug wire disconnected.
— engine cool as opposed to a saw that has just
been run.
A
WARNING
Have all chain saw service performed by a quali-
Red service dealer other than the items listed in
the maintenan<^ section of this manuaL
A. GUIDE BAR AND CHAIN
Increase the service life of your Guide Bar and
Chain Ъу:
~ Usiagthe sawproperly and as recommended in this
mani^.
— Maintaining correct chain tension, page 8,
— Proper lubrication, page 10.
— Regular maintenance as described in this section.
1. CHAIN MAINTENANCE
• Sharpen the chain when:
— wood chips are small and powdery.
Wood chips made by the saw chain should be
about the size of the teeth of the chain.
— saw has to be forced through the cut.
— saw cuts to one side.
I CAUTION: ! Always wear gloves when handling the
chain. The chain can be sharp enough to cut you
even though it is too dull to cut wood.
a. SHARPENING INSTRUCTIONS
Items required:
Gloves
Flat File
5/32” Diameter File
Depth Gauge
6” Fde Holder
1.
) Stop the engine and disconnect the
spark plug.
2.
) Adjust the chain for proper tension. Page 8.
3.
) Work at the midpoint of the bar, moving the
chain forward by band as each cutter is filed.
4.
) Sharpen Cutters.
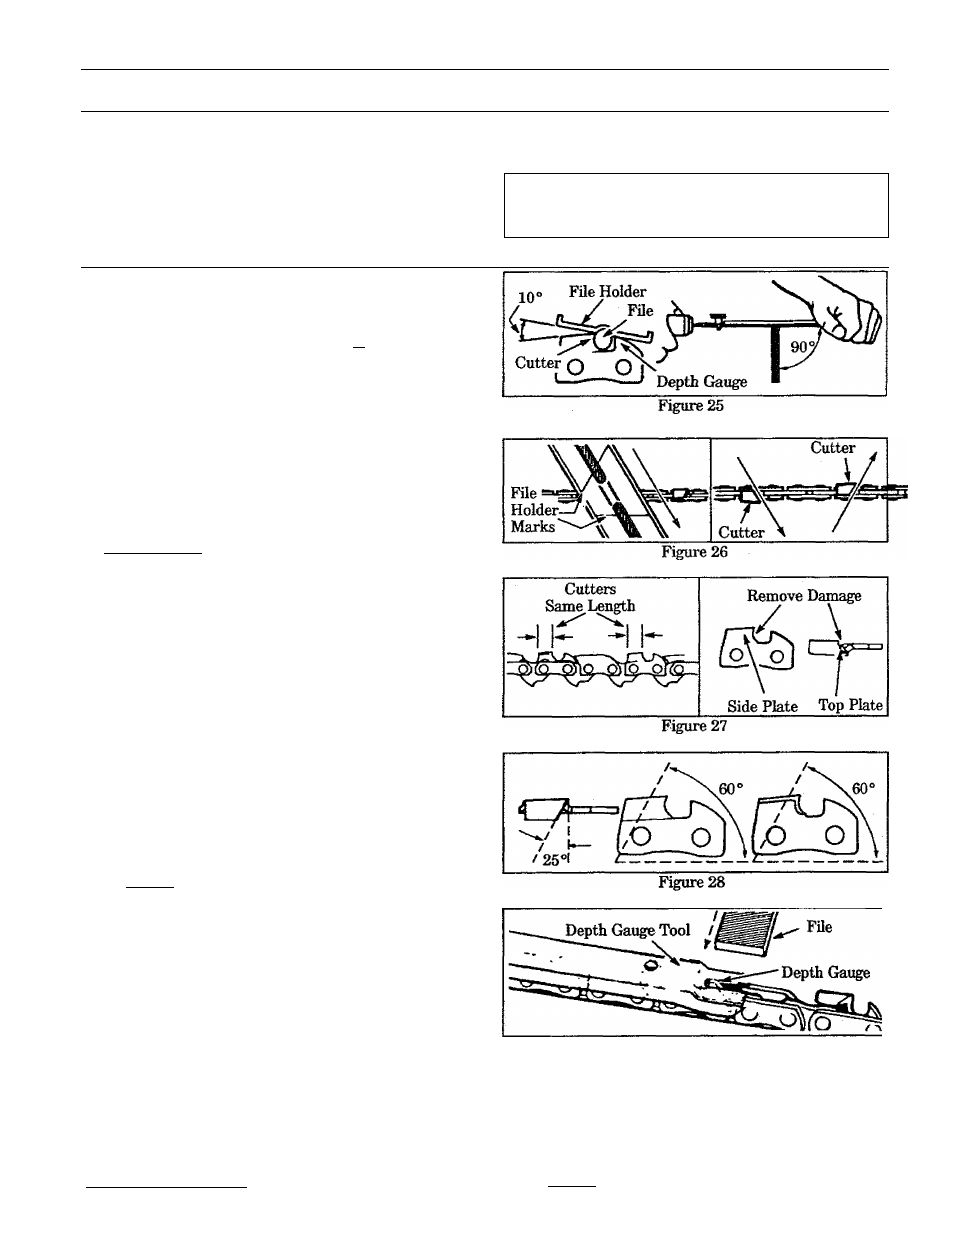
a. ) Position the file holder level at a 10®
angle on the top plate of the cutter and
depth
Figure 25 .
b. ) Ahgn the 25° file holder marks with the
bar and parallel to the center of the chain.
Figures 26 & 28 .
NOTE: If your file holder has a 30° mark, disre
gard this mark and file at a 25° angle.
c. ) File from inside toward outside of cutter,
straight across on forward stroke in one
direction only. Use 2 or 3 strokes per cut
ting edge. Figure 27.
d.
) Keep all cutters the same length. Fig
ure 27.
e. ) File enough to remove any damage to the
cutting edges (side plate and top plate) of
the cutter. Figure 27 ,
£) File chain to meet specifications shown in
Figure 28,
A
WARNING
”
Maintain the proper hook angle according to the
manufacturers speciRcation for the chain you
are using. Too much hook an^e will increase the
chance of kickback which can result in serious
ццшу. Figures 28 & 30 .__________________________
Figure 29
5.) Correct Depth Gauges
a.) Place depth gauge tool over each cutter
depth gauge. Figure 29 .
h.) Fife depth gauge with a flat file until it is
A
gauge with a flat file. Figures 29 & 30.
NOTE: The veiy top of the depth gai^ should be
flat with the front half rounded off with a flat file.
-
16
-