Ur»'oiv!ep responsirpljtlfs, Engine coounc fwis (stt ftg it, Clean air screen (see fig. 13 – Poulan 168191 User Manual
Page 18
Attention! The text in this document has been recognized automatically. To view the original document, you can use the "Original mode".
*: Ur»'OIV!EP RESPONSIRPlJtlFS
IR
FILTER
{S
g
6
Fig
3ur efiaine will r
12)
( U h » •■j. /!, iJ !.-U ‘ !• f ■ r h'}« r
Clean the foam pre-cleaner after every 25 hours of opera-
« f
i'f
I,
fUCi
!i if •! C'l ti
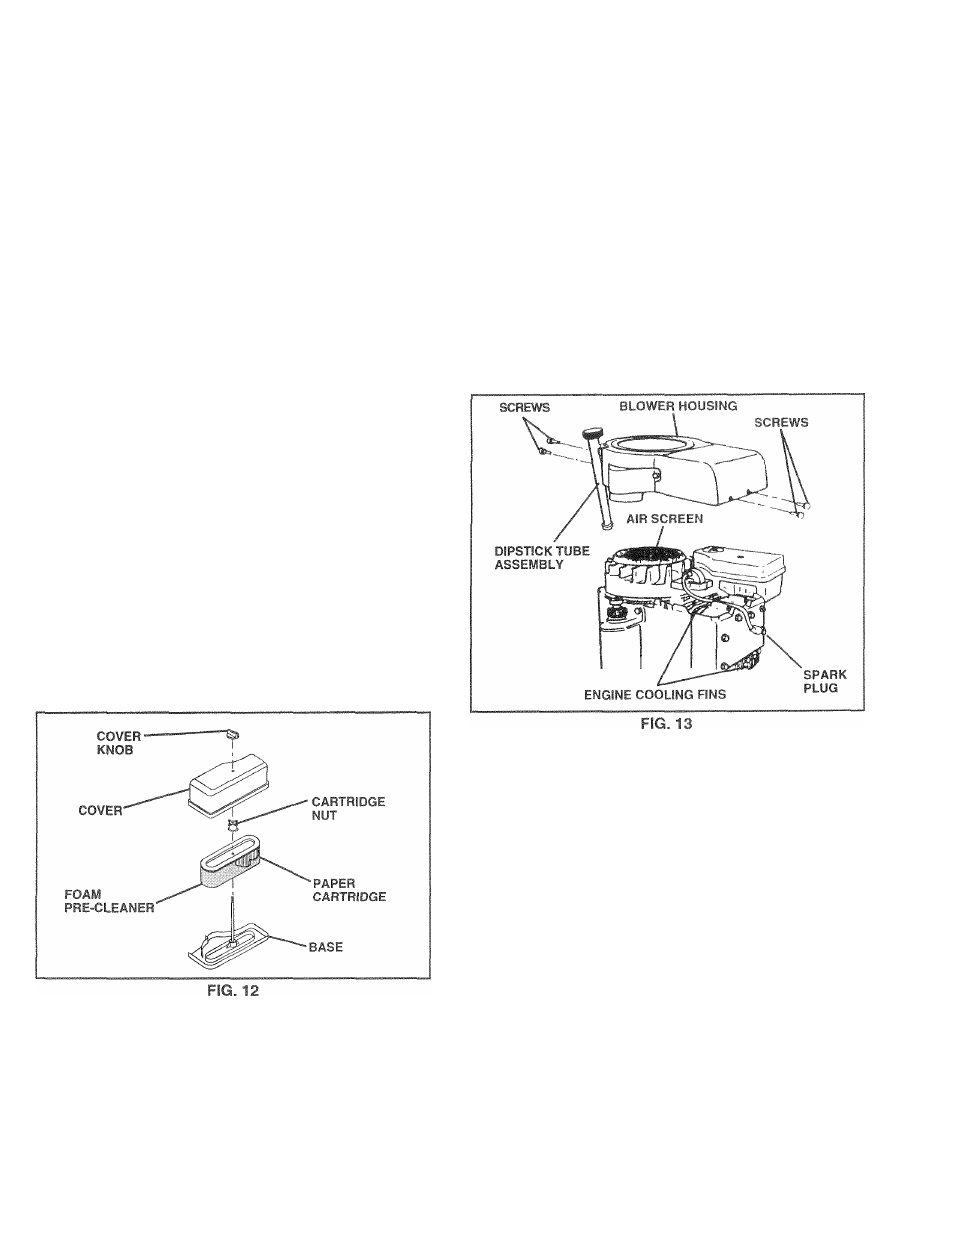
'•r; ' r< "r< -I{ (.1 „< < <► ,-Mr-i ,ii..re .-rif 11 ij I Pfcin j i h knobisi a,l•^ ' '«ver H . -FR v ILE FftE-n b/^rJER C Ik'i^ fr.an pf€ r-iearer off ‘.atinilqc wasn It in iiquia detergent ana water. Squeeze it dry in a clean cloth. Saturate it in engine oil. Wrap it in clean, absorbent If very dirty or damaged, replace pre-cleaner. Reinstall pre-cleaner over cartridge. Reinstall cover and secure with knob(s). TO SERVICE CARTRIDGE Remove cartridge nut. Carefully remove cartridge to prevent debris from en Clean cartridge by tapping gently on flat surface. If very Reinstall cartridge, nut, precleaner, cover and secure with knob(s). IMPORTANT: PETROLEUM SOLVENTS, SUCH AS KEROSENE, ARE NOT TO BE USED TO CLEAN THE THE CARTRIDGE. DO NOT OIL CARTRIDGE. DO NOT USE PRESSURIZED AIR TO CLEAN OR DRY CARTRIDGE. CLEAN AiR SCREEN (See Fig. 13| Air screen must be kept free of dirt and chaff to prevent I It «as. ENGINE COOUNC FWiS (Stt Ftg iT| ufiy t‘j I dill or oil t.mii fer.yiue ‘“Olii g in' to pre 'ent er«j ne dariiagp ff- -iri cn'erh-ating • Remm«^ c r f r o m biow^i hnu=nng 'nd iirt hou^-ing • Cover oil fill opening to prevent entry of dirt. • Use compressed air or stiff bristle brush to thoroughly clean engine cooling fins. • To reassemble, reverse above procedure. 18
doth and squeeze to remove excess oil.
tering carburetor. Clean base carefully to prevent
debris from entering carburetor.
dirty or damaged, replace cartridge.
CARTRIDGE. THEY MAY CAUSE DETERIORATION OF
engine damage from overheating. Clean with a wire brush
or compressed air to remove dirt and stubborn dried gum
ahd dipstii.k tube dosembly off engine.