Winding the iobbin, How to wind the bobbin evenly, Neidli and thread never – SINGER W217 User Manual
Page 5
Attention! The text in this document has been recognized automatically. To view the original document, you can use the "Original mode".
NEiDLI AND THREAD
Never
use
a benf needle, nor cxie with o blunt point, since this couses imper
fect stiJehes ond moy couse the needle to breok.
Unless the needle is in
CLEAR
TO
THE
TOP,
FLAT
SIDE
TOWARD
THE
BALANCE
WHEEL,
the
machine will be out of "time", ond skipped or imperfect stitches will result
end needles moy break.
The size of the needle should conform- to the size of the thread ond both should
be suiloble to the material. Use a needle sufficiently lorge to permit the
threod to poss freely through the eye. In general sewing, use the some size
threod in the bobbin as used on top. For detoiled informotion consult follow
ing chort,
NEEDLE AND THREAD SIZES (USE 1 5 x 1 NEEDLE ONLY) CHART
Sizes & Grades
of Needles
( Medium-Fine)
14
(Medium )
16
( Light. Heovy)
18
(Medium-
Heavy)
19
(Heovy)
Type of Fobric
ond
“ ..........
Work to be Done
Cotton
Silk
M edium light.weight & sum m ertim e fobnes.
For house dresses. children's dresses
80
to
100
0
woshoble cotton dress, oprons, light-weight
cur tom s.
Twist
Dress silks ond coM on. iighl-weight woolens,
draperies, fobric furnishings. For genero!
60
to
80
A & B
household sewing, fine m en’s shuts, sm ocks,
window droperies and fobric decorations.
Twist
Heavy cretonne, m odros, m usfm , brocodes
40
C
and, qu’lts.
For m en’s work shirts, sm ocks ond oprons.
heovy quilling ond fobne furnishings.
60
Twist
Heavy woven cooling, light-weight convos.
bed ticking, upholstery ond owning m ote-
30
D
rials, slipcover fobrics.
For work or sports uniform s, suits m ode
of strong linen or cotton fobrics. ownm g
40
Twist
slip covers ond m ottresses.
______
Heavy woven suiting, coating duck, tick,
ing. drilling, convos and socking, for heovy
10
to
30
E
wash uniform s, bedding supplies for hospi-
lois ond com ps.
Twist
SIZE OF THREAD
Linen
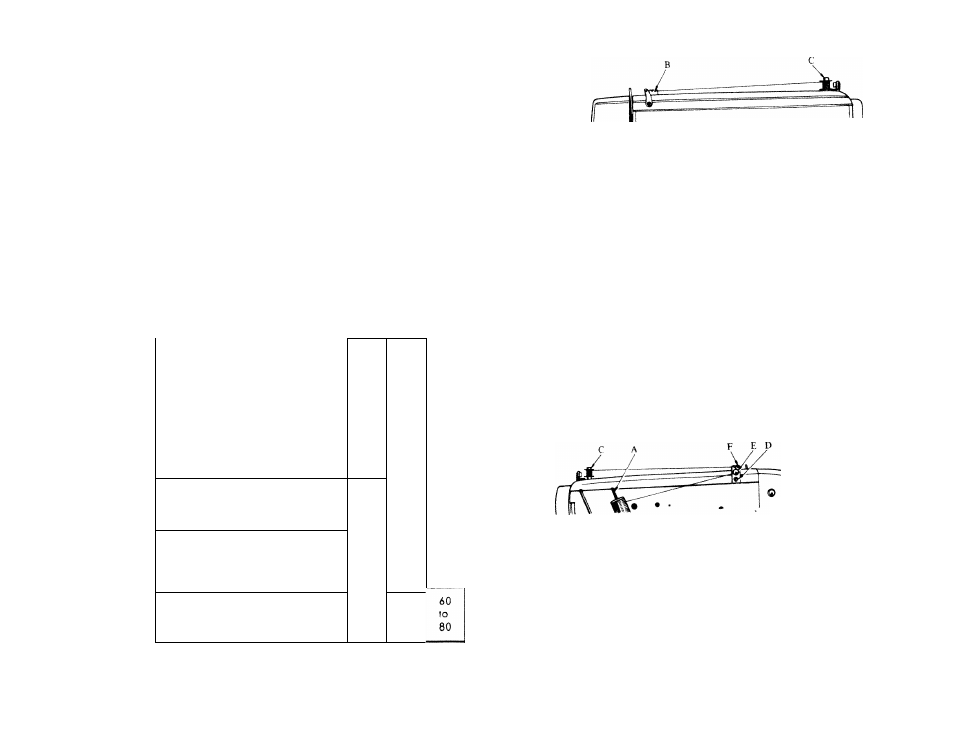
WINDING THE iOBBIN
Fig. 5-A
1,
Hold the balance wheel (20) with your left hand, and with your right hand loosen
the stop motion knob (19) by turning it toward you. You can now turn the
balance wheel without the needle bar and other sewing mechanism moving.
2 Place the bobbin on the bobbin winder spindle (C) and push it down firmly. Press
the bobbin winder spindle (C) to right until a "Click" is heard. This engages the
bobbin winder with the balance wheel.
3, Place a spool of therad on the spool pin (A), run the thread under the tension
disc
(E) and then through the left slot of thread guide (B) and back to the bobbin on the
spindle.
4 Bun the end of the thread through any hole in the top side of the bobbin from the
inside out, leaving 3 to 4 inches of thread projecting from the bobbin. Thread
should not be allowed to catch over the edge of the bobbin.
5.
Now, you can operate the machine as in ordinary sewing and the thread will be
wound. Operate the machine slowly to wind the bobbin evenly.
6.
The loose end of the thread which is threaded through the hole in the bobbin should
be held by hand until a few coils are wound. Then break off the loose end.
7.
When the bobbin is completely wound, stop the machine and press the bobbin
winder spindle (C) to left so that the bobbin winder disengages the balance wheel.
Do not wind the bobbin so full that the thread extends beyond the sides of the
bobbin.
8. Break off the thread, and remove the bobbin.
9.
Hold the balance wheel with your left hand and with your right hand tighten the
stop motion knob by turning it away from you. (See Figs. 5-A, 5-B & 5-C)
HOW TO WIND THE BOBBIN EVENLY
Rear
view
of machine
i'
Fig. 5-B
To correct uneven winding of the bobbin, proceed as follows.
1. If more thread winds at the top of the bobbin, loosen screw (D) and shift thread
guide (£) siightiy downward.
Repeat as necessary until bobbin winds evenly. (Fig. 5-B).
2. If more thread winds at the bottom of the bobbin, loosen screw (D) and shift
thread guide (E) slightly upward.
Repeat as necessary until bobbin winds evenly. (Fig. 5-B).
3. When winding the bobbin, be sure that the thread goes under the tension disc and
through right slot (F), and then to the bobbin winder. (Fig. 5-C).
Not* : This machine uses standard 15 class bobbin.
Fig. 5-C
5
-