USL ECI-60 User Manual
Page 5
- 8 -
- 9 -
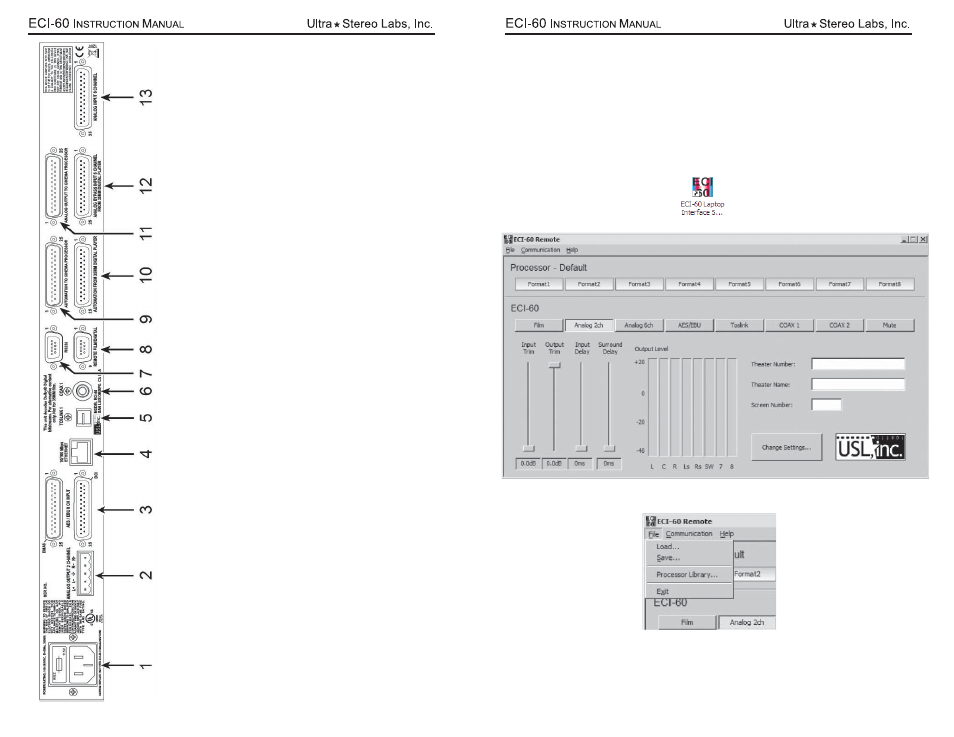
Power entry Module –
Accepts IEC type of line cord from power 100-240V
AC source.
Also contains a 300mA
Slo-
Blo 5x20mm fuse.
Analog 2 Channel Output – Balanced analog output of
AES Channels 7 and 8. Output level nominal 300mV
, 600V
Digital Input – 8 channels of
AES balanced line input. Channels 1-6 are routed through the unit to the
Analog Out-
put
(item #1
1). Both DCI and DMA8 connector formats are supported. Channels 7 and 8 are routed to
Analog 2
Channel Output (item #2).
Ethernet Port – For communication with the User Interface. Use in place of the RS-232 Port (item #7).
T
oslink Port – Optical Fiber input for SPDIF (PCM) or
AC3 signals.
Coax 1 Port – RCA
type Connector for SPDIF (PCM) or
AC3 signals.
RS-232 Port – For communication with the User Interface. Use in place of the Ethernet Port (item #4).
Remote Start/Stop –
A
manual control port for selecting Film or Digital Mode.
Cinema Processor
Automation Port –
A
bi-directional port for receiving and sending automation pulses between the
Cinema Processor and the ECI.
Digital Player
Automation Port –
A
bi-directional port for receiving and sending automation pulses between the Ex-
ternal Digital Player and the ECI.
Analog Output – Sends balanced line audio outputs to the Cinema Processor
.
Analog Bypass Input – Receives balanced line inputs from the external Digital Player
.
Analog Input 2 Channel - Receives balanced line signals for the 2 Channel
Analog Inputs;
Analog Input 6 Channel
Receives balanced line signals for the 6 channel
Analog Inputs.
1.
2.
3.
4.
5.
6.
7.
8.
9.
10.
11.
12.
13.
Installation Procedure
Begin by placing the ECI-60 laptop interface software CD into your CD-ROM drive.
The installation program should start automatically within a few seconds. If it does
not, you will need to run “Setup.exe” from the root directory of your CD-ROM drive.
Either double click the “Setup.exe” icon or click the Windows “Start” button and
select “Run…”. Now enter “X:\setup.exe” (where X: is your CD-ROM drive), then
click the “OK” button. Follow the instructions in the installation software.
The software will place an icon on your desktop which you may use to access the
setup software.
Double click the ECI-60 icon on your desktop and the opening screen appears.
The opening screen is comprised of the menu bar, a section for selecting proces-
sors and controls for the functionality of the ECI-60 itself.
At the top of the screen is the Menu Bar. The menu bar gives access to various
functions; Under “File” is not only the usual “Load” (to load a previously construct-
ed setup) and “Save” (to save a setup you want to retain) and “Exit” (which really
needs no explanation), but also the “Processor Library”. The “Processor Library”
will be explained later in this manual.