Top Flite TOPA0310 User Manual
Page 26
Mount the wing servos
Let’s start with the flap...
❏ ❏
1. Check the orientation of the flap servo in the
wing panel you are building. Mount your flap servo to
the 1/2" x 1" x 3/4" basswood
servo mounting blocks
using the screws that came with your servo. If
necessary, trim the blocks to accommodate your servo.
❏ ❏
2. Use 30-minute epoxy and two #2 x 3/8" flat-
head screws to
securely
and
permanently
mount the
blocks to the 1/8" x 1-1/2" x 3-11/16" plywood
flap
servo plate.
Be certain the flap servo is in the correct
orientation for the wing panel you are building. A
Dremel
®
#178 cutting bit works great for countersinking
the screws in the bottom of the servo plate.
❏ ❏
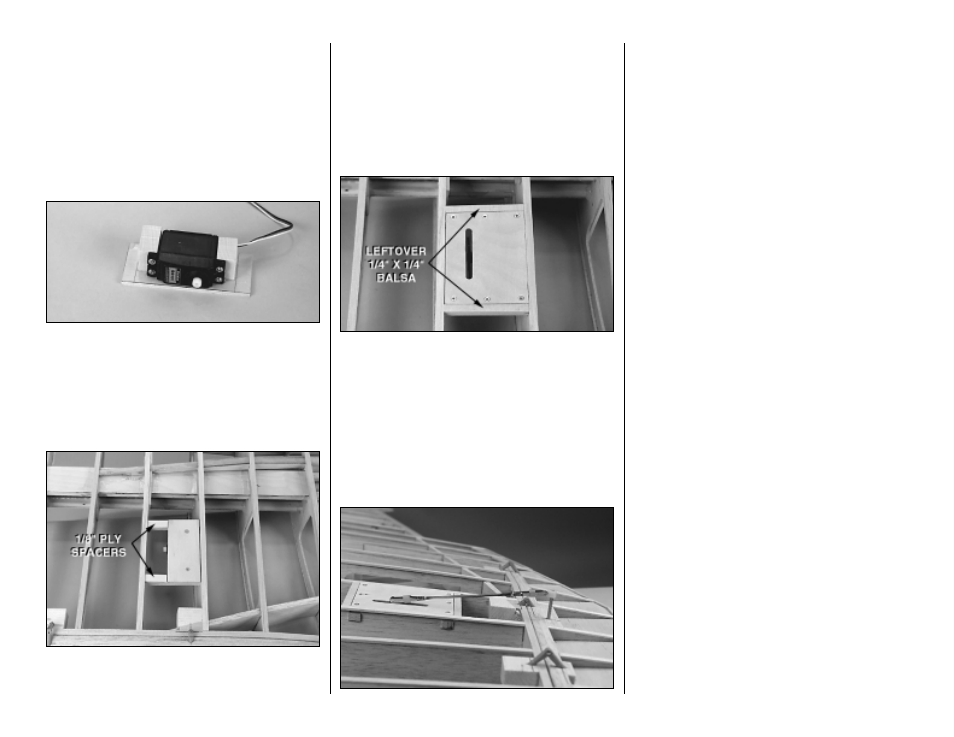
3. Place the servo plate with the flap servo on
the rails. Cut spacers from leftover 1/8" plywood and
glue them to the rail.
❏ ❏
4. Place the die-cut 1/16" plywood
flap hatch
cover
on the servo plate. Drill 1/16" holes through the
punchmarks in the hatch cover and into the rails.
Enlarge the holes
in the hatch cover only
with a
3/32" drill bit, then countersink the holes for the flat-
head screws the same way you did for the bottom of
the servo plate. Mount the hatch cover with #2 x 3/8"
flat-head screws.
❏ ❏
5. Glue leftover 1/4" x 1/4" balsa sticks between
the ribs on both ends of the hatch cover. Cut the slot
in the hatch cover for your servo arm.
❏ ❏
6. Mount the aileron servo and hatch cover the
same way noting the orientation of the servo for the
wing panel you are building. The plywood aileron
servo plate is 1/8" x 1-3/4" x 3-11/16"
Hook up the controls
Refer to this photo to hook up the flap and aileron.
❏ ❏
1. Drill a #36 or 7/64" hole in the flap control
horn block that is in alignment with your flap servo
arm. Tap 6-32 threads in the control horn block. Add
a few drops of thin CA in the hole, allow to fully cure,
then retap the threads.
❏ ❏
2. Thread a large nylon torque rod horn onto
one end of a 6-32 x 1-1/2" threaded rod. Temporarily
thread the control rod 1/2" into the hole you tapped
in the control horn block. The control rod won’t be
glued in place until after the model is covered.
❏ ❏
3. Make the flap pushrod from a 4-40 solder
clevis, a .095" x 4-1/2" threaded one-end pushrod
and a 4-40 threaded clevis. Silver solder should be
used on the solder clevis. After soldering, remove
residual soldering flux, then coat the clevis and the
rod with a film of oil to prevent corrosion.
❏ ❏
4. Connect the flap to the servo with the control
rod. Notice that the servo arm is 90 degrees (straight
down) when the flap is up.
❏ ❏
5. After you’ve set up the flap linkage, install
silicone retainers on the clevises and a 4-40 nut
behind the threaded clevis.
❏ ❏
6. Make the aileron linkage the same way.
❏ ❏
7. While you have both servos in the wing,
determine how you are going to route your servo
cords and determine what type of servo extension
cords you will use.You could make paper guide tubes
and glue them in place, or just route the servo cords
through the holes in the ribs.
❏ ❏
8. Reinforce any glue joints you missed earlier
or those that don’t look strong.
If you haven’t yet began the second wing panel,
return to step 1 on page 17 and start building it.
Otherwise, pick up where you left off and finish
building the right panel.
- 26 -