Sonoma cgr30 natural gas conversion instructions – Sure Heat Sonoma CGR30 Natural Gas Conversion Kit User Manual
Page 7
Sonoma CGR30
Natural Gas Conversion Instructions
Installing the NG regulator
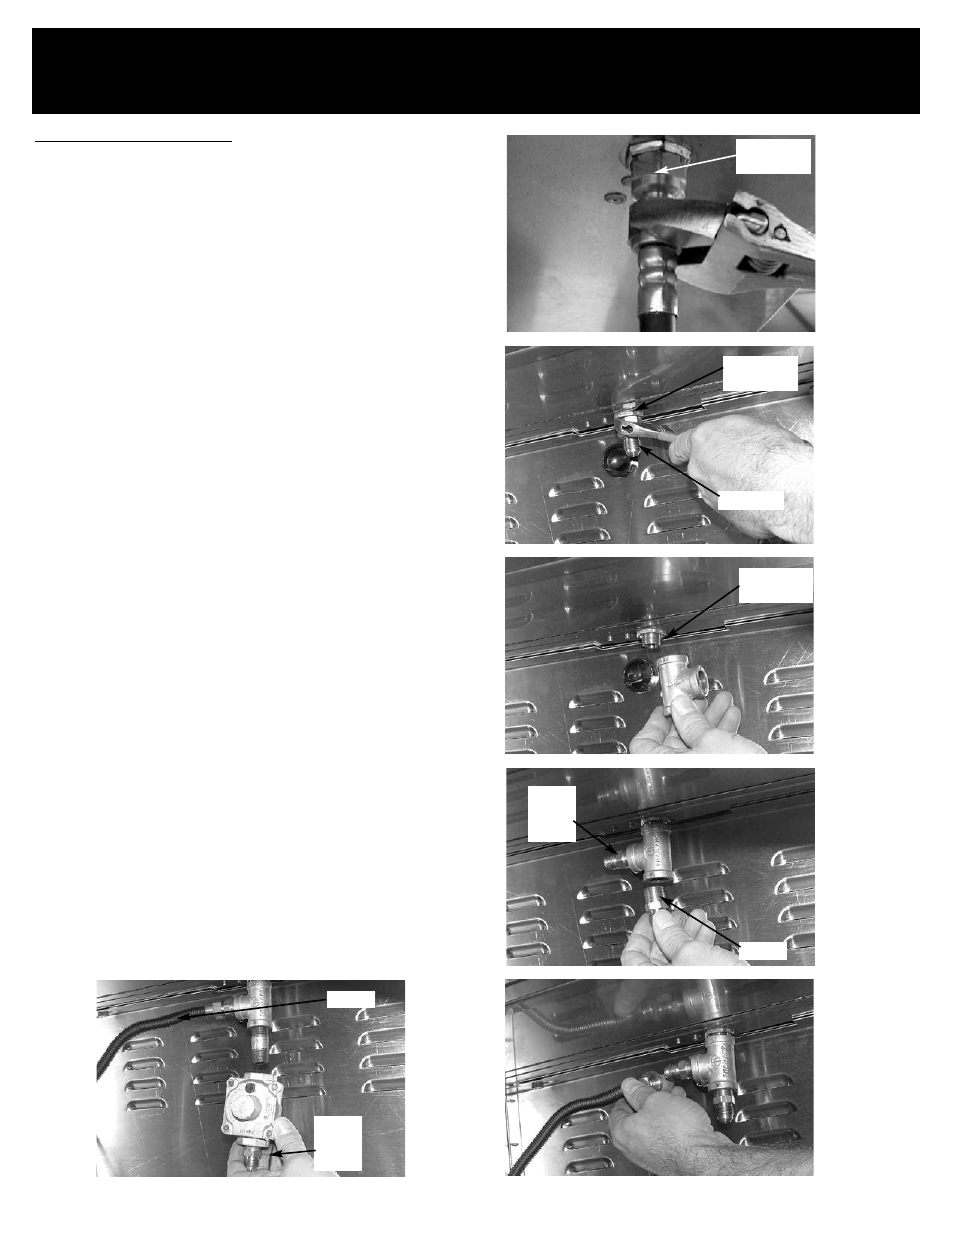
1. Remove the LP regulator from the main gas pipe using an
adjustable wrench. Located inside the cart on bottom of grill
head. (See Fig. 23)
Remaining end still connected will be removed later.
2. Remove the brass fitting from main gas line. (See Fig. 24)
** Note – for the following steps, the supplied pipe dope
needs to be applied to all indicated fittings before the
fittings are screwed in.
Pipe dope should not be used on any flared fittings!
3. Attach the “T” fitting to the main gas line as shown. Tighten
with wrench. (See Fig. 25)
4. Attach one of 3/8” to flared fitting to the “T” fitting as shown.
Remember to apply pipe dope to the non-flared end. Tighten
with wrench. (See Fig. 26)
5. Attach one end of the supplied hose to the flared fitting on
the side of the “T” connector. (See Fig. 27) The other end of
the hose will be attached to the side burner later.
6. Attach the 3/8” nipple to the bottom of the “T” connector (See
Fig. 27)
7. (** Note – pay attention to arrow on the NG regulator indicat-
ing direction of gas flow. The arrow should point up.) Attach
the NG regulator to the nipple (See Fig. 28).
Remember to
apply pipe dope!
8. If not already attached, attach a 3/8” to flared fittings to the
input side of the regulator as shown. Tighten with wrench.
(See Fig. 27)
9. At the completion of the conversion, a leak test should be
performed on all fittings. See Use and Care manual for leak
testing procedures.
10. This completes the NG regulator installation.
Fig 23
Fig 24
Fig 25
Fig 26
Fig 28
Main Gas
Pipe
Main Gas
Pipe
LP Nipple
Nipple
3/8” To
Flare
Fitting
Main Gas
Pipe
Fig 27
3/8” To
Flare
Fitting
Hose