SeaLand Dometic Electronic Water Valve User Manual
SeaLand Hardware
Dometic Electronic Water Valve
Replacment Instructions
® Registered; ™ Trademark of Dometic Corporation
© Dometic Corporation
600346456
11/10
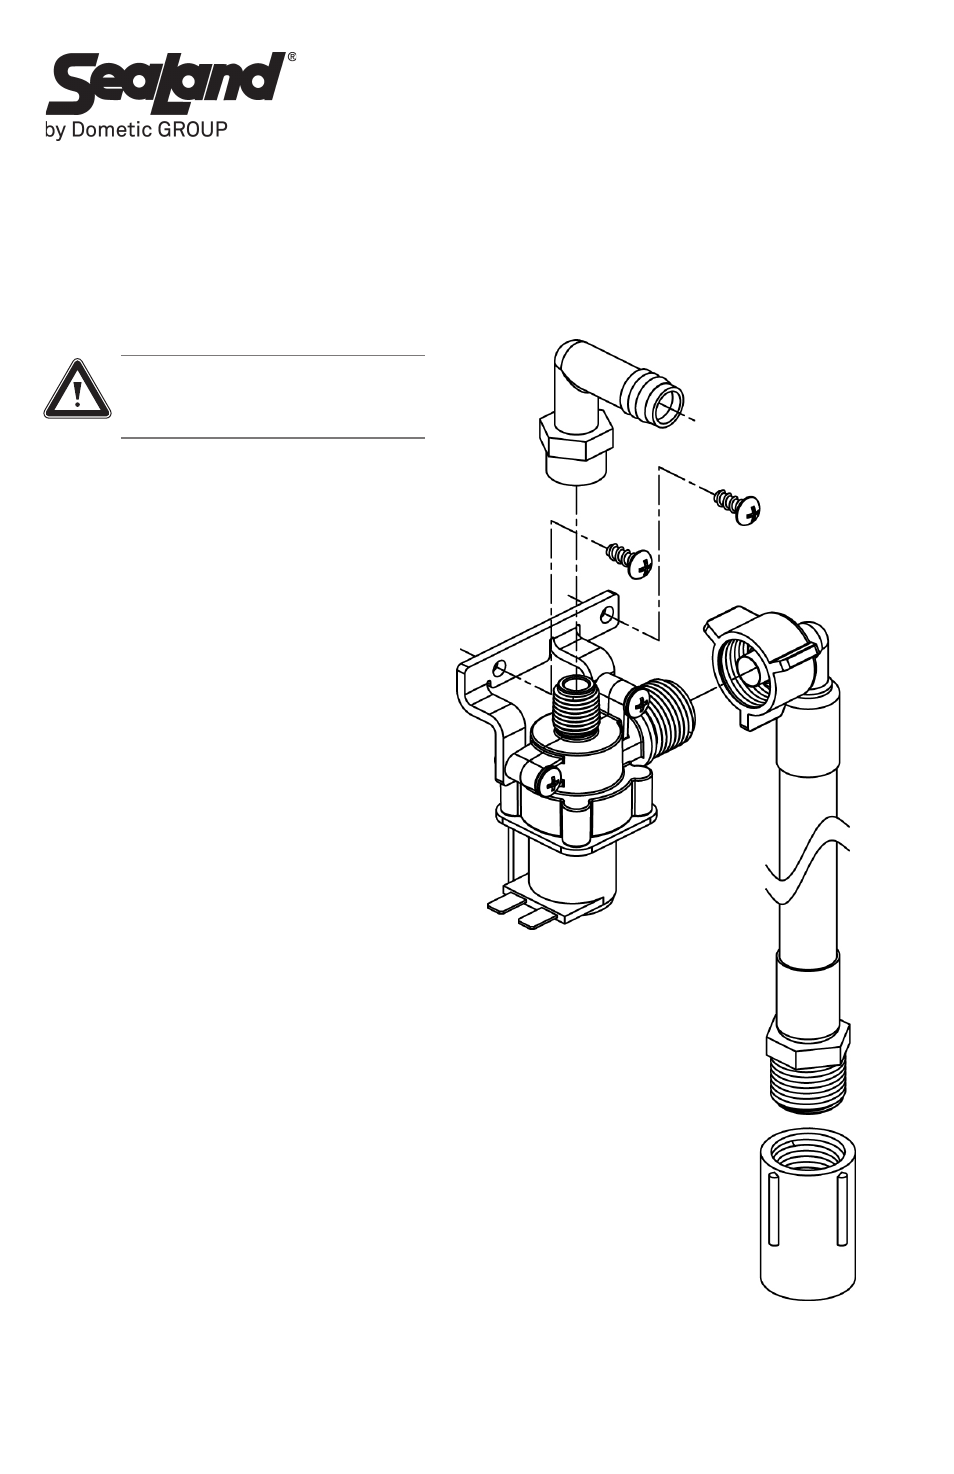
1. Remove two wire terminals from
existing water valve.
2. Turn off power to fresh water
pump.
3. Remove existing valve from
base.
4. Assemble new valve with
bracket to the base using the
screws provided.
5. Connect water line to the new
supply hose.
Note: Use 1/2 in. x 1/2 in. coupling
supplied, if necessary.
6. Reconnect wire terminals to
water valve and turn power on.
Check for leaks and correct as
necessary.
Caution!
Turn off electrical power to toilet
before replacing water valve.
See also other documents in the category SeaLand Hardware:
- 2 to 4 Bolt Mounting Kit (1 page)
- 960 Series Mounting Bracket (1 page)
- Bowl Reinforcement Bracket (1 page)
- Diptube Kit (1 page)
- Do Not Flush Panel (12 pages)
- DTD01 Discharge Pump Control (72 pages)
- DTD01A Auto Discharge Pump Control (16 pages)
- DTD02 Discharge Pump Control (16 pages)
- DTM01 Tank Monitor (12 pages)
- DTM01C Tank Monitor (48 pages)
- DTM04 Tank Monitor System Manual (72 pages)
- DTM04 Tank Monitor System Manual (9 pages)
- DTMF04 Freshwater Tank Monitor (12 pages)
- DTW Discharge Pump (56 pages)
- DVF1619 Vent Filter (28 pages)
- DVS01 VacuFlush Status Panel (12 pages)
- DVS02 Vacuum Status Control (12 pages)
- Electronic Toilet Flush Switch (8 pages)
- Flush Touchpad (1 page)
- MasterFlush Toilets - RV Installation Appendix (4 pages)
- ECO vent filter (16 pages)
- Standpipe Kit (24 pages)
- Tank Flange (1 page)
- TankSaver Relief Valve (1 page)
- TW Discharge Pump (3 pages)
- Universal Level Indicator (1 page)
- S Series Vacuum Pump (2 pages)
- TankManager (12 pages)
- TankMaster 6 (12 pages)
- TankMaster 4 (12 pages)
- TankWatch 1 Level Monitoring System (2 pages)
- TankWatch 3 Level Monitoring System (2 pages)
- TankWatch 4 Level Monitoring System (9 pages)
- VacuStat Status Panel (2 pages)
- VacuStat Status Panel with Vimar and Gewiss Control Panels (2 pages)
- Dometic 300 Flush Ball Seal (1 page)
- Dometic 300 series Toilet Water Valve (1 page)
- Bowl Kit Installation (1 page)
- Bowl Seal Kit Installation (1 page)
- Duckbill Valve (1 page)
- Floor Flange Seal Kit (1 page)
- Vacuum Breaker-Hand Sprayer Kit (1 page)
- Vacuum Breaker Kit (1 page)
- J-series Vacuum Generator Duckbill Valve (1 page)