Warning – Reznor R8HE Option - Installation - Gas/High Alt. Conv. User Manual
Page 2
2
CONVERTING TO LP/PROPANE GAS AT
ALTITUDES BETWEEN ZERO & 10,000 FT.
Converting the two-stage gas valve to LP/Propane requires
the replacement of the burner orifices and/or the stem/
spring assembly in the pressure regulator.
Table 2 (page 4), provides the manifold pressure for
altitudes above 2,000 feet.
WARNING:
Shut off the gas supply at the manual gas shutoff
valve, before disconnecting the electrical power.
A fire or explosion may result causing property
damage, personal injury or loss of life. Failure to
follow the safety warnings exactly could result in
serious injury, death or property damage.
WARNING:
To avoid electric shock, personal injury, or death,
turn off the electric power at the disconnect or the
main service panel before making any electrical
connections.
WARNING:
The reduction of input rating necessary for high
altitude installation may only be accomplished
with factory supplied orifices. Do not attempt to
drill out orifices in the field. Improperly drilled
orifices may cause fire, explosion, carbon
monoxide poisoning, personal injury or death.
Before You Convert the Gas Valve
1. Turn the thermostat OFF or to its lowest temperature
setting.
2. Verify the gas supply is shut OFF.
3. Verify the electrical power to the appliance is turned
OFF.
Removing The Burner Orifices
1. Set the thermostat to the OFF position, or its lowest
temperature setting.
2. Shut OFF the gas supply at the manual shutoff valve
located outside of the appliance.
3. Turn off all electrical power to the appliance.
4. Remove the louvered access panel from the burner
compartment.
5. Move the gas valve ON/OFF switch to the OFF position
as shown in Figure 1.
6. Disconnect the 3-wire connector from the gas valve
terminal.
7. Remove the supply gas piping from the gas valve inlet.
8. Carefully remove four screws securing the gas manifold
assembly to the burner assembly.
9. Set the screws aside and remove the gas manifold
assembly from the appliance.
10. Carefully remove the burner orifices from the gas
manifold assembly.
11. Read the rating plate affixed to the appliance to
determine its rated input (Btu/hr) and the size of the
factory installed orifices.
IMPORTANT NOTE: Before installing an orifice, check
the side or face of the orifice for the drill number and
verify that it is the appropriate size.
12. Install the appropriate LP/Propane gas burner orifices
into the gas manifold assembly.
NOTE: To prevent cross threading, hand tighten the
orifices into the gas manifold assembly until snug, then
tighten with a wrench 1/2 to 1 full turn.
WARNING:
Do not use Teflon tape or pipe joint compound
on the orifice threads. The hole in the orifice
may become blocked and cause fire, explosion,
property damage, carbon monoxide poisoning,
personal injury, or death.
13. Reinstall the gas manifold assembly to the burner
assembly with the 4 screws, that were removed earlier.
NOTE: It is important that the center of the orifices are
aligned with the center of the burners.
14. Reconnect the gas piping to the gas valve inlet.
15. Reconnect the 3-wire connector to the gas valve
terminal.
Converting the Gas Valve
IMPORTANT NOTES:
• When converting to LP/Propane gas from natural
gas, the springs from gas valve must be replaced
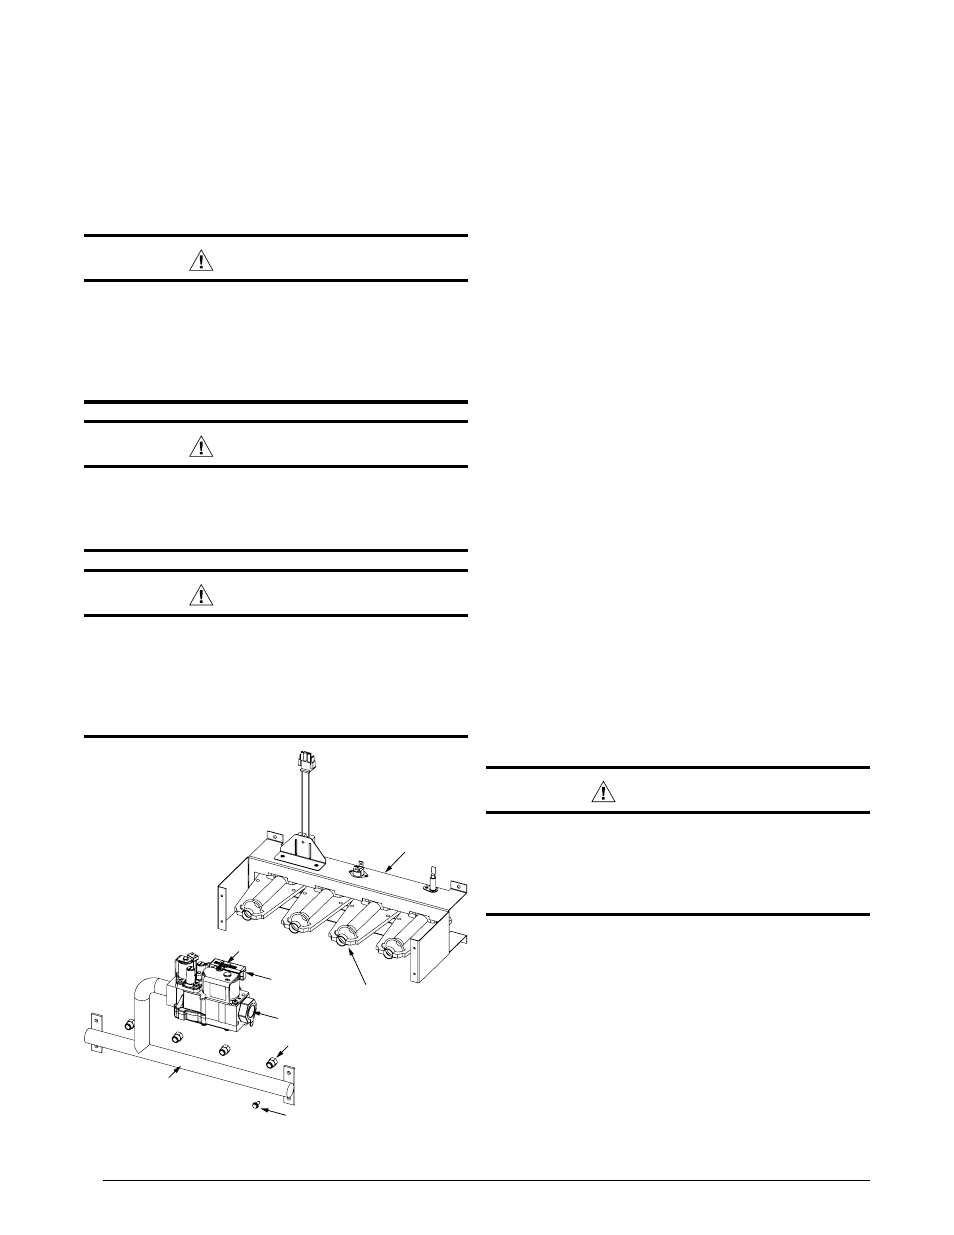
Figure 1. Burner & Manifold Assembly
GAS INLET
ON / OFF
SWITCH
BURNER
ASSEMBLY
SCREWS (X4)
GAS
MANIFOLD
BURNER ORIFICES
3-PIN
CONNECTOR
BURNERS