Reznor UDBS Sizes 30, 45, 60, and 75 Option - Installation - Aesthetic Concentric Adapter User Manual
Page 3
Form I-UDAS/UDBS-ASC, P/N 209344R6, Page 3
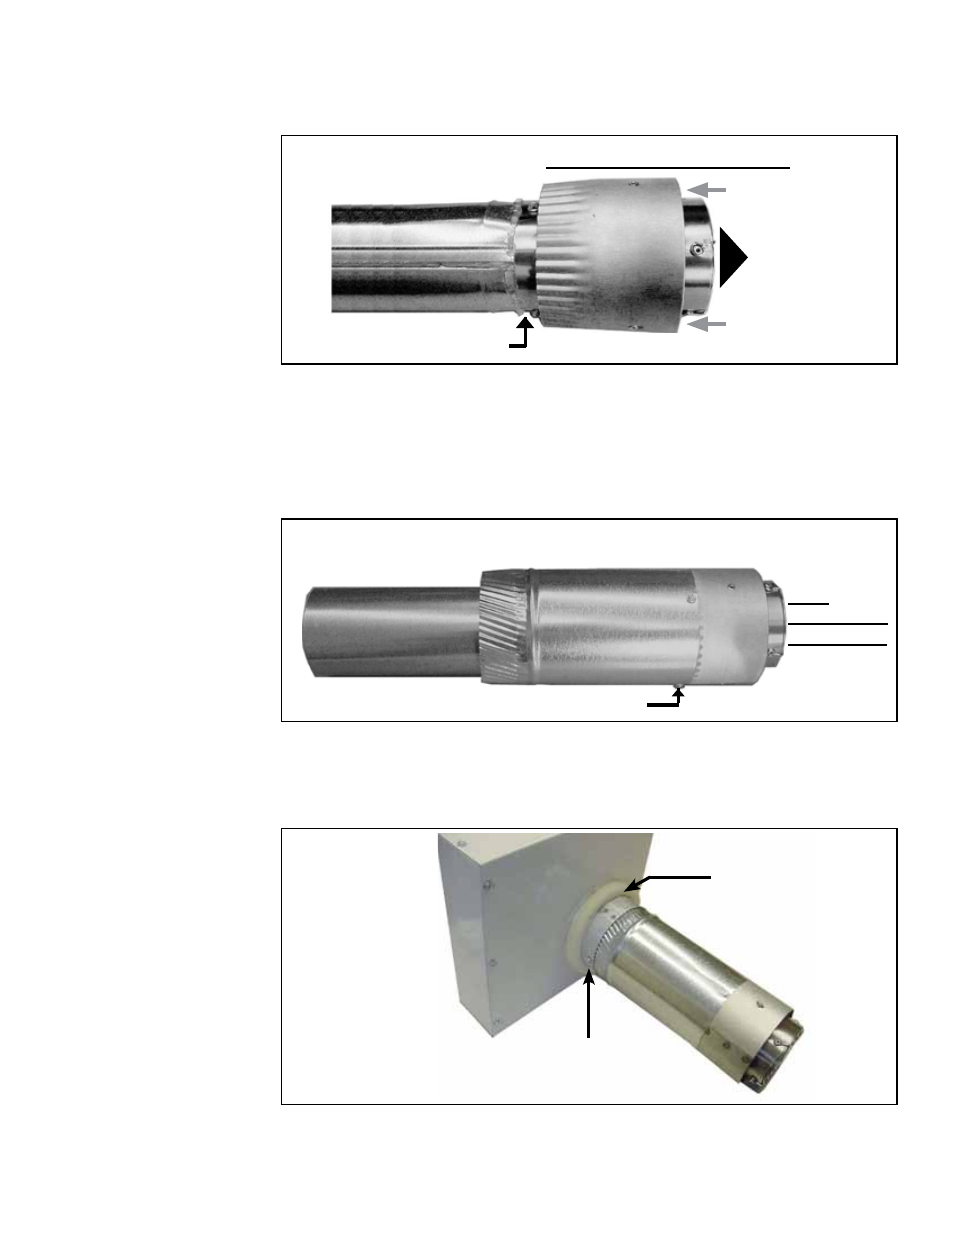
FIGURE 2 - Vent
terminal with 3”
inner concentric
exhaust pipe
attached and sealed.
Field-supplied, 3-inch
diameter Inner Vent Pipe
Vent/Combustion Air Terminal
Exhaust
Flow
Combustion Air
Combustion Air
Join with three screws
and seal.
FIGURE 3 - Slide
the 4” outer pipe
over the inner pipe
and attach to the
terminal.
Join with three screws and seal.
Vent/
Combustion
Air Terminal
4” Outer Pipe
for Combustion Air
3-inch Inner Vent Pipe
attached to the
Terminal in FIGURE 2.
e) Attach the assembled vent terminal and concentric pipes to the box. On the side
of the box with only a 4” collar, slide the three-inch diameter pipe through the collar into
the concentric adapter box, inserting the outer 4-inch diameter pipe into the collar. Drill
two holes, one on each side, and secure the pipe to the collar with sheetmetal screws.
(See
FIGURE 4.)
c) Cut to length the field-supplied, 4-inch diameter combustion air pipe that will be
the outer portion of the concentric pipes:
Pipe length must be 1-1/2 inches (38mm) less than the wall thickness. This pipe must
be one continuous piece.
d) Slide the cut piece of 4” pipe over the 3” pipe and onto the crimped portion of the
terminal. Drill three holes equally spaced and secure with three sheetmetal screws.
Seal the joint with the silicone sealant provided. (See
FIGURE 3.)
FIGURE 4 -
Assembled
concentric
pipes and vent/
combustion air
terminal attached
to the concentric
adapter.
Drill two holes (one on each side)
and secure with sheetmetal screws.
Position the foam
gasket against
the box.
The concentric
adapter box is
only 3” (76mm)
deep and is
made of painted
metal to match
the heater.
(
NOTE: If using 4” vent pipe to the heater, the length of this 3” pipe should be no
longer than 5” (127mm) plus the thickness of the wall.)
b) Attach the 3” concentric pipe to the collar on the vent terminal with three sheetmetal
screws. Seal the joint with the silicone sealant provided. (See
FIGURE 2.)
f) Install the foam gasket. Slide the foam gasket over the terminal and the 4-inch pipe
and position it against the concentric adapter box. (See
FIGURE 4.) The gasket will
provide a seal between the pipe and wall.