OFM AT User Manual
At tables & base, Multi-purpose table, Assembly instructions
J
Hex Nut
1 Unit
A
Table Top
1 Unit
C
Gear Bar
1 Unit
D
Legs
3 Units
E
Crank Mechanism
1 Unit
F
Gear Nuts
2 Units
G
Leveling Glide
3 Units
H
Hex Bolt
1 Unit
L
Top Plate Screw
3 Units
M
Tabletop Screw
4 Units
I
Short Screw
16 Units
K
Washer
16 Units
1
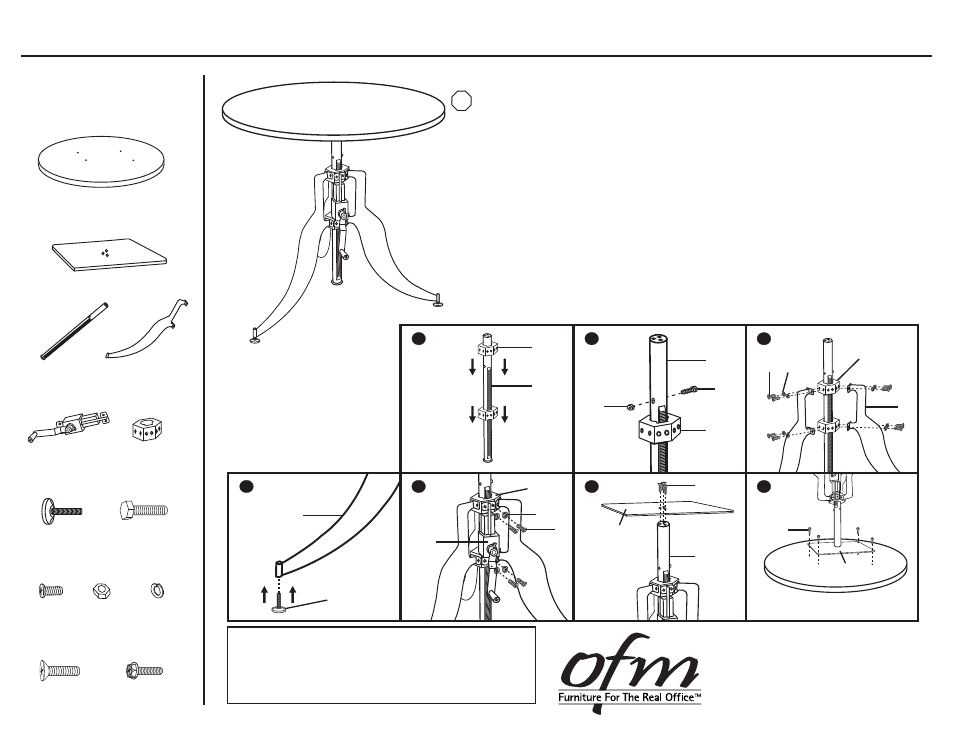
Assembly Instructions
Tools Needed: Flat Head & Philips screwdriver, adjustable wrench
Please read all instructions before assembly.
Step 1:
Slide Gear Nuts (F) down over Gear Bar (C).
Step 2:
Secure Gear Bar (C) by inserting Hex Bolt (H) through side and secure
with Hex Nut (J). This keeps the Nuts (F) from sliding off Bar (C).
Step 3: Attach Legs (D) on 3 sides of Gear Nuts (F) using Short Screw (I) and
Washer (K), making sure to leave middle set of holes open.
Step 4:
Attach Leveling Glides (G) to bottom of Legs (D).
Step 5: Attach Crank Mechanism (E) to Gear Nuts (F) using Short Screw (I) and
Washer (K). Make sure the mechanism is engaged before securing.
Step 6: Attach Top Plate (B) to top of Gear Bar (C) using Top Plate Screws (L).
Step 7: Place Table Top (A) upside down on clean surface. Attach Top Plate (B)
to Table Top (A) using Tabletop Screws (M).
Parts Listing
08.27.2013
Assembly Notes:
During assembly, hand tighten screws only. When all screws
are in place, you may then tighten all screws completely.
CAUTION:
1. Do not use this table as a step ladder.
2. Check for loose screws and tighten them every 6 months.
AT Tables & Base
Multi-Purpose Table
919-362-4765 (fax)
www.ofminc.com
161 Tradition Trail, Holly Springs, NC, 27540
800-520-7471 (voice)
919-303-6389 (voice)
[email protected]
B
Top Plate
1 Unit
1
6
L
C
B
7
M
B
A
1
F
C
2
C
F
J
H
4
G
D
3
F
K
I
D
5
I
E
K
F
STOP