OFM 3000 Series User Manual
3000 series, Leg installation & ganging instructions, Assembly instructions
C
Allen Wrench
1 Unit
Assembly Notes:
During assembly, hand tighten screws. Only when all screws
are in place, you may then tighten all screws completely.
CAUTION:
1. Do not use this product as a step ladder.
2. Check for loose screws and tighten them every 6 months.
12.16.2014
Parts Listing
Base Chair/Cushion
included with all models
3000 Series
Leg Installation & Ganging Instructions
STOP
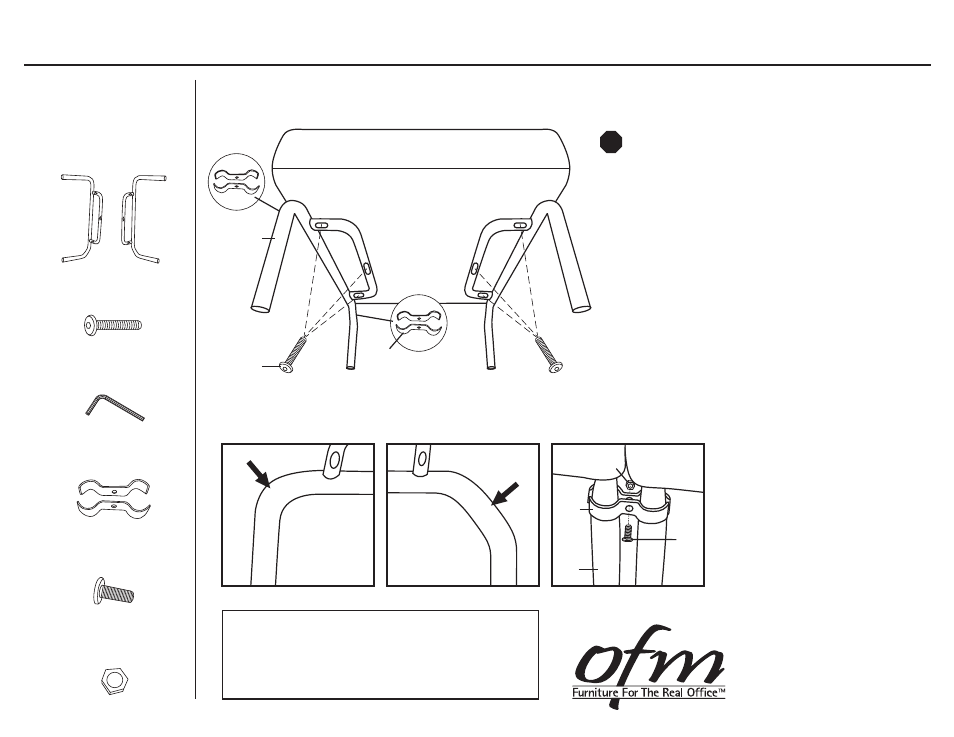
Assembly Instructions
Tools Needed: Allen Wrench (provided), Screw Driver
Note: The front leg is rounded.
The back leg is angled.
Step 1: Remove pre-inserted Screws (B) from the bottom
of the Chair/Cushion. Attach Legs (A) by aligning
the holes in the Legs (A) with the corresponding
holes in the Cushion.
Note: Make sure
angled leg is to the back of the Cushion.
Step 2: Attach by inserting 8x50mm Screws (B)
through Legs (A) and into the Cushion
using an Allen Wrench (C).
Step 3: If applicable, attach Ganging Bracket (D)
to Legs (A) using Ganging Bracket Screw (E)
and Ganging Bracket Nut (F). Tighten
using Screw Driver.
A
D
Ganging Brackets
2 Sets
E
Ganging Bracket Screw
2 Units
F
Ganging Bracket Nut
2 Units
B
8x50mm Screw
6 Units
A
Legs
2 Units
Front
Leg is
Rounded
Back
Leg is
Angled
B
D
A
D
F
E
919-362-4765 (fax)
161 Tradition Trail, Holly Springs, NC, 27540
www.ofmfurniture.com
800-520-7471 (voice)
919-303-6389 (voice)