Motion Pro 08-0411 User Manual
Page 2
I08-0411
5/2014
2 of 3
Calibration and Use:
Calibration must be performed every time the SyncPRO™ is
used to achieve proper synchronization. Failure to calibrate
the tool at every use can result in the loss of fluid.
Caution: Engine speeds exceeding 3,500 RPM, rapid throttle
closure can cause the SyncPRO™ fluid to be sucked into the
engine.
The SyncPRO™ has a vacuum limit of 40cm Hg (7.7 psi).
Exceeding this limit will result in the loss of fluid from the tool.
Consult your service manual for manifold vacuum pressures
for your particular engine.
Follow all instructions and specifications in your factory shop
manual. Carburetor or throttle body synchronization should
be done in accordance with the factory shop manual for your
vehicle.
Always use this tool in a well-ventilated area with plenty of fresh air.
Use an exhaust collector or ventilation fan to remove exhaust fumes
whenever possible. Utilize a fan to cool the engine when the engine
is running.
1. Always use the SyncPRO™ in an upright position. The handle
bar end is usually a convenient location.
2. Bring the engine to its normal operating temperature and then
shut it off.
3. Remove or raise the fuel tank. For non-fuel injected bikes you
can use Motion Pro’s Auxiliary Tank (P/N 08-0032) during
synchronization. For fuel injected models with external fuel pumps
you can use Motion Pro’s Deluxe Auxiliary Tank (P/N 08-0189).
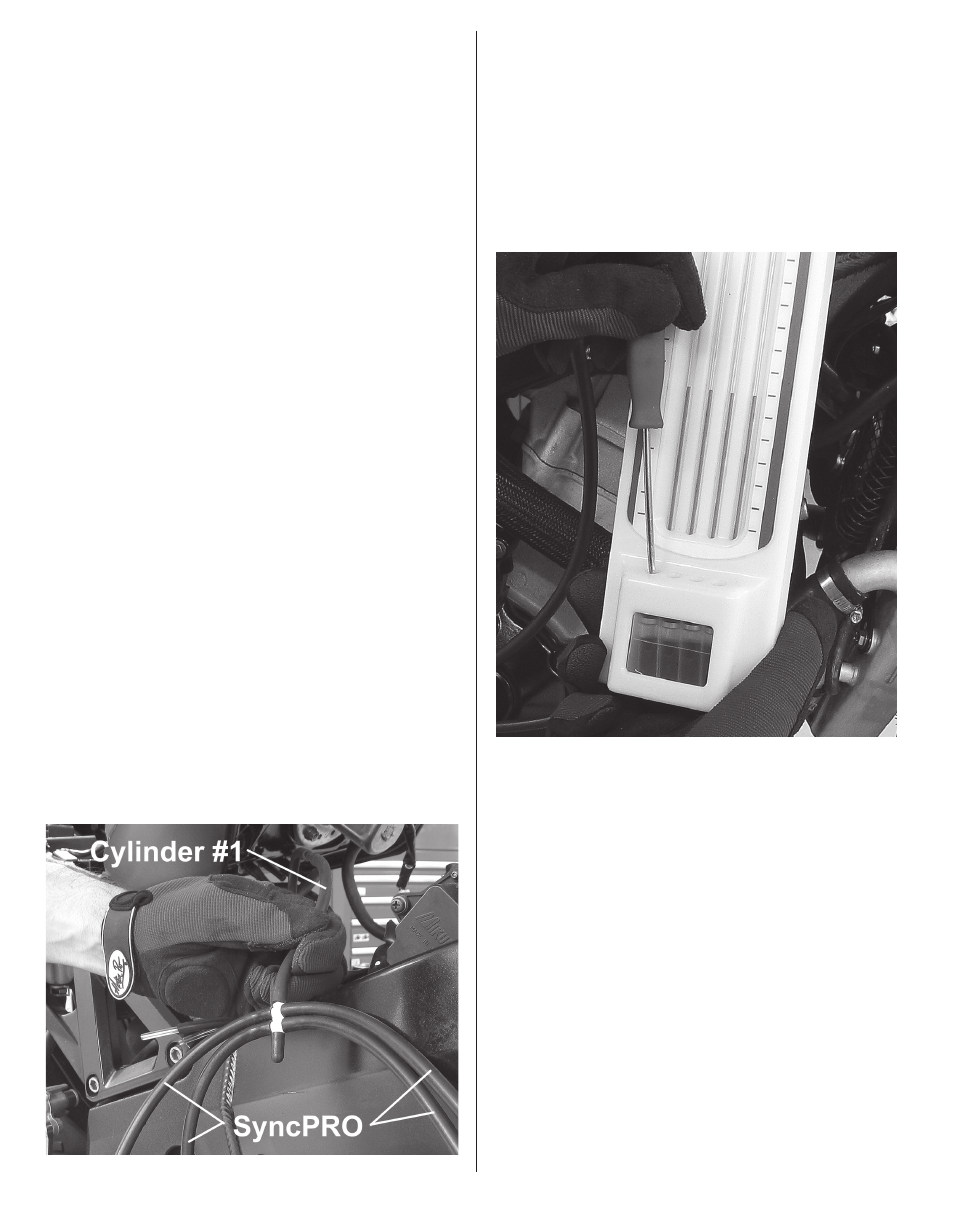
4. Attach the short piece of vacuum hose with the calibration
manifold to the non-adjustable master carburetor or throttle body.
This is generally the carburetor or throttle body that the cables are
directly attached to. See your service manual for details. Then
attach all 4 vacuum hoses from the SyncPRO™ to the calibration
manifold (Image 8).
5. Before starting the engine turn all of the calibration screws
(Image 9) on the SyncPRO™ counterclockwise to completely
lower the fluid levels. This will give you the maximum vacuum range
prior to starting the engine.
Caution: Engine speeds exceeding 3,500 RPM, rapid throttle
closure and/or a vacuum of 40cm Hg (7.7 psi) or more can
cause the SyncPRO™ fluid to be sucked into the engine.
6. Start the engine and run it at idle.
7. Calibrate the SyncPRO™ (make sure the fluid levels of all four
channels are the same height) with the engine running by turning
the calibration screws on the SyncPRO™ clockwise to raise the
fluid level and counterclockwise to lower the fluid levels (Image 9).
Set the levels approximately 1/3 of the way up the scale if possible.
8. Turn off the engine and remove the short piece of vacuum hose
with the calibration manifold and attach it to the side of the
SyncPRO™ for storage (Image 7).
9. Attach the vacuum hoses to each cylinder (vacuum hose No. 1
to cylinder No. 1, vacuum hose No. 2 to cylinder No. 2, etc.). If you
are synchronizing a twin, the two extra vacuum hoses can be left
unattached and do not need to be plugged. Use the vacuum port
adapters on models that require them. Most Honda and Suzuki
models use 5mm adapters, while most Yamaha models use 6mm
adapters. Some Kawasaki and Yamaha models have spigots
molded into the intake manifolds and do not require adapters.
10. Start the engine and bring it back up to its normal operating
temperature. With the engine at the proper idle, adjust the car-
buretor adjustment screws so that the SyncPRO™ fluid columns
are approximately the same height. Once this is accomplished
you have completed your carburetor synchronization. Motion Pro
offers several tools for carb adjustments (P/N 08-0022, 08-0119,
08-0229). If synchronization cannot be achieved, other problems
may exist. Some possibilities are low compression, intake mani-
fold leaks, dirty air filters, worn out carburetor bodies, worn throttle
slides or possibly a restricted exhaust system.
IMAGE 8
IMAGE 9