Breaking chains – Motion Pro 08-0403 User Manual
Page 2
BREAKING CHAINS
Use only the correct breaking tip for your application, or you will damage the tip.
Included in this kit: 3.8mm Breaking Tip for drive chains #428 - #630.
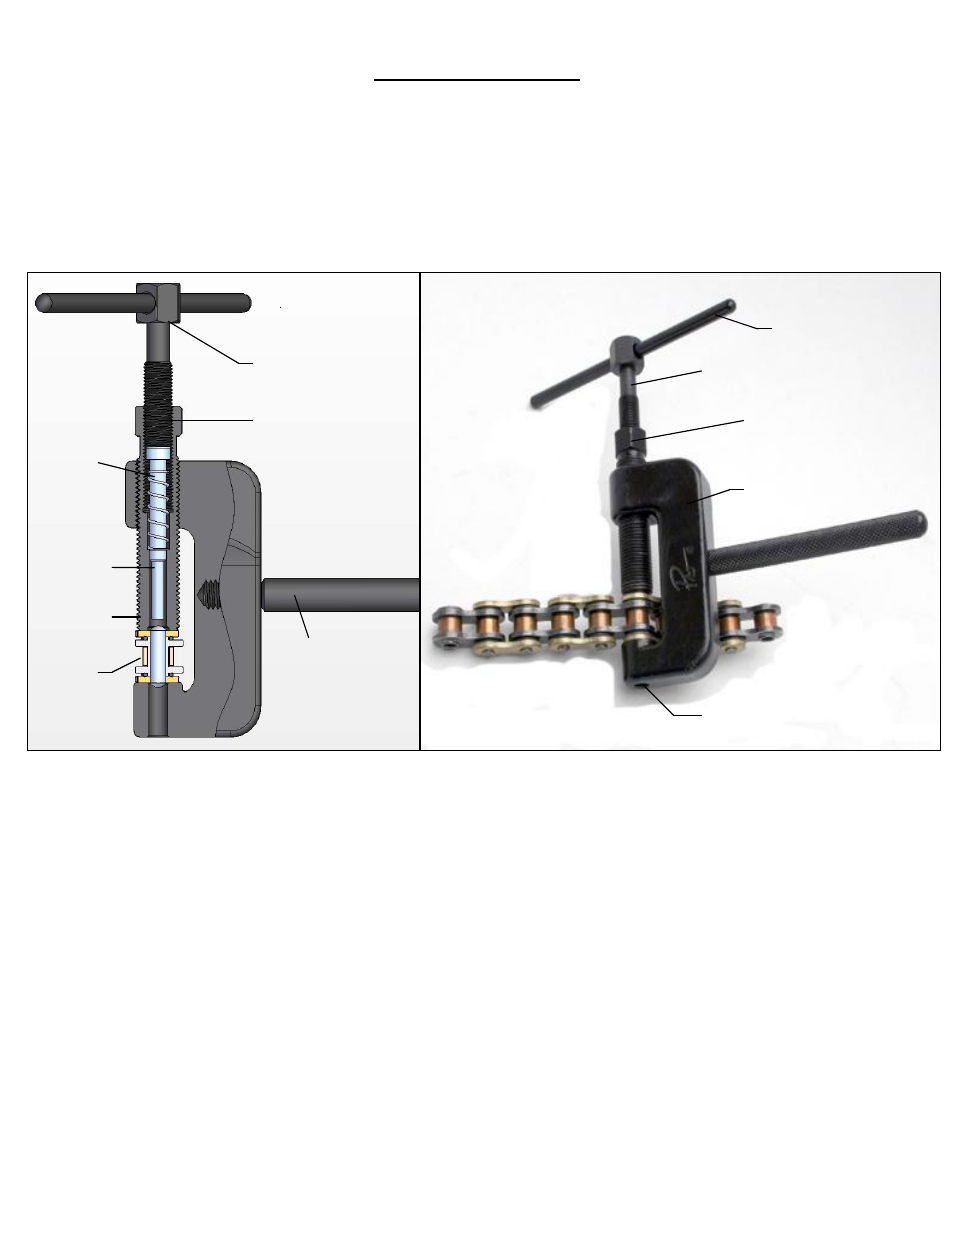
Assemble the tool as shown in Image B and the diagram below for breaking chains. Thread the alignment bolt
into the body. Insert the breaking tip into the spring and drop them into the alignment bolt with the spring under
the tip head. Thread the push bolt into the alignment bolt above the tip.
Image B shows a drive chain in place.
1-Place the tool over the chain as shown in Image B. The breaking tip must be withdrawn at least 2mm into
the alignment bolt to clear the end of the chain pin. Do not withdraw the breaking tip too far into the alignment
bolt or it can get hung up inside the alignment bolt. One end of the chain pin will be held in position by the end
of the alignment bolt, while the other end is held in position by the hole of the tool body.
2-Tighten the alignment bolt securely against the side plate of the chain, but do not over-tighten or the
alignment bolt and tip could drift out of position. The alignment bolt is for aligning and supporting the breaking
tip, so do not attempt to break the chain with the alignment bolt retracted or you will damage the breaking tip.
3-Read this step all the way through before beginning. Tighten the push bolt by hand only with a Philips
screwdriver or a 14mm wrench until the chain pin is pushed completely out and through the hole in the tool
body. You will feel some initial tension as the chain pin begins to shear, but afterwards the breaking tip should
push smoothly into the chain link. IMPORTANT:
If the chain pin doesn’t start to break free, or you don’t feel
the breaking tip going into the chain link smoothly, back out the alignment bolt just enough to check that the
breaking tip is correctly lined up with the chain pin. Once the breaking tip and chain pin are aligned properly,
tighten the alignment bolt back down and start over at the beginning of this step. Do not apply excessive force
or use air tools or you may damage the tool.
PAGE 2
Philips screwdriver can
be used. Handle not
included in kit.
Push Bolt
Alignment
Bolt
Handle
Chain
Link
Body
Hole in tool Body
Push Bolt
Alignment Bolt
IMAGE B
Spring
Extractor
Pin
Alignment
Bolt
I08-0403
11/2011