Cardo G4 User Manual
Page 7
En
gli
sh
NOTE: While we have no reason to believe that the gluing option might
negatively affect any helmet, Cardo does not assume any responsibility
to that effect, irrespective of its nature and circumstances. The Glue Plate
is offered as an option that you may choose to use at your own risk and
subject to renouncement of any future claims.
1. Use the enclosed Allen Wrench to remove
both Allen screws and release the Helmet
Clamp’s back plate.
2. Determine the location on the helmet where the Helmet Clamp
must be attached.
3. Adjust the Helmet Clamp’s location on the Helmet so that the
microphone is located opposite the center of
your mouth. You may need to reposition the
Clamp repeatedly until you identify the best
spot. (Be sure to clean the selected area prior to
the gluing process).
4. Use the pre-moistened Towlette to clean the helmet area where
you want to install the Glue Plate. Allow to dry thoroughly.
5. Peel the foil cover from the Glue Plate’s adhesive pad.
6. Place the Glue Plate into position according to #3. Press firmly 15
seconds on all 3 parts of the Glue Plate.
7. The adhesive pad bonds to full strength over the next 24 hours.
Therefore we recommend not using the G4 during this 24 hour
period.
8. Fasten the Clamp to the Glue Plate using the Allen screws that
were previously removed.
If you have purchased a helmet clamp version with the corded
microphone, please proceed as follows:
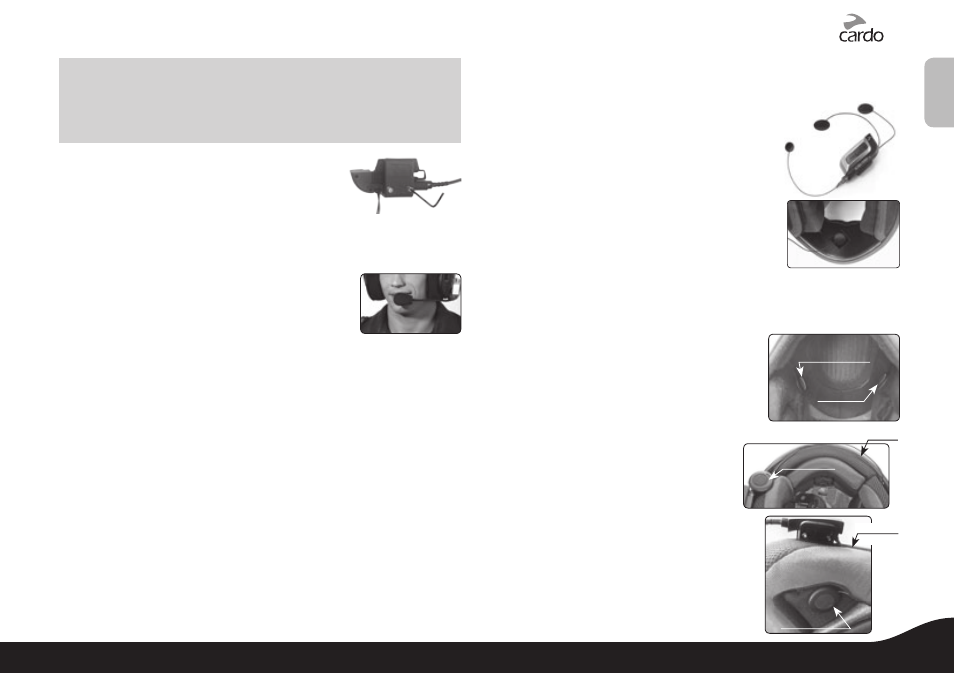
5.2 ATTACHING THE CORDED MICROPHONE TO A
FULL-FACED HELMET
If you are using the corded microphone version, you must first make
sure your helmet clamp is attached to your
helmet as described in previous section (5.1).
Clean the exact spot on the internal padding of
the helmet, opposite your mouth, where the
microphone will be placed.
a. Peel the foil cover from the adhesive Velcro
pad and place the Velcro pad on the chosen
location opposite your mouth.
b. Attach the microphone to the Velcro, as shown
in photo.
c. When done, tighten the screws of the clamp.
5.3 POSITIONING THE MICROPHONE AND SPEAKERS
Speaker A
Speaker B
The microphone must be positioned in front of
the center of your mouth as detailed above.
Attach the speakers to the Velcro inside your
helmet, opposite your ears (short speaker
cord for left ear & long speaker cord for right
ear). Use the supplied Velcro pads if needed.
Using two speakers inside the
helmet may be prohibited in certain
jurisdictions. If this is the case, you
should tuck away the long corded
speaker underneath the helmet
padding as follows:
Speaker A
Speaker
B
Speaker B
Cable
Lead the speaker cord [B] alongside the
rim of the padding to the right side
and then back to the left side, near
speaker [A]. Then place the speaker
[B] underneath the padding.
7
scala rider
®
G4