Great Planes Piper J-3 Cub 60 Kit - GPMA0162 User Manual
Page 48
stretching a landing approach Caused by the unequal drag
of the upward and downward deflecting ailerons, this
undesirable trait can be minimized by setting up the ailerons
with "Differential Throw," or by "coordinating" the turns,
using aileron and rudder control simultaneously.
NOTE: The decal sheet gives you everything you need to
completely trim your model
D 1 Study the plan and the photos on the box to
determine where to place the decals
D 2. Thoroughly clean your airplane before applying decals.
D 3 Cut out the individual decal items and apply them in
the locations shown on the plan Certain non-scale decals
are provided which you may use at your discretion.
HINT: To apply decals accurately, peel only a small portion
of backing from one end, cut off the backing with a
scissors, position the decal carefully, press down the
exposed portion of the decal, peel off the rest of the
backing, then (working from the already stuck down end)
carefully press down the rest of the decal.
D 4. From chrome trim sheet material or MonoKote
covering cut out and apply a 2" x 4-1/2" rectangle to the
top of the wing to represent the top window.
Following is a checklist of some other items you'll want to
consider before your first flight with this model.
D Record weight
D Check all screws
D Adjust tail gear for straight roll
D Adjust throttle pushrod linkage
D Oil axles
D Place AMA I D sticker inside
D Take photographs'
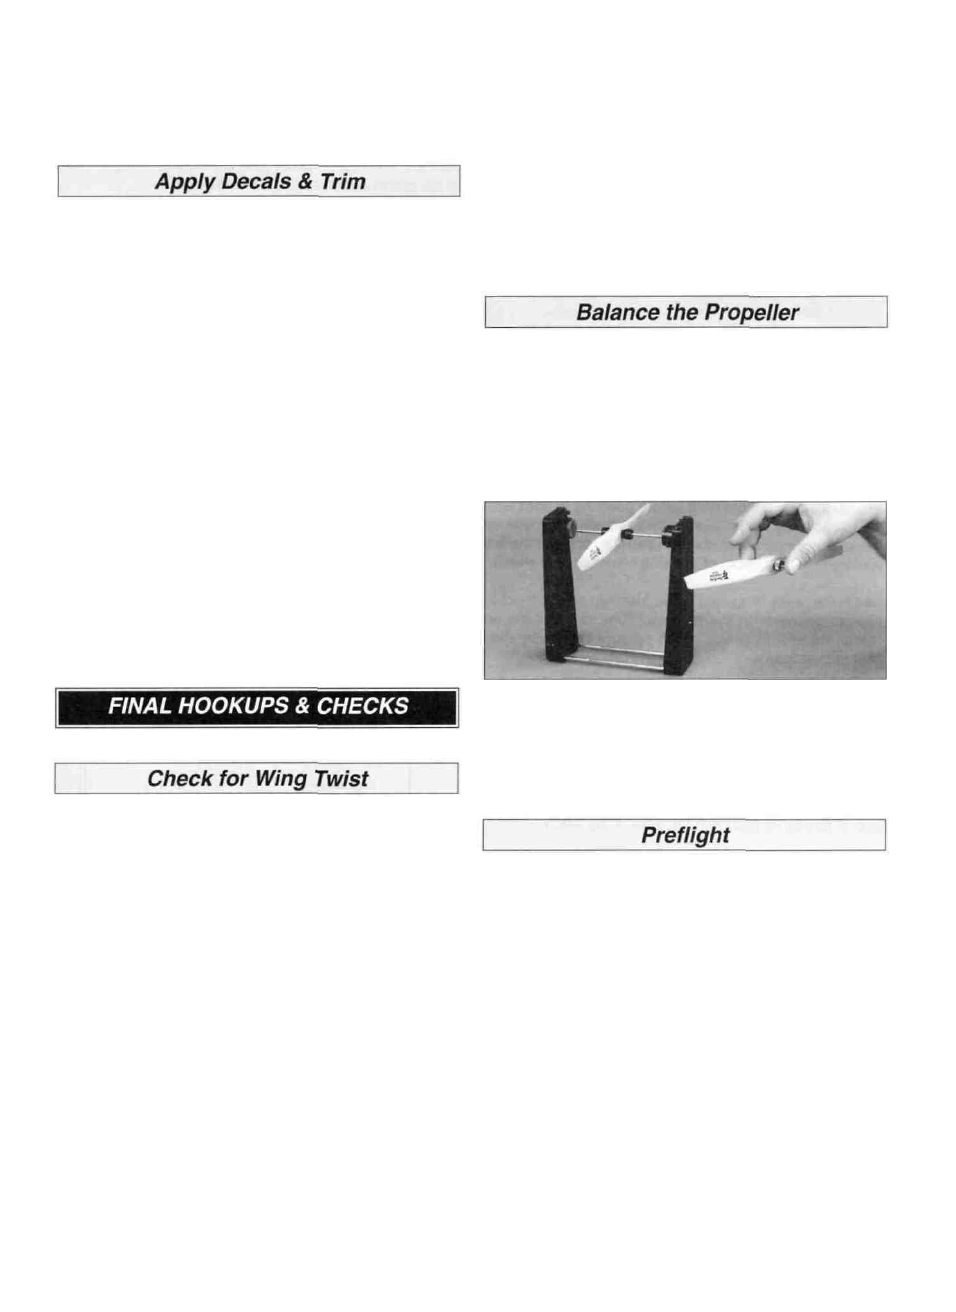
Balance your propellers carefully before flying. An
unbalanced prop is the single most significant cause of
damaging vibration Not only will engine mounting screws
and bolts vibrate out, possibly with disastrous effect, but
vibration will also damage your radio receiver and battery
Vibration will cause your fuel to foam, which will, in turn,
cause your engine to run rough or quit
We use a Top Flite Power Point Precision Magnetic
Balancer (TOPQ5700) in the workshop and keep a Great
Planes Fingertip Balancer (GPMQ5000) in our flight box.
NOTE: Even if you have built your wing on a perfectly flat
surface and used utmost care, it is possible that your wing
may have a twist due to uneven shrinking of the covering
material You must check for this condition and correct
it before the first flight
If you do not own a wing incidence meter, we
recommend that you purchase one from your local hobby
dealer or borrow one from another modeler With the wing
mounted to the fuselage use the incidence meter to check
the angle of your wing at the root and at the tips If the
incidence meter reveals a wing twist of more than 1/4
degree you must grasp the wing at the tip and twist it
slightly, while reheating the covering material Keep
checking, twisting and reheating until the wing twist is
removed Readjust the wing strut attachments so they will
not twist the wing when they are installed NOTE: If you
have corrected a wing twist by this method, you should
periodically recheck to make sure the correction has held.
D 1 Charge the batteries Follow the battery charging
procedures in your radio instruction manual You should
always charge your transmitter and receiver batteries the
night before you go flying and at other times as
recommended by the radio manufacturer
D 2 Ground check the model If you are not thoroughly
familiar with the operation of R/C models, ask an
experienced modeler to check to see that you have the
radio installed correctly and that all the control surfaces do
what they are supposed to The engine operation must
also be checked and the engine "broken in" on the ground
by running the engine for at least two tanks of fuel
Follow the engine manufacturer's recommendations
for break-in. Check to make sure all screws remain tight,
that the hinges are secure and that the prop is on tight.
48