Helicopter and controller parts, Helicopter charging procedure – Estes 4604 - Diamondback User Manual
Page 2
2
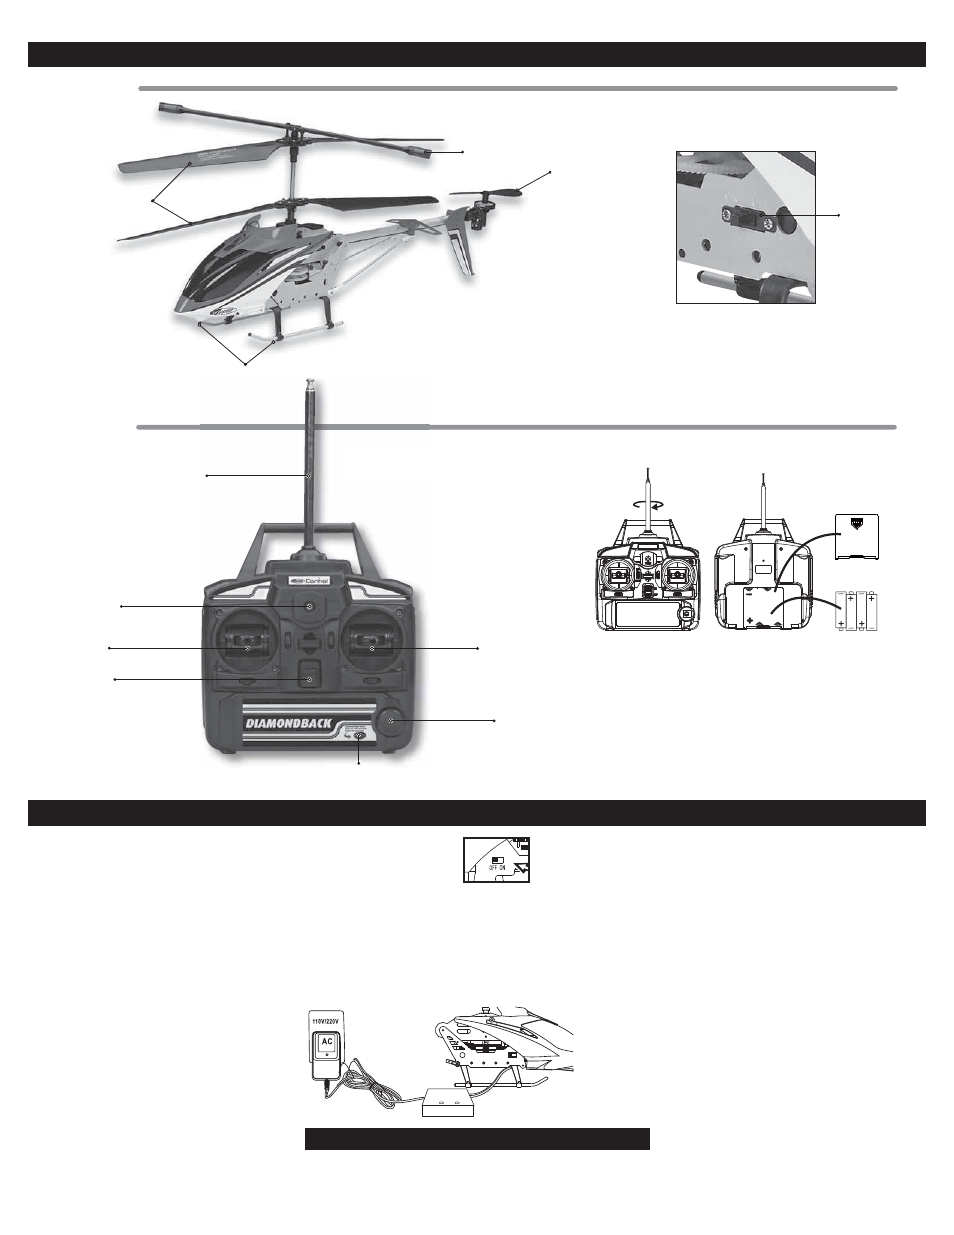
Helicopter and Controller Parts
ON/OFF Switch
Helicopter
Controller
Controller Battery Installation
2. Open the battery cover and insert (4)
new “AA” batteries following the polarity
indicator. (Fig. 2)
(Batteries sold separately)
Battery
cover
4 x 1.5V “AA” batteries
Fig. 1
Fig. 2
1. Install antenna by turning it
clockwise until it is fi nger tight. (Fig. 1)
1. Install antenna
clockwise until it
Antenna
On / Off
Ascension/Descend
Control Stick
Forward / Backward
Left / Right
Flight Trim Dial
Indicator Light
Advanced Flight Button
Flybar
Tail Rotor
Counter-rotating
rotor blades
Landing Gear
While charging, switch
to “OFF” position.
IMPORTANT!! ALWAYS charge the helicopter LIPO battery in a location that is fi reproof.
NEVER leave the battery unattended while being charged! If the battery feels warm during
charge, remove the battery at once and disconnect the charge cord from the power source.
NOTE: The normal safe charging time for the Diamondback
Helicopter battery is 2+ hours. However, charge time
could be less depending on the state of the battery before
charging.
1. Always turn off both the helicopter and Controller.
2. Place the helicopter on a fi re resistant surface before
charging.
3. Plug the A/C wall adapter into outlet.
4. Insert AC wall adapter plug into the charger.
5. Make sure the red battery leads on the helicopter are
disconnected.
6. The GREEN LED on the charger will be lit, indicating
standby mode. The RED LED on the charger will be OFF.
7. Plug the white battery plug into the white charge jack on
the charger. The battery plug will only fi t in the correct
position. The RED LED will glow RED and remain RED
during charging. Both the RED and GREEN LED’s should
glow solid while charging.
8. When the battery is fully charged, the GREEN LED will turn
OFF. Remove the battery from the charger at this time.
9. Remove the A/C wall charger from the outlet.
10. When you are ready to fl y, connect the red battery leads
11. Flight time is approximately 6-7 minutes per charge.
Helicopter Charging Procedure
NOTICE: When not using your helicopter, turn off the helicopter and Controller
power switch. Doing so will extend the battery life of the Controller and helicopter.
NEVER leave battery unattended during the charging process!
IMPORTANT PRECAUTIONS
• Charge only the Estes Diamondback Helicopter lithium-
ion rechargeable battery.
• Do not attempt to use this charger with NiCad, NiMH or
different types of Lithium-Ion batteries as they are not
compatible!
• Do not leave charger unattended while charging.
Disconnect the battery and remove input power from
charger immediately if either becomes hot! However, it
is normal for the charger to get warm.
• Disconnect battery from charger immediately and
remove to a fi re proof location if battery begins to swell
or smoke!
• Only use the included approved AC adapter to power
the charger.
• Do not allow water, moisture or foreign objects into the
charger.
• Do not block the air intake holes, which could cause
charger to overheat.
• Do not place charger or any battery on a fl ammable
surface or near a combustible material while in use.
• Do not charge on a carpet, cluttered workbench, paper,
plastic, vinyl, leather or wooden object.
• Always disconnect charger from input power when not
in use.
• Do not attempt to charge a battery if it is swollen or hot.
• Keep out of reach of children.
LED scheme – Use this table to determine charge action:
RED LED
GREEN LED
ACTION
OFF Solid ON no battery is connected
OFF Flashing conditioning battery
Solid ON Solid ON battery charging
Solid ON OFF charge complete
Flashing Flashing ERROR