Assembling engine mount, Preparing fins – Estes 2053 - Paveway User Manual
Page 2
1
.
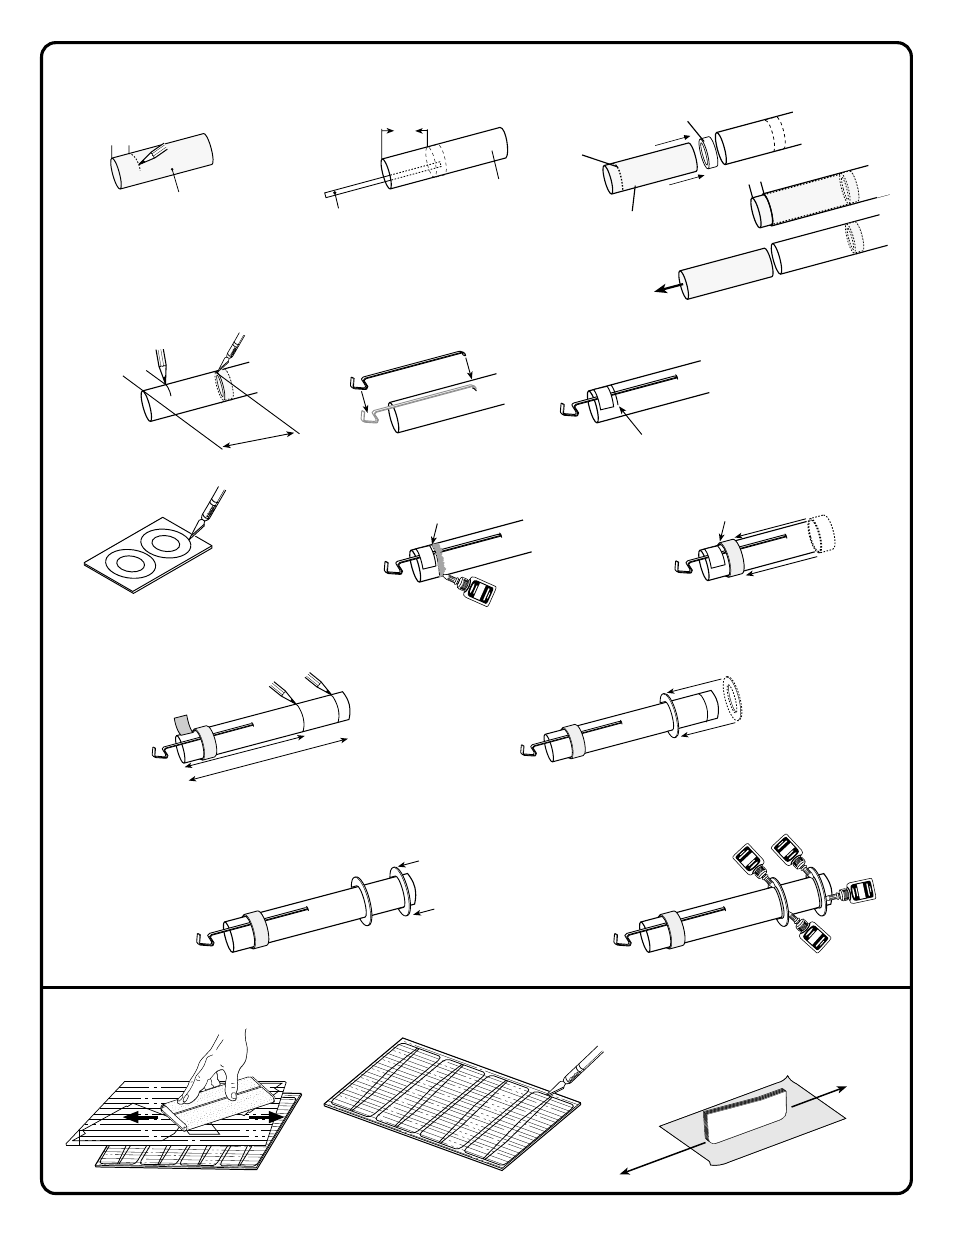
ASSEMBLING ENGINE MOUNT
I" mark
(25 mm)
C
.
Stack like pieces and sand edges
smooth. Leave the edges square,
do not round them.
A
.
Fine sand balsa sheets.
B
.
Carefully cut parts free with knife.
2
.
PREPARING FINS
1" mark
(25 mm)
1" mark
(25 mm)
A
.
Measure and mark Yellow
Sp acer Tool.
B
.
Use scrap balsa to smear glue 2" (51 mm)
inside engine mount tube.
C
.
Push engine block into BT-20 engine mount
tube with spacer tool up to mark. Remove
spacer tool.
E
.
Position Engine
Hook.
F
.
Temporarily tape hook
into place.
G
.
Carefully remove rings
from card.
H
.
Apply glue above the
1" (25 mm) line.
I
.
Slide mylar retainer ring onto engine
mount tube up to 1" (25 mm) mark. Let
dry.
J
.
Place a pencil mark at 2 1/2" (64 mm) and
4 7/8 (124 mm) from end of engine mount.
Remove tape.
K
.
Slide a centering ring down to
the 2 1/2" (64 mm) mark.
Yellow Spacer
Tool
1/2”
(13 mm)
Rear
2 1/2 (64 mm)
4 7/8 (124 mm)
L
.
Slide a centering ring down to
the 4 7/8" (124 mm) mark.
M
.
Apply glue fillets to both sides of
each centering ring. Let dry.
G
LU
E
GLUE
GLUE
GLUE
G
LUE
2"
(51 mm)
Scrap Balsa
Engine mount
Tube
Remove
Immediately
1"
(25 mm)
2 1/4"
(57 mm)
D
.
Mark engine mount tube at 1" (25 mm) and
2 1/4" (57 mm) from rear end. Cut 1/8" (3 mm)
slit at 2 1/4" (57 mm) mark.
Green Engine
Block
Mark
Yellow Spacer Tool
1/2"
(13 mm)
Rear