Eeprom, Custom characters – Digilent 410-092P User Manual
Page 3
PmodCLS Reference Manual
Digilent, Inc.
www.digilentinc.com
www.digilentinc.com
page 3 of 4
Copyright Digilent, Inc. All rights reserved. Other product and company names mentioned may be trademarks of their respective owners.
w
enable write to
EEPROM
save cursor mode to
EEPROM
save display mode to
EEPROM
Symbol
Definition
row number (0 - 1)
column number (0
– 39)
numeric parameter
(decimal, hex, or binary)
decimal selection
parameter
character table selector
(0
– 2 in EEPROM, 3 in
RAM)
EEPROM
Before you can store any value to an address
in EEPROM, writing to EEPROM must first be
enabled. The command to enable writing to
the EEPROM must be sent before each
successive write to EEPROM. If the command
to enable writing to the EEPROM is not sent
before an EEPROM-related command, the
command will be ignored.
Custom Characters
The module can display up to eight custom
characters at a time, but is capable of storing
four sets of eight characters. This consists of
three stored character tables in EEPROM and
one table loaded into the LCD’s RAM.
To create a new custom character, send the
command
(ESC)[
row in the character and
selection parameter (0 through 7.) A custom
character definition contains eight rows, so the
escape sequence to define one must have
eight
that specifies the character being defined.
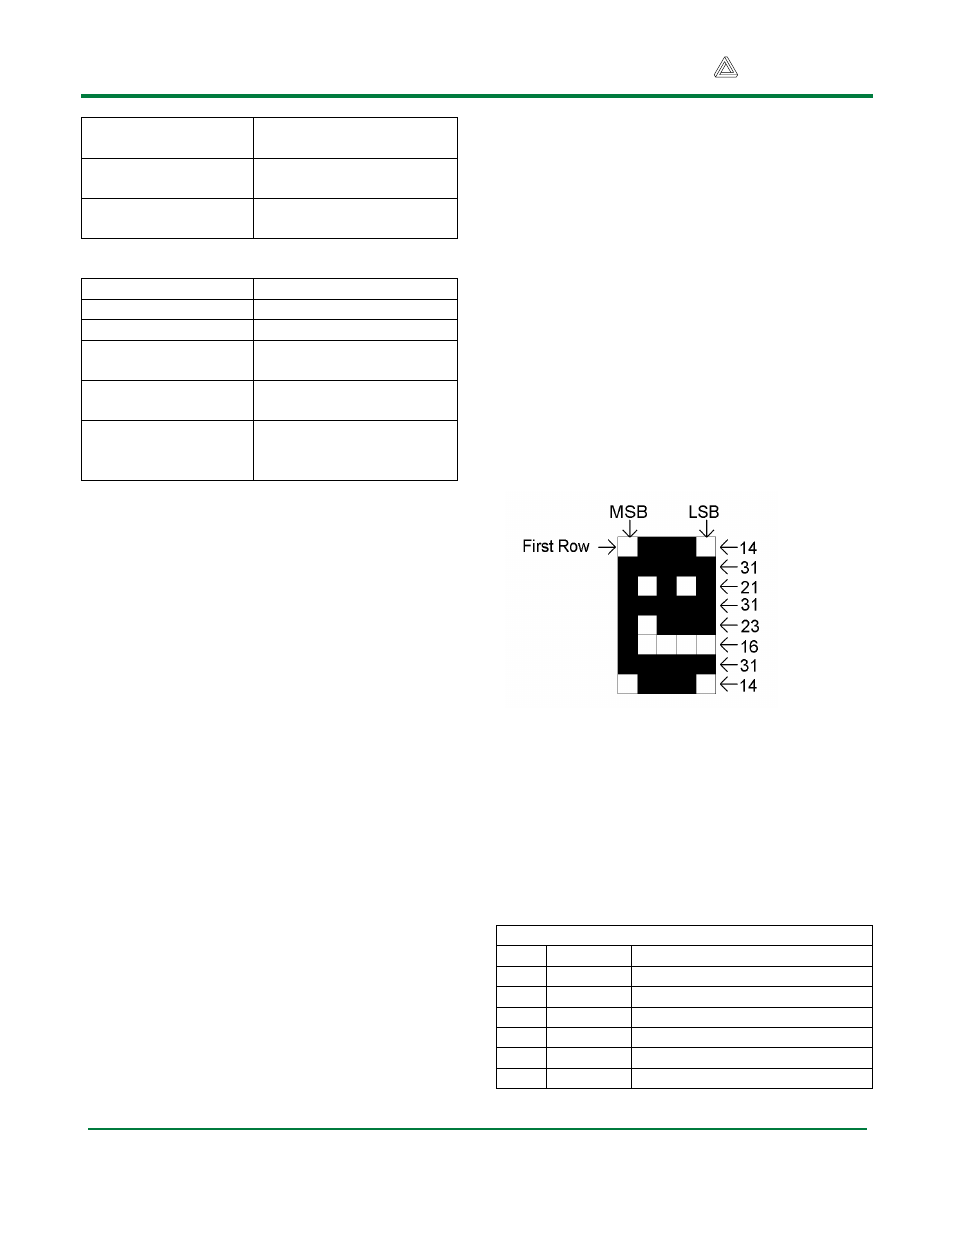
To create a new character, first draw out the
pattern. Then, determine the numerical value
of each row in the character. Note that the left-
most segment is the most significant bit.
Record each row, from top to bottom, and
record which character in the table to save it
to. Each row of the character contains six
pixels, so only the low six bits of each byte
value are used.
For example, the following character would be
saved by writing:
lcdChar(0x1B);
lcdString("[14;31;21;31;23;16;31;14;0d");
where lcdChar( ) and lcdString( ) are functions
that write characters and arrays of characters.
The above command saves the character to
the ‘0’ address in the LCD’s RAM table. To
display this character, send the numerical
value of the addressed character. In this
example, it is performed by writing
lcdChar(0x00);
The character will appear at the location of the
LCD’s cursor.
Connector J1
– SPI Communications
Pin
Signal
Description
1
SS/RST
Slave Select
2
MOSI
Master out/Slave in Data
3
MISO
Master in/ Slave out Data
4
SCK
Serial Clock
5
GND
Power supply ground
6
VCC
Power supply (3.3V)