Crosman BP2220 User Manual
Page 7
• For creating a single stage trigger, adjust screw (A) clockwise until the desired Sear engagement is
attained. Adjusting screw (A) in this manner will eliminate engagement of screw (B) and will yield the
lightest possible single stage trigger pull. Screw (B) can also be utilized to create single stage trigger by
turning in clockwise until the desired Sear engagement is attained. It is advised to also turn Screw (A) out
counter-clockwise a few turns to ensure it is no longer engaged at any point. Which screw is utilized to
create the single stage trigger depends on the preference of the individual.
• After adjusting your trigger, always check that the trigger and safety are functioning properly. If you are not
sure if the trigger or safety is operating properly, take your gun to an experienced gunsmith.
• Replace the Grip and Grip screw.
D. Maintaining the Marauder Pistol Trigger
• The Marauder pistol trigger is assembled with a moly graphite EP grease that should last for years. In the
event your trigger becomes contaminated with debris and is not functioning properly, contact a qualified
gunsmith to examine for repair or necessary maintenance.
E. Adjusting the Trigger Over-travel
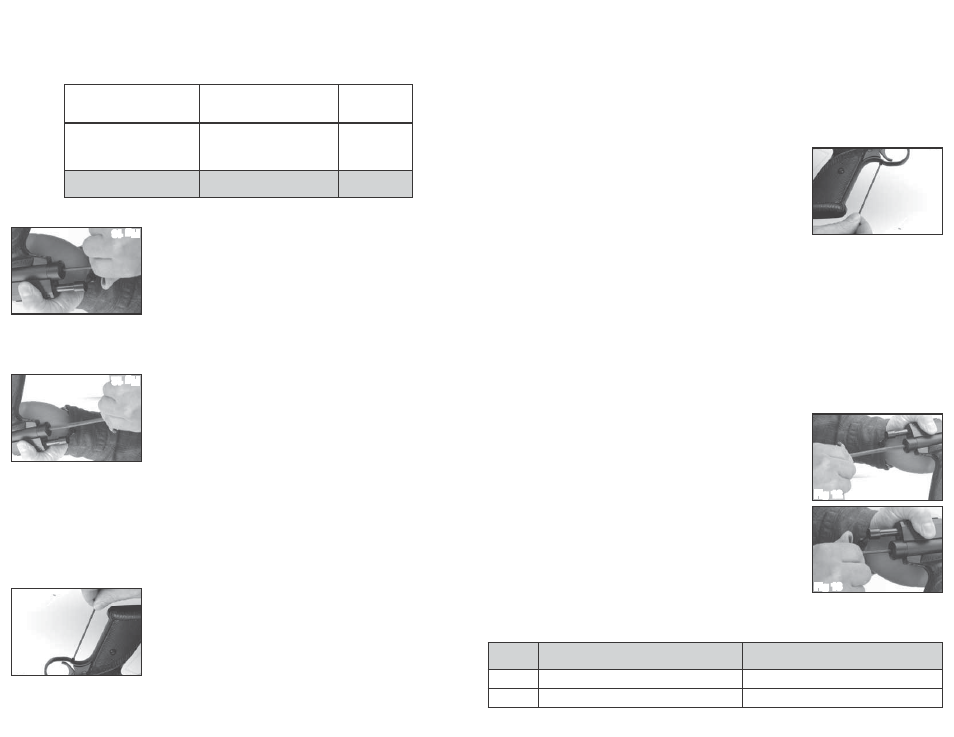
• To ensure crisp, consistent action of the trigger, a set screw has been
incorporated into the trigger guard to allow each shooter to set the
trigger over-travel to their preference. Removing the screw will give the
most over travel, tightening the screw all the way in will stop the trigger.
Shooters will find their preference somewhere in between.
• Make sure the air pistol is unloaded (section 5A) and de-gassed (section 3D)
• Turn the set screw (H) as shown in Figure 11, all the way in with a hex wrench.
(not included)
• Cock the bolt by pushing the bolt handle up and pulling it all the way
back. Close the bolt and push the bolt handle down to lock.
• Point the air pistol in a SAFE DIRECTION, take “OFF SAFE” (section 2B) and pull the trigger. If the pistol
does not fire, turn the set screw counter clockwise in ½ turn increments until it fires.
IMPORTANT! Turn an additional ½ turn counter clockwise. This is important to ensure proper operation of
the trigger.
• Put the air pistol “ON SAFE”.
11. Adjusting for Various Fill Pressures and Velocities
• Proper adjustment of the BP2220 requires use of a chronograph.
• The BP2220 has been factory set for a fill pressure of 2900 psi and velocity of approximately 700 fps.
If you, as the owner, wish to alter the factory settings you should do so only after reading the following
instructions carefully.
• The BP2220 is designed to be tuned to work at various fill pressures from 2500 psi (172 bar) up to 3000
psi (207 bar). This is done by adjustment of the hammer spring preload and hammer stroke length. In
either case the adjustment changes the amount of energy the hammer generates when striking the valve.
Higher fill pressures require more hammer energy while lower fill pressures require less hammer energy.
Higher fill pressures will typically yield more usable shots from a given charge. It is advised to always
record your settings when tuning your air pistol.
A. Hammer Spring Preload Adjuster
The hammer spring preload adjuster may be accessed through the rear plug
on the reservoir tube with a 3/16” Allen wrench as shown in Figure 12. To
increase hammer energy turn the preload adjuster clockwise up to 7 revolu-
tions. This would be the case when starting from all the way back counter-
clockwise.
NOTE: More revolutions will simply cause the adjuster to spin but will not
yield any higher force. Increasing the preload will be required to facilitate use
of higher fill pressure.
To lessen hammer energy turn the adjuster counterclockwise. It is advised to
always record your settings when tuning your air pistol.
B. Stroke Adjustment
The striker can be accessed through the hammer spring preload adjuster us-
ing a 1/8” Allen wrench (Figure 13). Turning the striker clockwise will shorten
the hammer stroke and turning counter clockwise will lengthen the stroke. A
long stroke length will yield higher hammer energy while a short stroke length
will yield lower hammer energy. The striker can be adjusted inward by up to
12 revolutions though this many turns should not be necessary.
• A starting point for low fill pressures would start with a low hammer
spring preload tension and a shorter hammer stroke.
• A starting point for higher fill pressures will require more hammer spring preload tension and a longer
hammer stroke. Refer to the chart below for suggested combinations of these adjustments based on fill
pressure.
Fill
Pressure Hammer Spring Preload
Hammer Stroke
Higher
Increase, turn adjuster in (Clockwise)
Increase. Turn Striker out (Counter Clockwise)
Lower
Decrease, turn Adjuster out (Counter Clockwise)
Decrease. Turn Striker in (Clockwise)
Fig 11
Fig 12
Fig 13
7
D. Mantenimiento del gatillo de la pistola Marauder
• El gatillo de la pistola Marauder está ensamblado con una grasa
EP con molibdeno y grafito que debe durar años. En caso
de que el gatillo se contamine con residuos y no esté funcionando corr
ectamente, comuníquese con un armero calificado
para que lo examine y haga las reparaciones o el mantenimiento corr
espondientes.
E. Ajuste del exceso de recorrido del gatillo
• Para garantizar una acción pr
ecisa y consistente del gatillo, se ha incorporado un
tornillo de fijación en el guar
damonte para permitir que cada tirador ajuste el recor
-
rido del gatillo según su prefer
encia. Quitar el tornillo dará el máximo sobr
edes-
plazamiento y apretarlo completamente lo detendrá. Los tirador
es encontrarán su
prefer
encia en alguna de las posiciones intermedias.
• Asegúr
ese de que la pistola de aire comprimido se encuentr
e descargada (sección
5A) y sin gas (sección 3D).
• Gir
e el tornillo de fijación (H) tal como se observa en la figura 11, totalm
ente con una
llave hexagonal (no se incluye).
• Monte el cerr
ojo empujando la palanca de éste hacia arriba y tirando de ella comple
-
tamente hacia atrás. Cierre el cerr
ojo y empuje hacia abajo la palanca del cerrojo
para trabarlo.
• Apunte la pistola de air
e en una DIRECCIÓN SEGURA, desactive el seguro (“OFF
SAFE”) (sección 2B) y tire del gatillo. Si la pistola no se dispara, gir
e el tornillo de fijación en sentido antihorario en incr
emen-
tos de 1/2 vuelta hasta que dispare.
¡IMPORTANTE!
Gírelo 1/2 vuelta más en sentido contrario a las agujas del r
eloj. Esto es importante para asegurar un funciona-
miento correcto del gatillo.
• Active el segur
o de la pistola de aire comprimido (“ON SAFE”).
11. Ajuste de distintas presiones de llenado y velocidades
• Un ajuste corr
ecto de la BP2220 requier
e del uso de un cronógrafo.
• La BP2220 fue configurada en fábrica para una pr
esión de llenado de 2900 psi y una velocidad de, apr
oximadamente, 650
pies por segundo. Si, como el propietario de la pistola, desea alterar las configuraciones estab
lecidas en fábrica, podrá
hacerlo luego de leer cuidadosamente las instrucciones a continuación.
• La BP2220 ha sido afinada para funcionar con varias pr
esiones de llenado, de 2500 psi (172
bar) a 3000
psi (207
bar).
Esto se lleva a cabo mediante un ajuste de la precarga del r
esorte del martillo y la
longitud de golpe del martillo. En cualquier caso, los ajustes modifican la cantidad
de energía que genera el martillo al golpear la válvula. Una presión de llenado más
alta requier
e más energía del martillo; mientras que una presión de llenado más baja
requier
e menos energía del martillo. Por lo general, una presión de llenado más alta
permitirá más disparos útiles de una carga determinada. Se r
ecomienda siempre
anotar la configuración al afinar la pistola de aire comprimido.
A. Ajuste de precar
ga del resorte del martillo
Al ajuste de precarga del r
esorte de martillo se puede acceder mediante el tapón trasero
del tubo del depósito, con una llave Allen de 3/16”, tal como se observa en la Figura 12.
Para aumentar la energía del martillo gire el ajuste de pr
ecarga en sentido horario hasta
7 revoluciones. Este sería el caso cuando se inicia desde el fondo
de la parte de atrás en
sentido antihorario.
NOTA:
Más revoluciones causarían que el ajuste r
ote, pero no pr
oporcionará una fuerza mayor
. Será necesario aumentar la
precarga para facilitar el uso de una mayor pr
esión de llenado.
Para reducir la energía del martillo, gir
e el ajuste en sentido antihorario. Se recomienda siempr
e anotar la configuración al afinar
la pistola de aire comprimido.
B. Ajuste del golpe
Se puede acceder al percutor mediante el ajuste de pr
ecarga del resorte del martillo, con
una llave Allen de 1/8” (Figura 13). Al girar el percutor en sentido horario se acortará el
golpe del martillo; al girarlo en sentido antihorario se prolongará el golpe. Un golpe largo
propor
cionará una mayor energía del martillo, mientras que un golpe corto brindará me
-
nos energía al martillo. Se puede ajustar el percutor hacia adentr
o hasta 12 revoluciones,
aunque nunca se suelen necesitar tantos giros.
El punto de inicio para presiones de llenado bajas comenzaría con una tensión de pr
e-
carga del resorte del martillo baja y con un golpe corto del martillo.
El punto de inicio para presiones de llenado altas r
equiere más tensión de pr
ecarga del
resorte del martillo y un golpe más largo del martillo. Consulte
el siguiente gráfico para
conocer las combinaciones sugeridas para estos ajustes en base a la pr
esión de llenado.
Presión de
llenado
Precar
ga del resorte del martillo
Recorrido del martillo
Mayor
Aumentar, girar el ajustador
hacia adentro (en sentido de las
manecillas del reloj)
Aumentar Girar el percu
-
tor hacia afuera (en sentido
contrario al de las manecillas
del reloj)
Menor
Disminuir, girar el ajustador ha
-
cia afuera (en sentido contrario
al de las manecillas del reloj)
Disminuir. Girar el per
cutor
hacia adentro (en sentido de
las manecillas del reloj)
12. Revisión de seguridad
•
NUNCA apunte la pistola de air
e comprimido a ninguna persona ni a nada que no tenga la intención de dispararle.
• Siempr
e trate la pistola de aire comprimido como si estuviera cargada y con el mismo r
espeto con el que trataría un arma
de fuego.
• Siempr
e apunte su pistola de aire comprimido en una DIRECCIÓN SEGURA. Mantenga siempr
e la boca de la pistola de
aire comprimido apuntando en una DIRECCIÓN SEGURA.
Fig 11
Fig 12
Fig 13
7